Unity Game Development on Kaia: Minting Fungible Tokens with ChainSafe
Introduction

Introduction
Blockchain technology has opened exciting new possibilities for game developers. Features like decentralization, immutability, and programmable money are transforming how we think about games and player experiences.
The gaming industry has seen tremendous growth in blockchain integration. Play-to-earn(P2E) games and metaverse platforms are becoming mainstream. These platforms let players buy items with cryptocurrency and collect unique digital assets. Rare items like swords, potions, and shields now exist on the blockchain as NFTs, where players can trade them based on rarity and utility.
Sounds exciting, right? You can build these features into your Unity game by integrating the ChainSafe gaming SDK. This guide will walk you through creating and integrating fungible tokens (KIP7 tokens) in your game on Unity. By the end, you’ll know how to connect your Unity game to the Kaia blockchain.
Prerequisites
- The newest version of Unity
- A Metamask wallet
- Testnet KAIA from Kaia Faucet
Why Choose Unity?
Unity is an excellent choice for game development. It’s a powerful platform for creating 2D and 3D games across computers, mobile devices, and more. Unity Technologies created it in 2005, and it uses C# and C++ programming languages. A key advantage is its accessibility, with free versions available for many users.
Why Choose ChainSafe?
ChainSafe is an open source SDK that provides the base layer for blockchain-enabled games. It helps us build games that interact with blockchains. With ChainSafe, you can:
- Connect your game to any EVM compatible blockchain
- Create different token types in Unity (ERC20, ERC721, ERC1155)
- Build in game marketplaces
- Import NFTs and much more
Getting Started
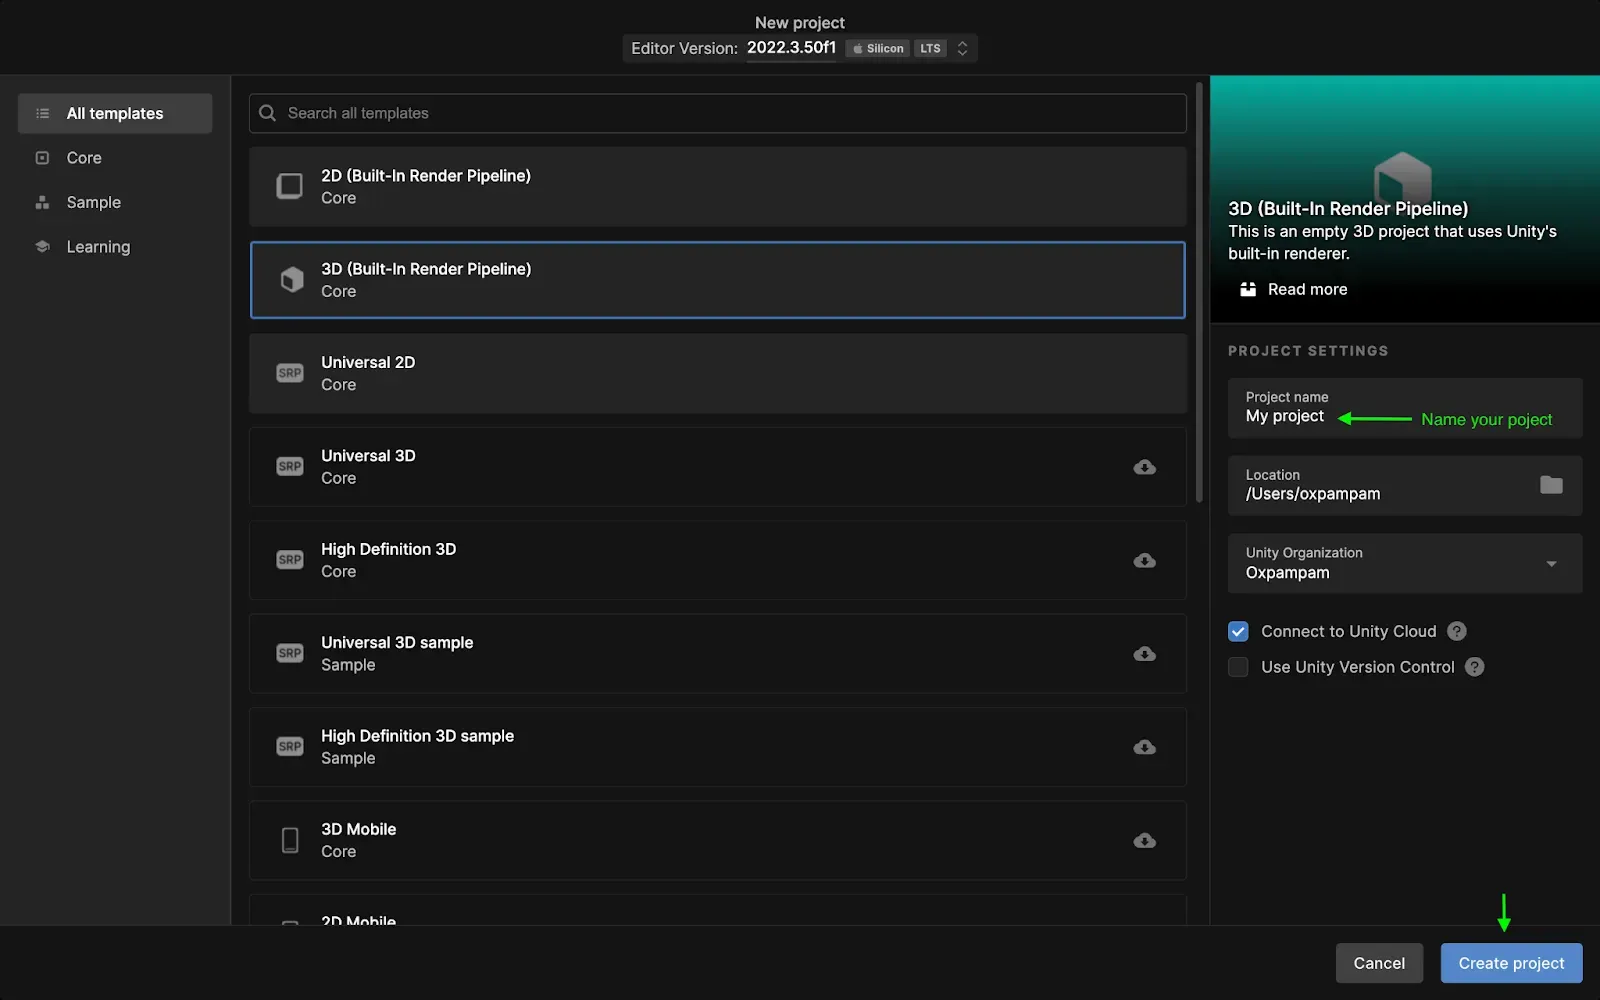
Create a new Unity3D project
To create a new project, do these:
- Navigate to the Projects tab,
- Click on the New project button.
- Select All templates. We will use a 3D template,
- Click on Create project.
Setup web3.unity
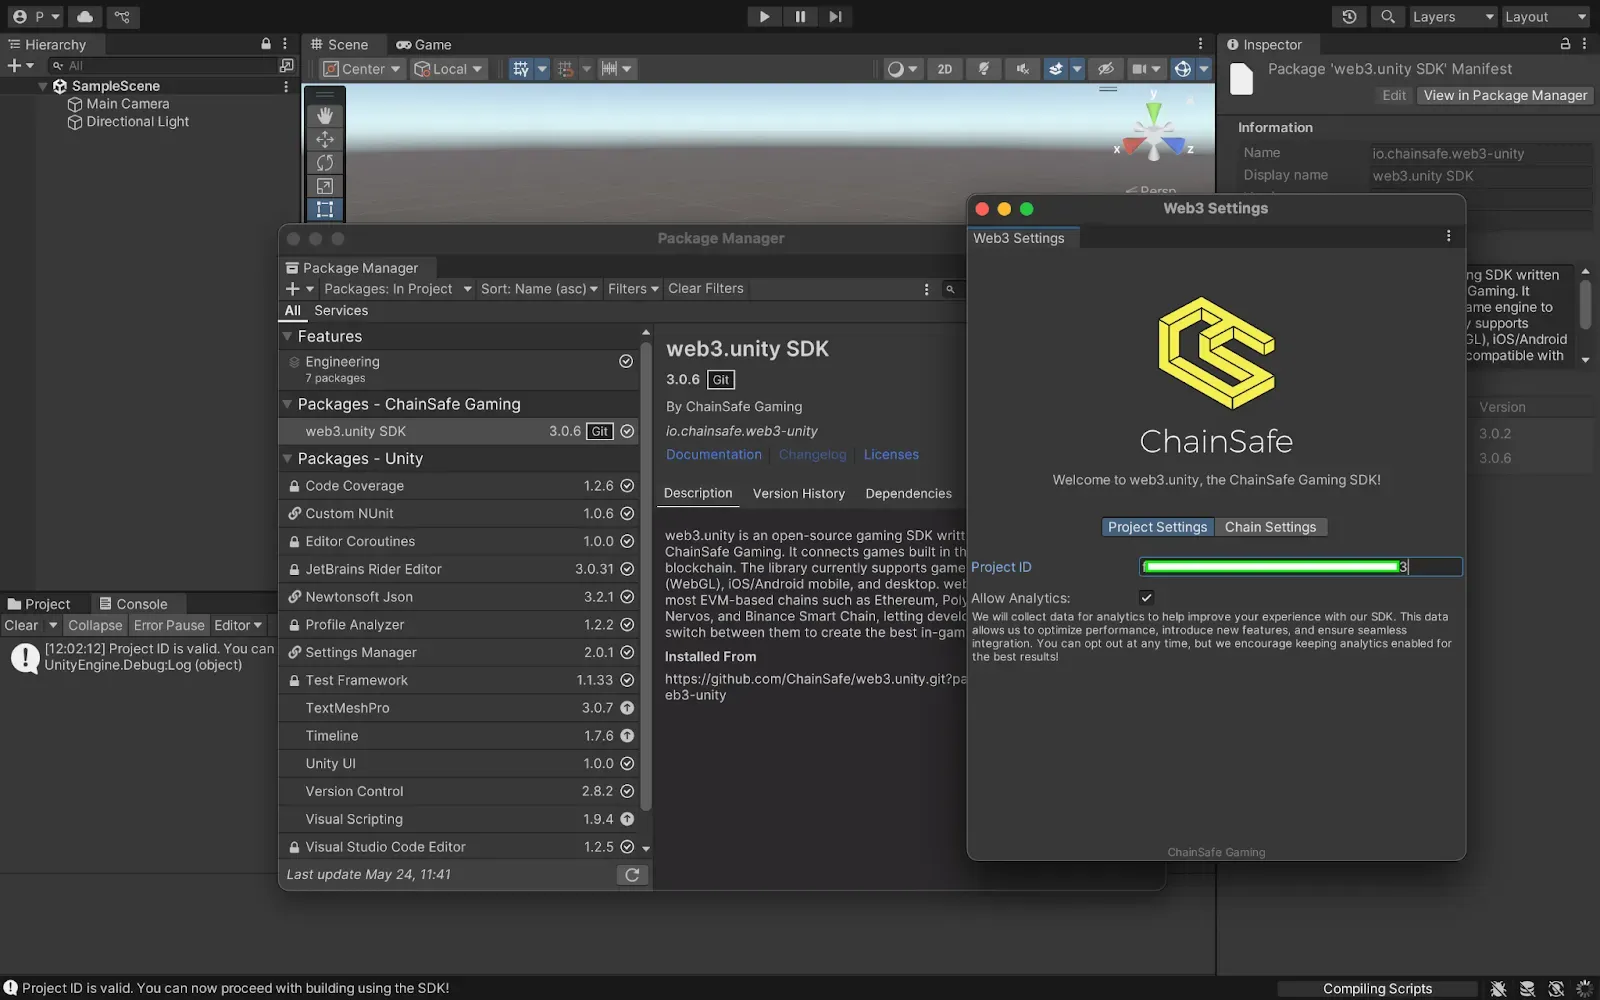
- Navigate to chainsafe docs and follow the getting started instructions to download the web3.unity SDK.

:::note
While setting up your Unity project, you are required to register your project with ChainSafe in order to successfully build with the SDK. In the case where you get a ChainSafeServerSettings prompt while importing the ChainSafe SDK in the step above, complete the next steps.
:::
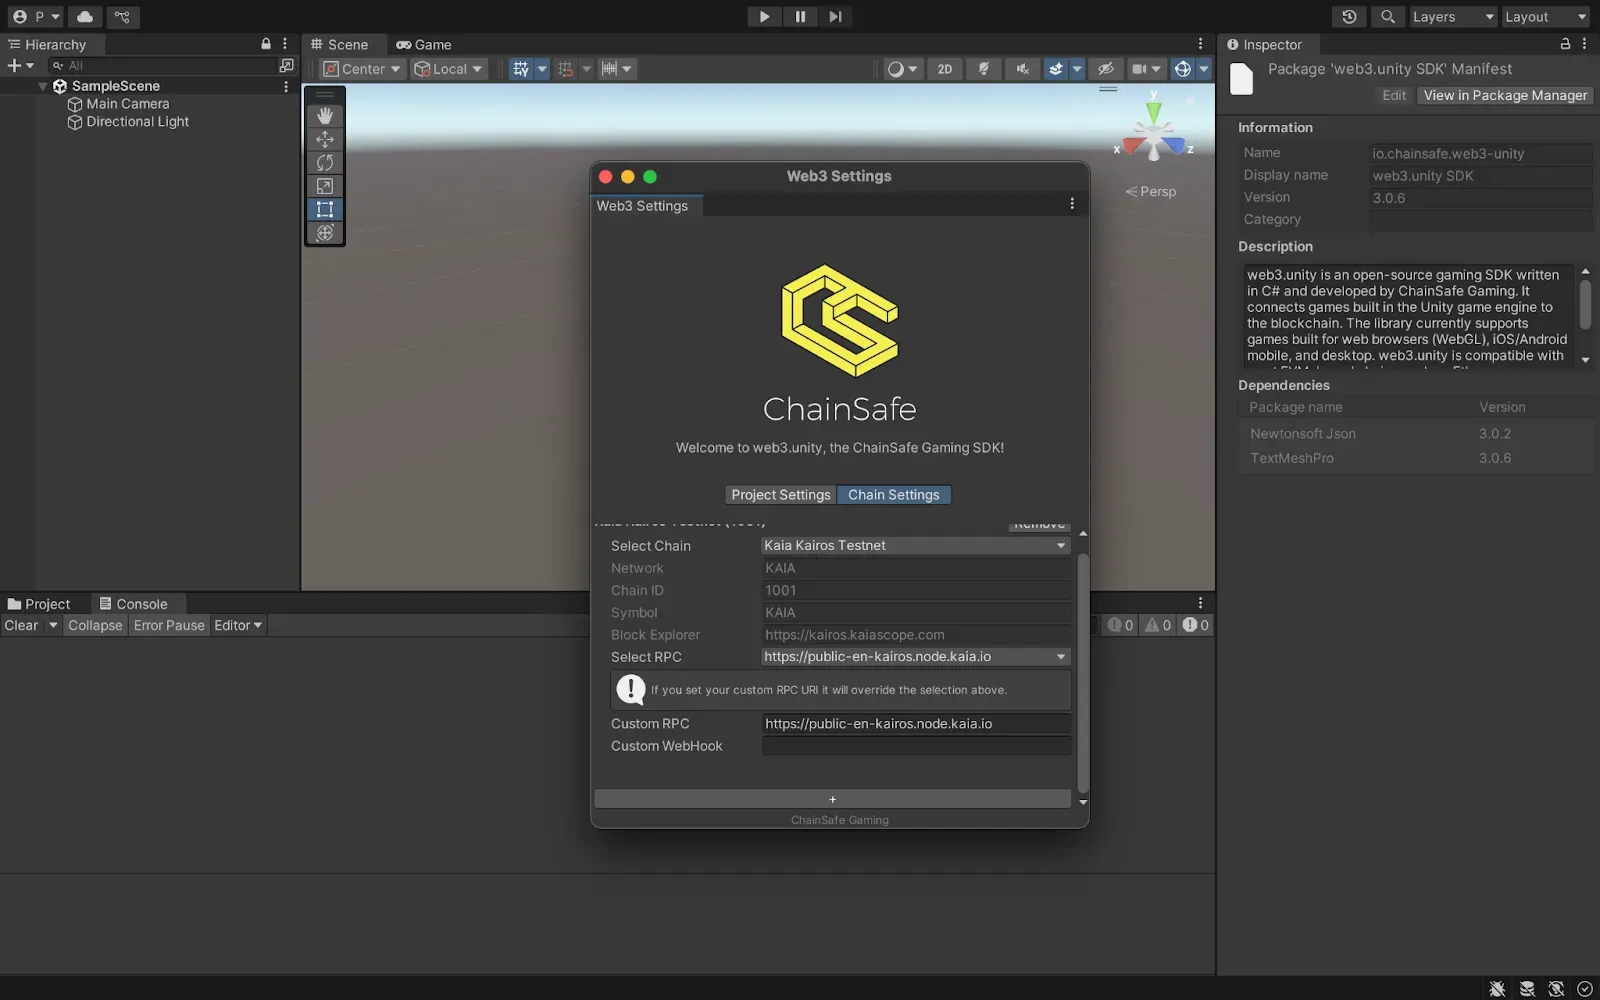
- Navigate to the chainsafe dashboard to create your project and grab your project ID.
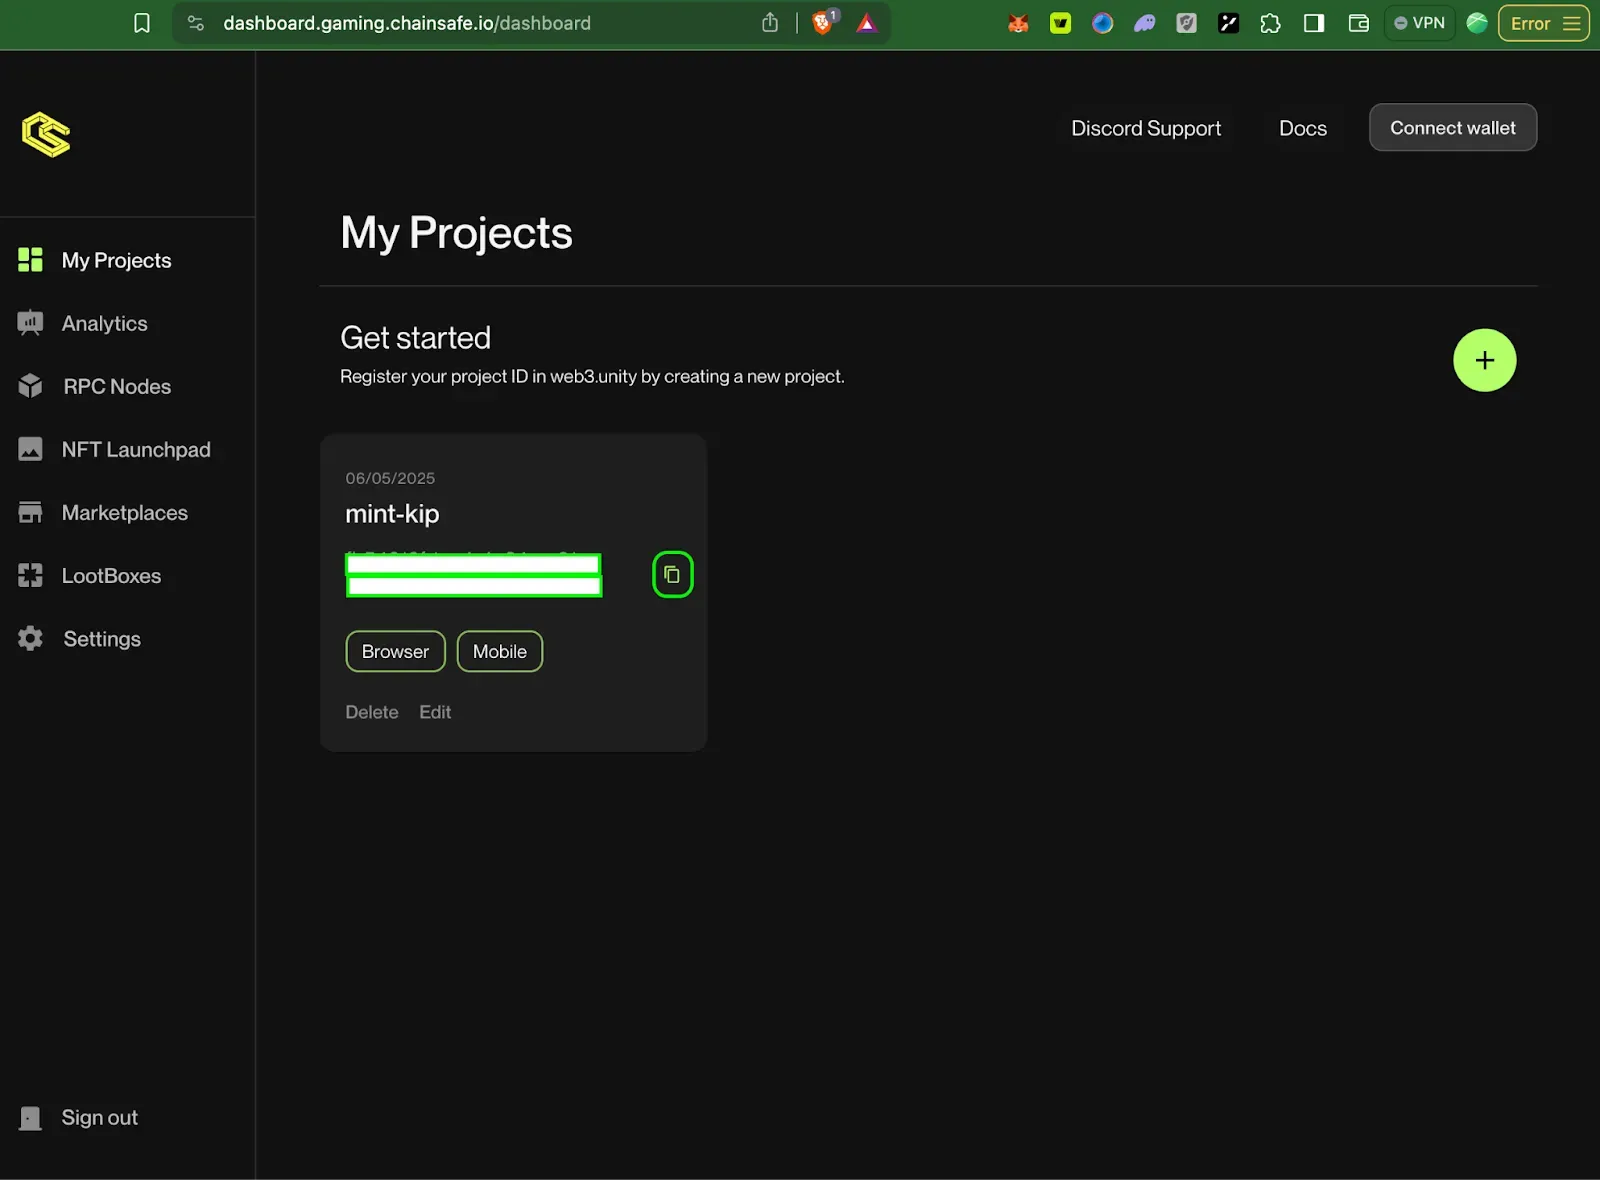
- Paste your project ID into your network settings and configure the chain to Kaia Kairos Testnet
Setting Up the Game Scene
We need to prepare our scene for Web3 functionality:
Loading the Scene
- Under Assets > Scenes, double click on SampleScene. This will be where all our token functionality lives
Adding Web3Unity Prefab
- Navigate to Packages > web3.unity SDK > Runtime > Prefabs
- Drag the Web3Unity Prefab into your scene hierarchy
- Go to Connection Handler and expand the connection provider dropdown
- Click “Add Provider” under MetaMask to add MetaMask as the wallet provider
Creating the UI Canvas
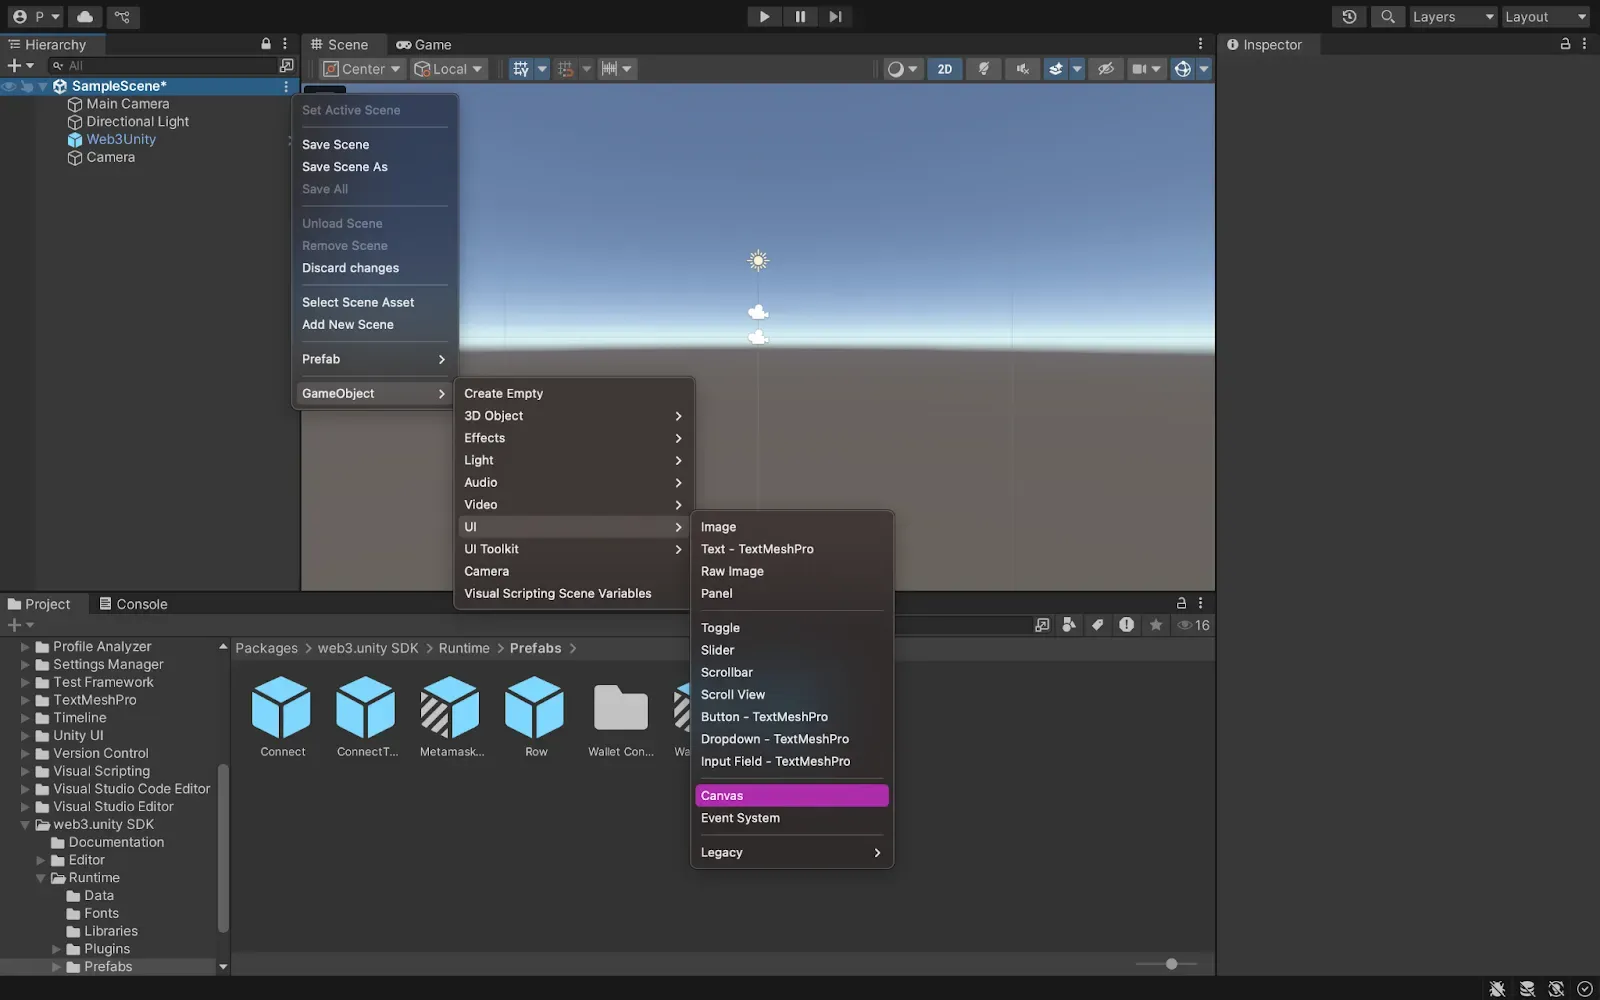
- Right click in the scene hierarchy
- Navigate to GameObject > UI > Canvas
- Copy the ConnectToWallet prefab from Packages > web3.unity SDK > Runtime > Prefabs
- Paste it as a child of the Canvas
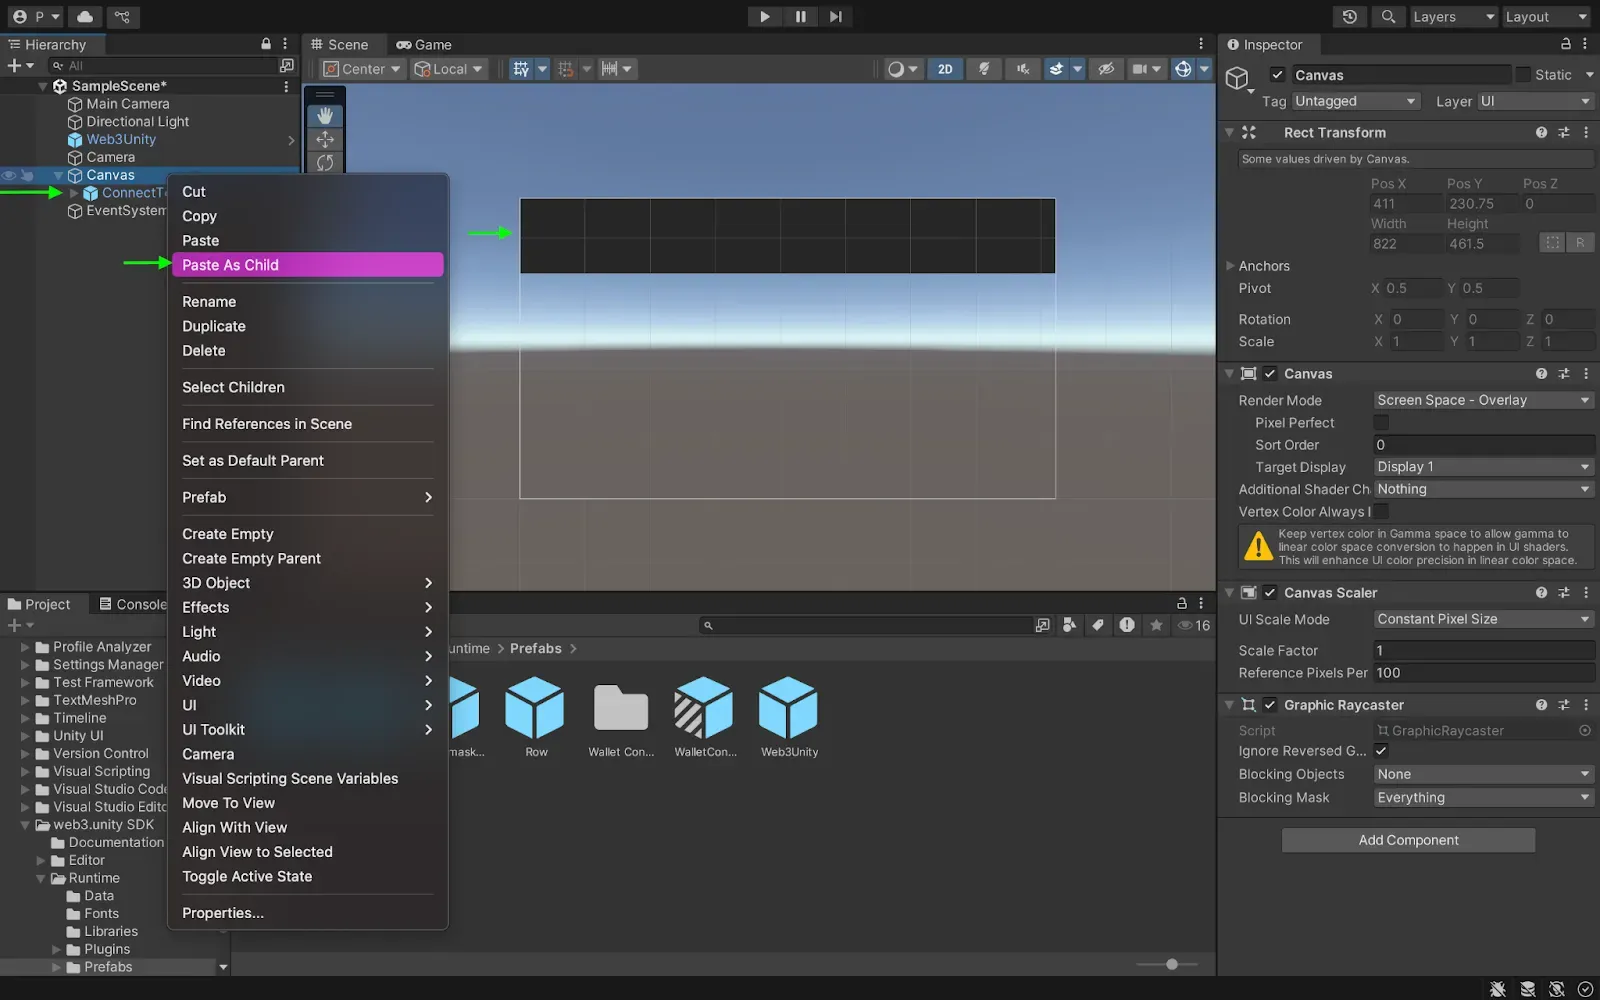
This prefab handles all blockchain connections and wallet management
Building Your Token Interface
Now let’s create the user interface components for our token functionality:
Token Name Component
We’ll create a button to fetch the token name and a text field to display it:
Name Button:
- Right click on Canvas > UI > Button (TextMeshPro)
- Rename it to “NameButton”
- Set the button text to “Name”

Token Name Display:
- Right click on Canvas > UI > Text (TextMeshPro)
- Rename it to “TokenNameText”
- Set the initial text to “Token Name: ”
Note about TextMeshPro: When you first create a TextMeshPro element, Unity will prompt you to import TMP Essentials. This includes the shaders, fonts, and materials needed for text to display properly. If you skip this prompt, you can import it later through Window > TextMeshPro > Import TMP Essentials.
Balance Checker Component
This lets users check token balances for any wallet address:
Wallet Address Input:
- Right click on Canvas > UI > Input Field (TextMeshPro)
- Rename to “WalletAddressInputField”
- Set placeholder text to “Enter wallet address…”
Balance Button:
- Create another button named “BalanceOfButton”
- Set text to “Check Balance”
Balance Display:
- Create text element “TokenBalanceText”
- Set initial text to “Balance: “
Mint Component
For creating new tokens:
Recipient Address Input:
- Create input field “ToAddressField”
- Placeholder: “Enter recipient address…”
Mint Amount Input:
- Create input field “MintAmountField”
- Placeholder: “Enter amount to mint…”
Mint Button and Status:
- Create button “MintButton” with text “Mint”
- Create text “MintStatusText” (leave empty initially)
Transfer Component
For sending tokens between wallets:
Transfer Components:
- Input field “RecipientAddressField” with placeholder “Enter recipient address…”
- Input field “TransferAmountField” with placeholder “Enter amount…”
- Button “TransferButton” with text “Transfer”
- Text “TransferStatusText” (leave empty initially)
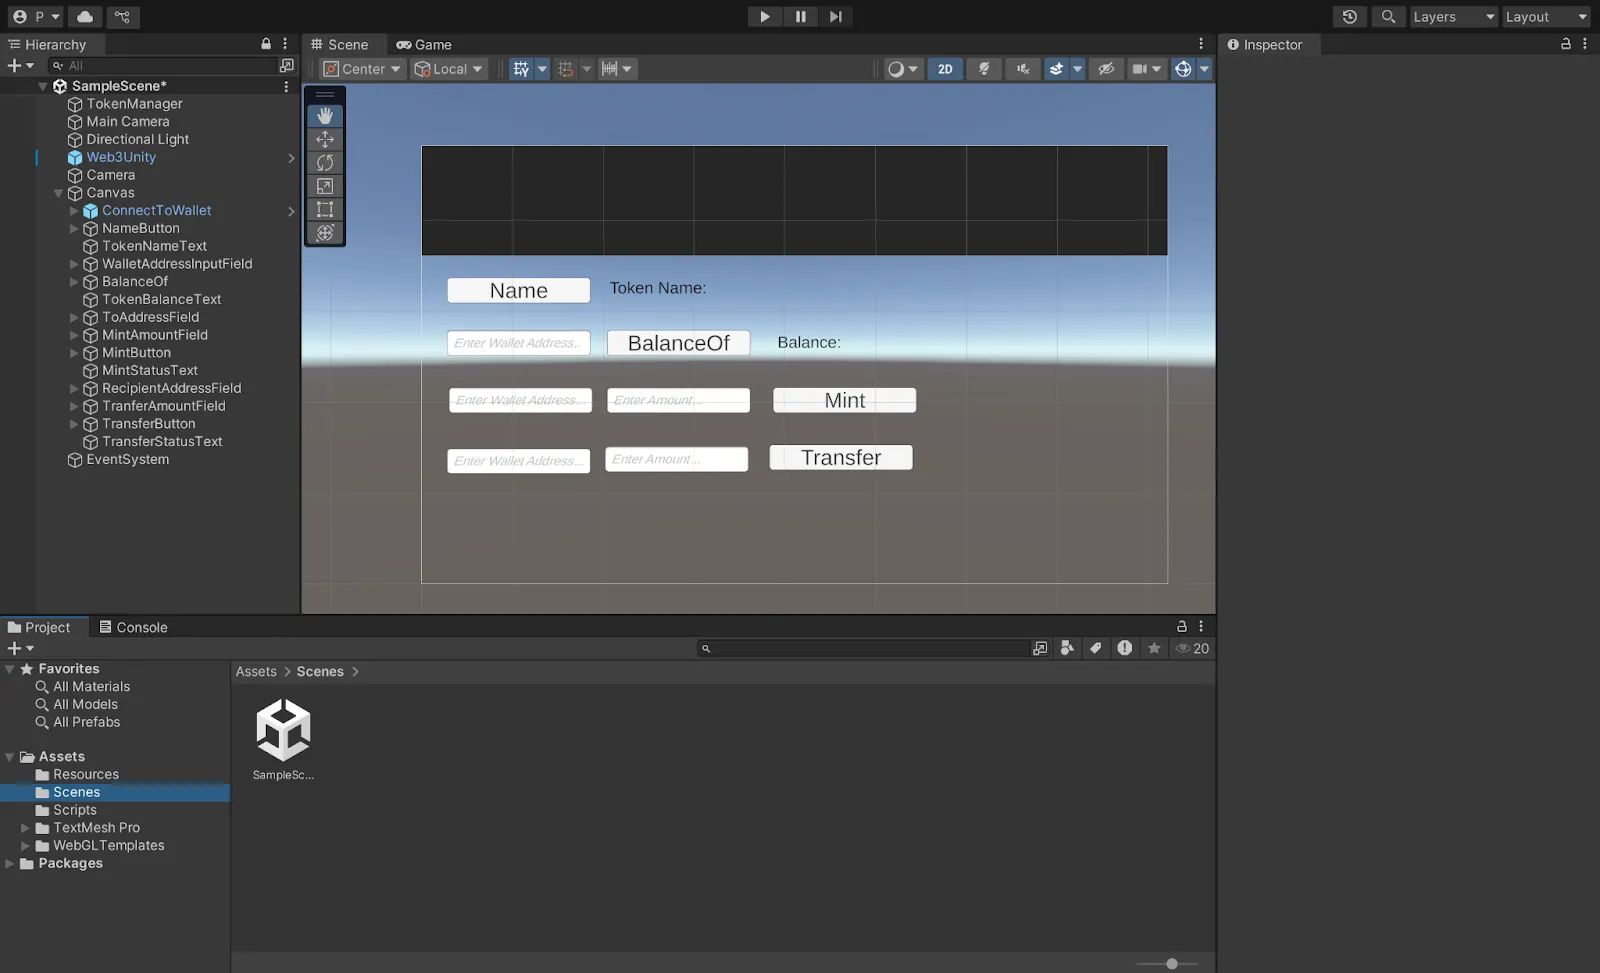
After creating all components, arrange them neatly in your scene using the Move Tool.
Creating and deploying KIP7 smart contract
First, we’ll use Kaia Contract Wizard to generate our smart contract.
Step 1: Using Kaia Contract Wizard
- Navigate to Kaia Contract Wizard.
- Select KIP7 (Kaia’s token standard, similar to ERC20).
- Configure your token:
- Name: UnityTestToken (or something else!)
- Symbol: UTT (your token’s ticker)
- Premint: 100 (initial token supply)
- Features: Check ✅ Mintable
:::Note
For this tutorial, we’ll modify the contract to allow anyone to mint tokens (not just the owner). We will tweak the mint function not to have onlyOwner modifier. To do this, we have to remove the ownable.sol import, and Ownable inheritance. The final contract code should now look like this:
:::
```sol
// SPDX-License-Identifier: MIT
pragma solidity ^0.8.4;
import "@kaiachain/contracts/KIP/token/KIP7/KIP7.sol";
contract UnityTestToken is KIP7 {
constructor() KIP7("UnityTestToken", "UTT") {
_mint(msg.sender, 100 * 10 ** decimals());
}
function supportsInterface(bytes4 interfaceId)
public
view
virtual
override
returns (bool)
{
return
super.supportsInterface(interfaceId);
}
function mint(address to, uint256 amount) public {
_mint(to, amount);
}
}
Step 2: Deploying via Remix IDE
- Copy and Paste the code above in a newly created file UnityTestToken.sol on Remix IDE.
- In Remix IDE:
- Click the Compile contract button.
- Activate the Kaia plugin in the plugin manager.
- Under Environment in the Kaia Plugin tab, choose Injected Provider — Kaia Wallet.
- Find your contract (UnityTestToken) in the Contract dropdown.
- Click Deploy to launch your token!
- When your Kaia Wallet pops up:
- Review the deployment details.
- Click Confirm to deploy to Kaia Kairos Testnet.
:::IMPORTANT
Copy and save the deployed contract address. You’ll need it later in the tutorial.
:::
Converting solidity calls to C#
In this section, we will encapsulate all of our contract ABI into more user-friendly, statically typed methods:
- Navigate to Remix, click on the compile button, and copy the contract ABI for UnityTestToken.sol
- In Unity, navigate to ChainSafe SDK > Contract ABI To C# Generator
- Name your file UnityTestToken, create a folder called Scripts in your asset folder , drag and drop the Scripts folder in the Asset folder into the Select folder field in your Contract ABI to C# Converter Modal, and paste in your ABI.
- Click convert.
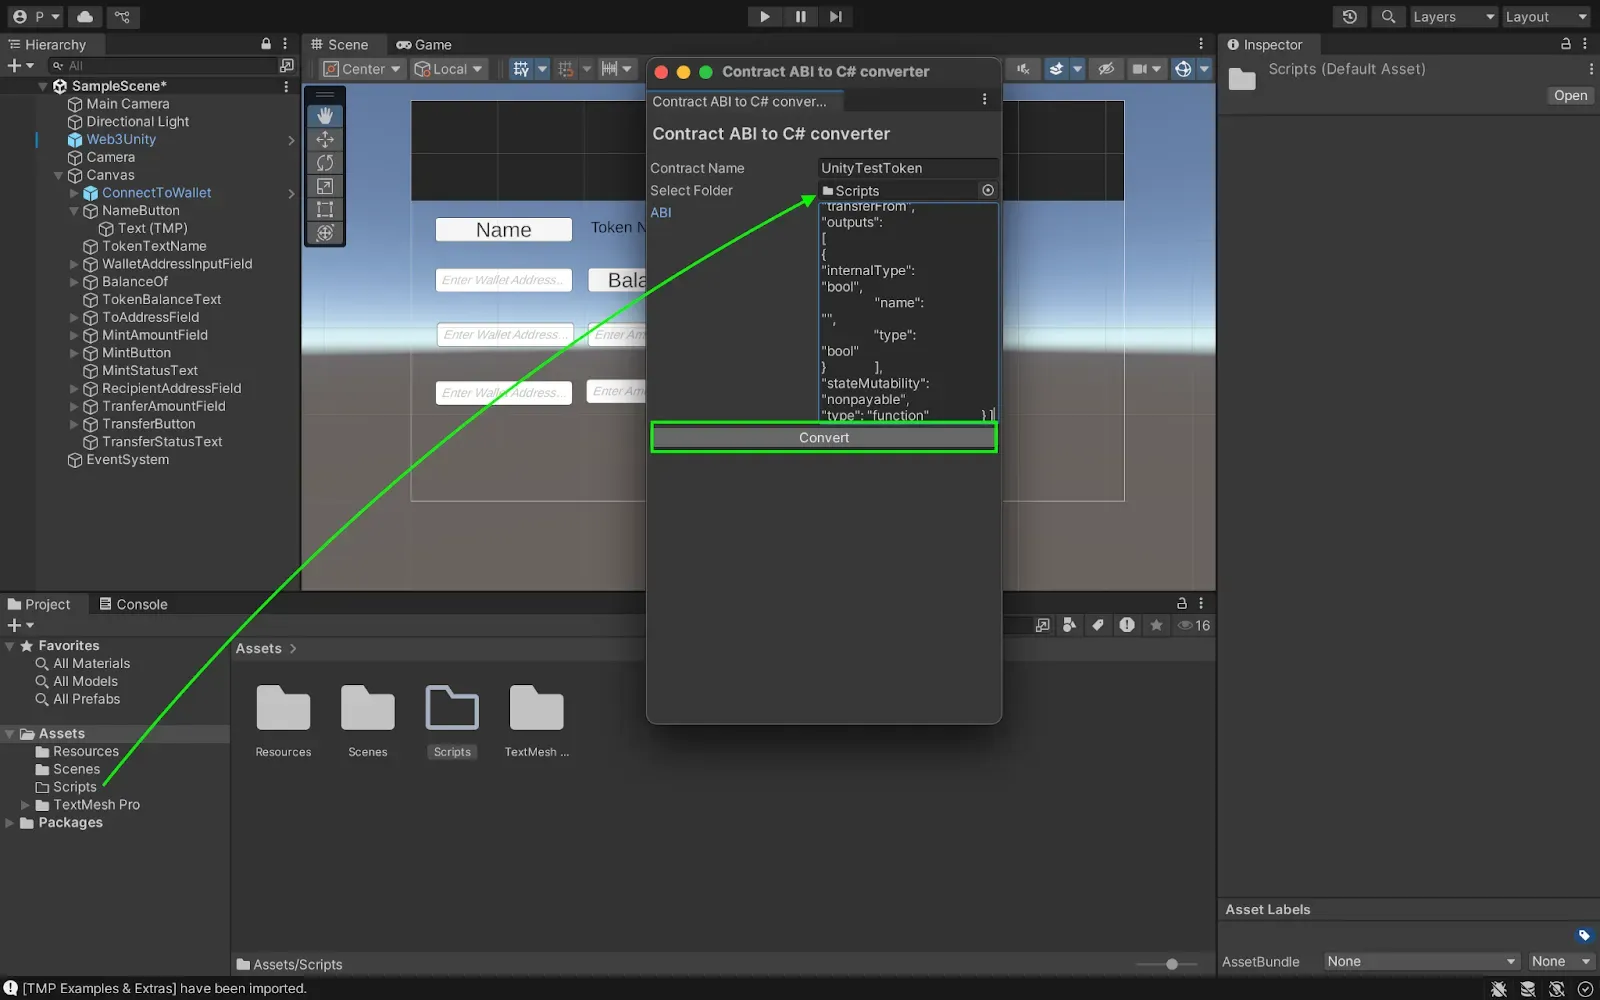
This creates all the C# scripts you need to interact with your smart contract.
Implementing TokenManager Script
In this step we will create a comprehensive script that handles all token operations. To do so, follow the steps below:
- Create a TokenManager script in your Scripts folder.
- Copy and paste the code below into your newly created scripts file:
using System;
using System.Collections;
using System.Collections.Generic;
using UnityEngine;
using UnityEngine.UI;
using TMPro;
using ChainSafe.Gaming.UnityPackage;
using ChainSafe.Gaming.UnityPackage.Connection;
using ChainSafe.Gaming.Web3;
using ChainSafe.Gaming.Evm.Contracts.Custom;
using System.Numerics;
using System.Threading.Tasks;
public class TokenManager : MonoBehaviour
{
[SerializeField] private string ContractAddress;
[SerializeField] private string DefaultWalletAddress; // Default address to check balance
// Basic Token Info UI
[SerializeField] private TMP_Text TokenNameText;
[SerializeField] private TMP_Text TokenBalanceText;
// New wallet address input field for checking balance of any address
[SerializeField] private TMP_InputField WalletAddressInputField;
// Transfer UI elements
[SerializeField] private TMP_InputField RecipientAddressField;
[SerializeField] private TMP_InputField TransferAmountField;
[SerializeField] private Button TransferButton;
[SerializeField] private TMP_Text TransferStatusText;
// Minting UI elements
[SerializeField] private TMP_InputField ToAddressField;
[SerializeField] private TMP_InputField MintAmountField;
[SerializeField] private Button MintButton;
[SerializeField] private TMP_Text MintStatusText; // Optional - for showing mint status
private UnityTestToken _tokenContract;
private bool _isContractInitialized = false;
private int _tokenDecimals = 18; // Default to 18, will be updated when contract is initialized
private void Awake()
{
Web3Unity.Web3Initialized += Web3UnityOnWeb3Initialized;
// Disable buttons until contract is initialized
if (TransferButton != null)
{
TransferButton.interactable = false;
}
if (MintButton != null)
{
MintButton.interactable = false;
}
// Clear status texts
if (TransferStatusText != null)
{
TransferStatusText.text = "";
}
if (MintStatusText != null)
{
MintStatusText.text = "";
}
// Initialize wallet address input field with default wallet
if (WalletAddressInputField != null)
{
WalletAddressInputField.text = DefaultWalletAddress;
}
}
private async void Web3UnityOnWeb3Initialized((Web3 web3, bool isLightWeight) obj)
{
try
{
// Initialize the token contract
_tokenContract = await obj.web3.ContractBuilder.Build<UnityTestToken>(ContractAddress);
_isContractInitialized = true;
// Get and store token decimals for later use
BigInteger decimals = await _tokenContract.Decimals();
_tokenDecimals = (int)decimals;
// Enable buttons now that contract is initialized
if (TransferButton != null)
{
TransferButton.interactable = true;
}
if (MintButton != null)
{
MintButton.interactable = true;
}
Debug.Log("Token contract initialized successfully. Decimals: " + _tokenDecimals);
// Automatically get the token balance when initialized
GetTokenBalance();
}
catch (System.Exception ex)
{
Debug.LogError($"Error initializing token contract: {ex.Message}");
if (TransferStatusText != null)
{
TransferStatusText.text = "Failed to initialize contract";
TransferStatusText.color = Color.red;
}
}
}
private void OnDestroy()
{
Web3Unity.Web3Initialized -= Web3UnityOnWeb3Initialized;
// Dispose of the contract when the object is destroyed
if (_tokenContract != null)
{
_tokenContract.DisposeAsync().AsTask().Wait();
}
}
// Button click handler for Name button
public async void GetTokenName()
{
if (!_isContractInitialized)
{
TokenNameText.text = "Contract not initialized yet. Please wait.";
return;
}
try
{
TokenNameText.text = "Loading token name…";
// Get token name
string name = await _tokenContract.Name();
TokenNameText.text = $"Token Name: {name}";
Debug.Log($"Token name fetched successfully: {name}");
}
catch (System.Exception ex)
{
TokenNameText.text = "Error fetching token name.";
Debug.LogError($"Error fetching token name: {ex.Message}");
}
}
// Button click handler for BalanceOf button - now uses input field if available
public async void GetTokenBalance()
{
if (!_isContractInitialized)
{
TokenBalanceText.text = "Contract not initialized yet. Please wait.";
return;
}
// Get the address to check - either from input field or default
string addressToCheck = DefaultWalletAddress;
// If we have the input field and it's not empty, use that address instead
if (WalletAddressInputField != null && !string.IsNullOrEmpty(WalletAddressInputField.text))
{
addressToCheck = WalletAddressInputField.text;
}
// Validate the address format
if (!IsValidEthereumAddress(addressToCheck))
{
TokenBalanceText.text = "Invalid wallet address format";
return;
}
try
{
TokenBalanceText.text = "Loading token balance…";
// Get balance of the address
BigInteger balance = await _tokenContract.BalanceOf(addressToCheck);
// Format the balance considering decimals
decimal formattedBalance = ConvertFromWei(balance, _tokenDecimals);
TokenBalanceText.text = $"Balance: {formattedBalance}";
Debug.Log($"Token balance fetched successfully. Address: {addressToCheck}, Balance: {formattedBalance}");
}
catch (System.Exception ex)
{
TokenBalanceText.text = "Error fetching token balance.";
Debug.LogError($"Error fetching token balance: {ex.Message}");
}
}
// Button click handler for Transfer button with balance-based verification
public async void TransferTokens()
{
if (!_isContractInitialized)
{
UpdateTransferStatus("Contract not initialized yet", Color.red);
return;
}
// Validate input fields
if (string.IsNullOrEmpty(RecipientAddressField.text))
{
UpdateTransferStatus("Please enter a recipient address", Color.red);
return;
}
if (string.IsNullOrEmpty(TransferAmountField.text))
{
UpdateTransferStatus("Please enter an amount to transfer", Color.red);
return;
}
string recipientAddress = RecipientAddressField.text;
// Validate recipient address format
if (!IsValidEthereumAddress(recipientAddress))
{
UpdateTransferStatus("Invalid recipient address format", Color.red);
return;
}
// Parse amount and validate
decimal amount;
if (!decimal.TryParse(TransferAmountField.text, out amount))
{
UpdateTransferStatus("Invalid amount format", Color.red);
return;
}
if (amount <= 0)
{
UpdateTransferStatus("Amount must be greater than 0", Color.red);
return;
}
// Disable button to prevent multiple clicks
if (TransferButton != null)
{
TransferButton.interactable = false;
}
UpdateTransferStatus("Processing transfer…", Color.yellow);
try
{
// Get initial balance for comparison
BigInteger initialBalance = await _tokenContract.BalanceOf(DefaultWalletAddress);
// Convert amount to wei
BigInteger amountInWei = ConvertToWei(amount, _tokenDecimals);
Debug.Log($"Attempting to transfer {amount} tokens ({amountInWei} wei) to {recipientAddress}");
Debug.Log($"Initial balance: {initialBalance}");
// Attempt the transfer - even if it returns an error, the transaction might succeed
try
{
UpdateTransferStatus("Sending transaction…", Color.yellow);
// Call the transfer function
await _tokenContract.Transfer(recipientAddress, amountInWei);
UpdateTransferStatus("Transaction submitted, waiting for confirmation…", Color.yellow);
}
catch (Exception ex)
{
// Log the error but continue - this might be a UI callback error only
Debug.LogWarning($"Transfer call reported an error: {ex.Message}");
Debug.LogWarning("Continuing to verify if the transaction actually went through…");
UpdateTransferStatus("Transaction may have failed, verifying…", new Color(1f, 0.6f, 0f)); // Orange
}
// Wait for transaction to be processed
await VerifyTransferSuccess(initialBalance, recipientAddress, amount);
}
catch (Exception ex)
{
// More serious error - couldn't even check balances
UpdateTransferStatus($"Error: {ex.Message}", Color.red);
Debug.LogError($"Transfer error: {ex.Message}");
}
finally
{
// Re-enable button
if (TransferButton != null)
{
TransferButton.interactable = true;
}
}
}
// Button click handler for Mint button
public async void MintTokens()
{
if (!_isContractInitialized)
{
UpdateMintStatus("Contract not initialized yet", Color.red);
return;
}
// Validate input fields
if (string.IsNullOrEmpty(ToAddressField.text))
{
UpdateMintStatus("Please enter a recipient address", Color.red);
return;
}
if (string.IsNullOrEmpty(MintAmountField.text))
{
UpdateMintStatus("Please enter an amount to mint", Color.red);
return;
}
string mintToAddress = ToAddressField.text;
// Validate address format
if (!IsValidEthereumAddress(mintToAddress))
{
UpdateMintStatus("Invalid recipient address format", Color.red);
return;
}
// Parse amount and validate
decimal amount;
if (!decimal.TryParse(MintAmountField.text, out amount))
{
UpdateMintStatus("Invalid amount format", Color.red);
return;
}
if (amount <= 0)
{
UpdateMintStatus("Amount must be greater than 0", Color.red);
return;
}
// Disable button to prevent multiple clicks
if (MintButton != null)
{
MintButton.interactable = false;
}
UpdateMintStatus("Processing mint…", Color.yellow);
try
{
// Get initial balance of the recipient for comparison
BigInteger initialBalance = await _tokenContract.BalanceOf(mintToAddress);
// Convert amount to wei
BigInteger amountInWei = ConvertToWei(amount, _tokenDecimals);
Debug.Log($"Attempting to mint {amount} tokens ({amountInWei} wei) to {mintToAddress}");
Debug.Log($"Initial recipient balance: {initialBalance}");
// Attempt the mint - similar to transfer, it might report an error but still succeed
try
{
UpdateMintStatus("Sending mint transaction…", Color.yellow);
// Call the mint function
await _tokenContract.Mint(mintToAddress, amountInWei);
UpdateMintStatus("Mint transaction submitted, waiting for confirmation…", Color.yellow);
}
catch (Exception ex)
{
// Log the error but continue - this might be a UI callback error only
Debug.LogWarning($"Mint call reported an error: {ex.Message}");
Debug.LogWarning("Continuing to verify if the mint actually went through…");
UpdateMintStatus("Mint may have failed, verifying…", new Color(1f, 0.6f, 0f)); // Orange
}
// Wait for transaction to be processed and verify
await VerifyMintSuccess(initialBalance, mintToAddress, amount);
}
catch (Exception ex)
{
// More serious error - couldn't even check balances
UpdateMintStatus($"Error: {ex.Message}", Color.red);
Debug.LogError($"Mint error: {ex.Message}");
}
finally
{
// Re-enable button
if (MintButton != null)
{
MintButton.interactable = true;
}
}
}
// Verify if a mint succeeded by checking balance changes
private async Task VerifyMintSuccess(BigInteger initialBalance, string mintToAddress, decimal amount)
{
// First delay to allow transaction to process
for (int i = 0; i < 3; i++)
{
await Task.Delay(1000); // Wait 1 second
UpdateMintStatus($"Verifying mint… ({i+1}/3)", Color.yellow);
}
try
{
// Check recipient balance after delay
BigInteger newBalance = await _tokenContract.BalanceOf(mintToAddress);
Debug.Log($"New balance after mint attempt: {newBalance}");
// Calculate expected balance after mint
BigInteger expectedNewBalance = initialBalance + ConvertToWei(amount, _tokenDecimals);
// If balance increased by approximately the mint amount, consider it successful
if (newBalance >= expectedNewBalance)
{
decimal changeAmount = ConvertFromWei(newBalance - initialBalance, _tokenDecimals);
UpdateMintStatus($"Mint successful! Created {changeAmount} tokens", Color.green);
// Clear amount field on success
MintAmountField.text = "";
// Update the displayed balance if we're checking the same address
GetTokenBalance();
}
else if (newBalance > initialBalance)
{
// Balance increased but not by the expected amount
decimal changeAmount = ConvertFromWei(newBalance - initialBalance, _tokenDecimals);
UpdateMintStatus($"Partial mint? Balance increased by {changeAmount} tokens", new Color(1f, 0.6f, 0f)); // Orange
GetTokenBalance();
}
else
{
// Balance didn't increase
UpdateMintStatus("Mint failed - no balance change detected", Color.red);
}
}
catch (Exception ex)
{
UpdateMintStatus($"Error verifying mint: {ex.Message}", Color.red);
Debug.LogError($"Mint verification error: {ex.Message}");
}
}
// Verify if a transfer succeeded by checking balance changes
private async Task VerifyTransferSuccess(BigInteger initialBalance, string recipientAddress, decimal amount)
{
// First delay to allow transaction to process
for (int i = 0; i < 3; i++)
{
await Task.Delay(1000); // Wait 1 second
UpdateTransferStatus($"Verifying transaction… ({i+1}/3)", Color.yellow);
}
try
{
// Check sender balance after delay
BigInteger newBalance = await _tokenContract.BalanceOf(DefaultWalletAddress);
Debug.Log($"New balance after transfer attempt: {newBalance}");
// Calculate expected balance after transfer
BigInteger expectedNewBalance = initialBalance - ConvertToWei(amount, _tokenDecimals);
// If balance decreased by approximately the transfer amount, consider it successful
if (newBalance <= expectedNewBalance)
{
decimal changeAmount = ConvertFromWei(initialBalance - newBalance, _tokenDecimals);
UpdateTransferStatus($"Transfer successful! Sent {changeAmount} tokens", Color.green);
// Clear amount field on success
TransferAmountField.text = "";
// Update the displayed balance
GetTokenBalance();
// Also check recipient balance if it's a different address
if (recipientAddress.ToLower() != DefaultWalletAddress.ToLower())
{
try
{
BigInteger recipientBalance = await _tokenContract.BalanceOf(recipientAddress);
Debug.Log($"Recipient balance: {ConvertFromWei(recipientBalance, _tokenDecimals)}");
}
catch (Exception ex)
{
Debug.LogWarning($"Failed to get recipient balance: {ex.Message}");
}
}
}
else if (newBalance < initialBalance)
{
// Balance decreased but not by the expected amount
decimal changeAmount = ConvertFromWei(initialBalance - newBalance, _tokenDecimals);
UpdateTransferStatus($"Partial transfer? Balance reduced by {changeAmount} tokens", new Color(1f, 0.6f, 0f)); // Orange
GetTokenBalance();
}
else
{
// Balance didn't decrease
UpdateTransferStatus("Transfer failed - no balance change detected", Color.red);
}
}
catch (Exception ex)
{
UpdateTransferStatus($"Error verifying transfer: {ex.Message}", Color.red);
Debug.LogError($"Verification error: {ex.Message}");
}
}
// Helper method to update transfer status text
private void UpdateTransferStatus(string message, Color color)
{
if (TransferStatusText != null)
{
TransferStatusText.text = message;
TransferStatusText.color = color;
}
Debug.Log(message);
}
// Helper method to update mint status text
private void UpdateMintStatus(string message, Color color)
{
if (MintStatusText != null)
{
MintStatusText.text = message;
MintStatusText.color = color;
}
Debug.Log($"[MINT] {message}");
}
// Helper method to convert from wei to token units based on decimals
private decimal ConvertFromWei(BigInteger weiAmount, int decimals)
{
if (decimals == 0) return (decimal)weiAmount;
// Calculate divisor (10^decimals)
BigInteger divisor = BigInteger.Pow(10, decimals);
// Convert to decimal for division
decimal result = (decimal)weiAmount / (decimal)divisor;
return result;
}
// Helper method to convert from token units to wei based on decimals
private BigInteger ConvertToWei(decimal amount, int decimals)
{
if (decimals == 0) return new BigInteger(amount);
// Calculate multiplier (10^decimals)
decimal multiplier = (decimal)Math.Pow(10, decimals);
// Convert to BigInteger after multiplication
BigInteger result = new BigInteger(amount * multiplier);
return result;
}
// Helper method to validate Ethereum address format
private bool IsValidEthereumAddress(string address)
{
// Basic validation - check if it's 42 characters long and starts with 0x
return address.Length == 42 && address.StartsWith("0x", StringComparison.OrdinalIgnoreCase);
}
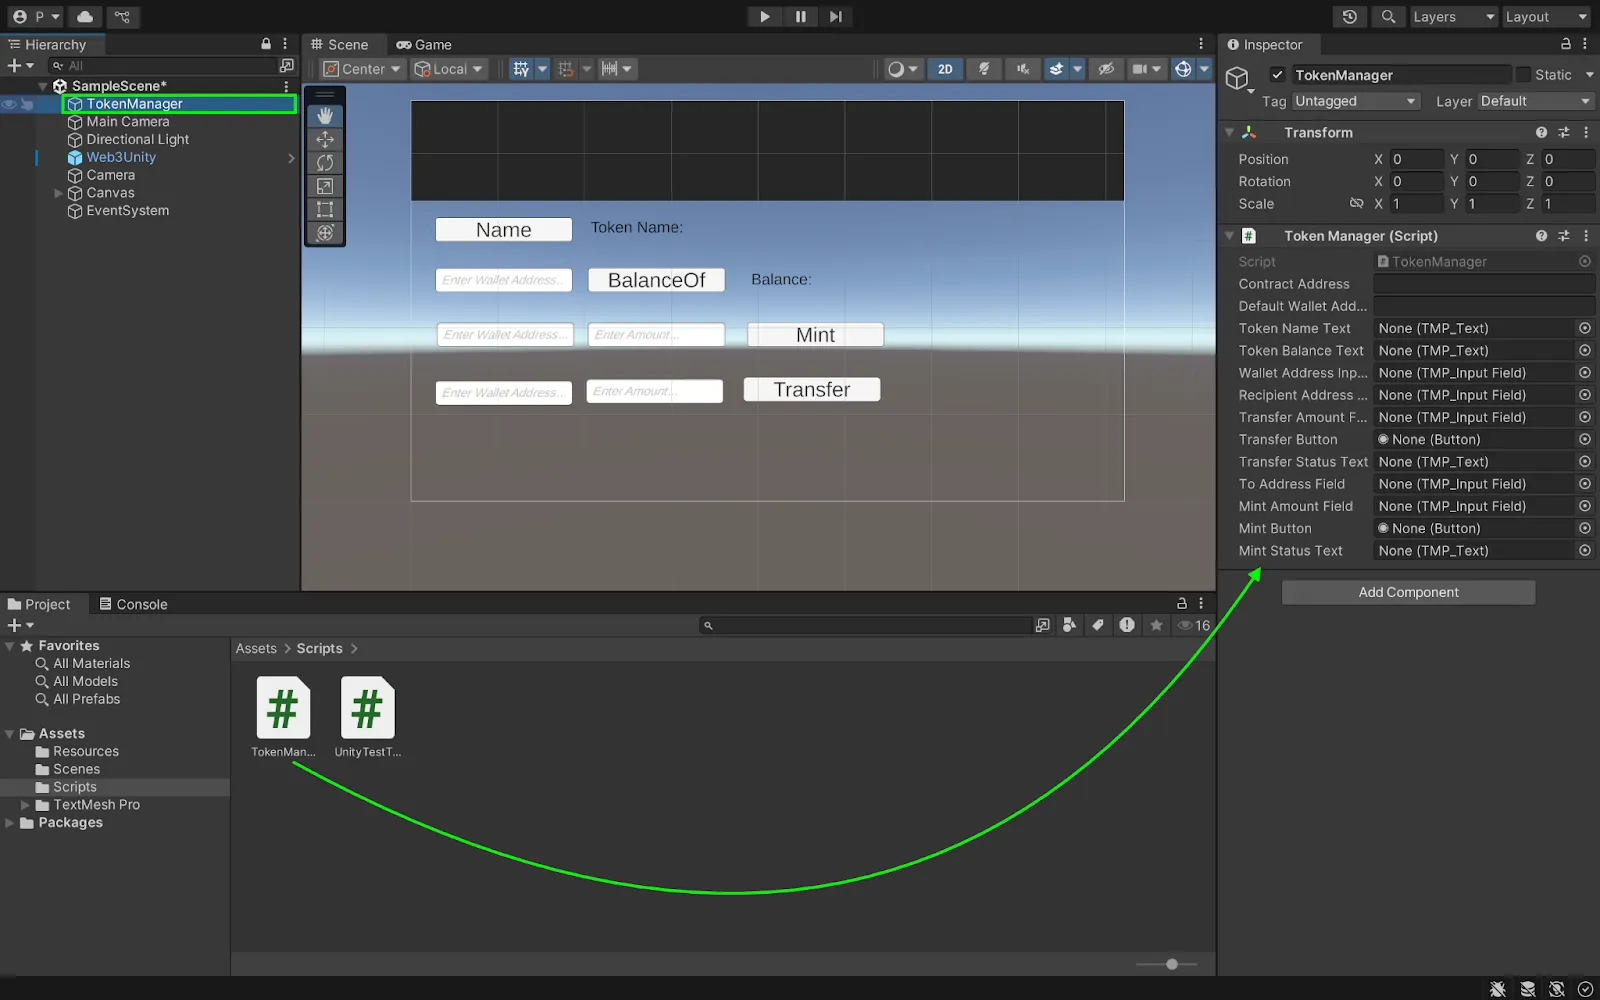
}Setting Up the TokenManager GameObject
- Create the Manager Object:
- Right-click in the Hierarchy window (root level).
- Select “Create Empty Object”.
- Name it “TokenManager”.
- Attach Your Script:
- Select the TokenManager GameObject.
- In Inspector, click Add Component.
- Search for and select “TokenManager”.
3. Connect UI Elements:
- With TokenManager selected, look in the Inspector.
- Drag and drop your UI elements from the Hierarchy to the corresponding fields:
- TokenNameText
- TokenBalanceText
- Mint, Transfer, Name, BalanceOf buttons
- Input fields ….
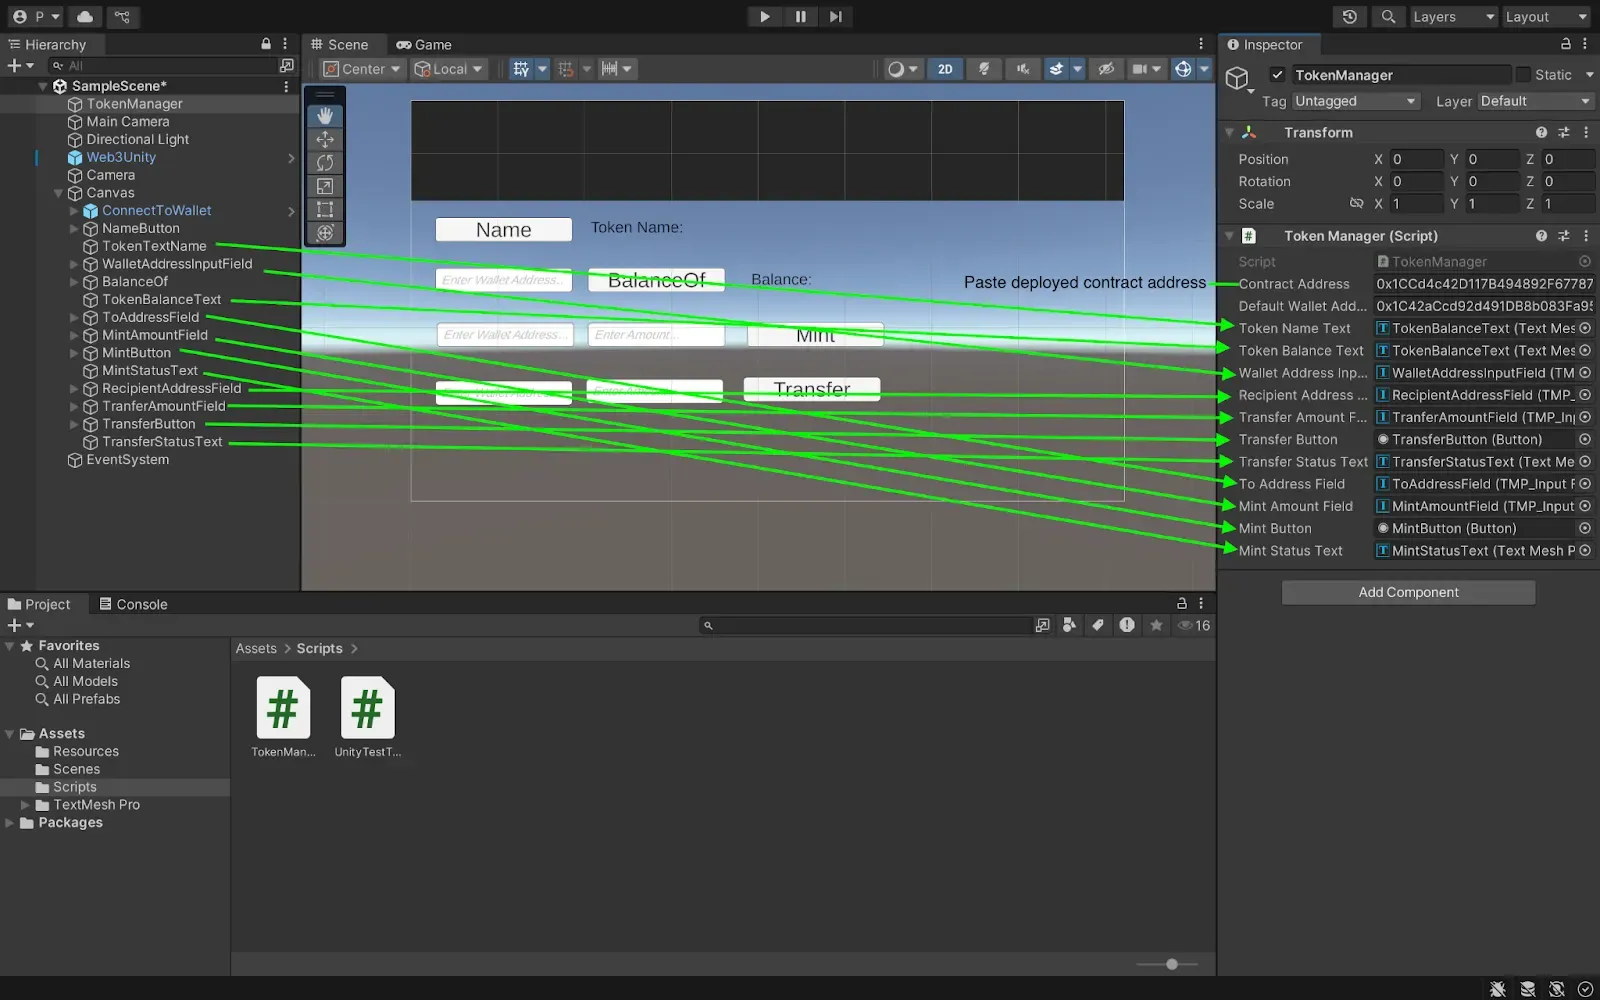
- Set your contract address and default wallet address.
Connecting Buttons to Script
In this section, we will connect the following buttons with their respective functions from the TokenManager script:
- Select a button (like NameButton)
- In the Inspector, find the OnClick() section and click the ➕ button
- Drag the TokenManager Object from Hierarchy window into the None (object) field
- Click on No Function → TokenManager → GetTokenName()
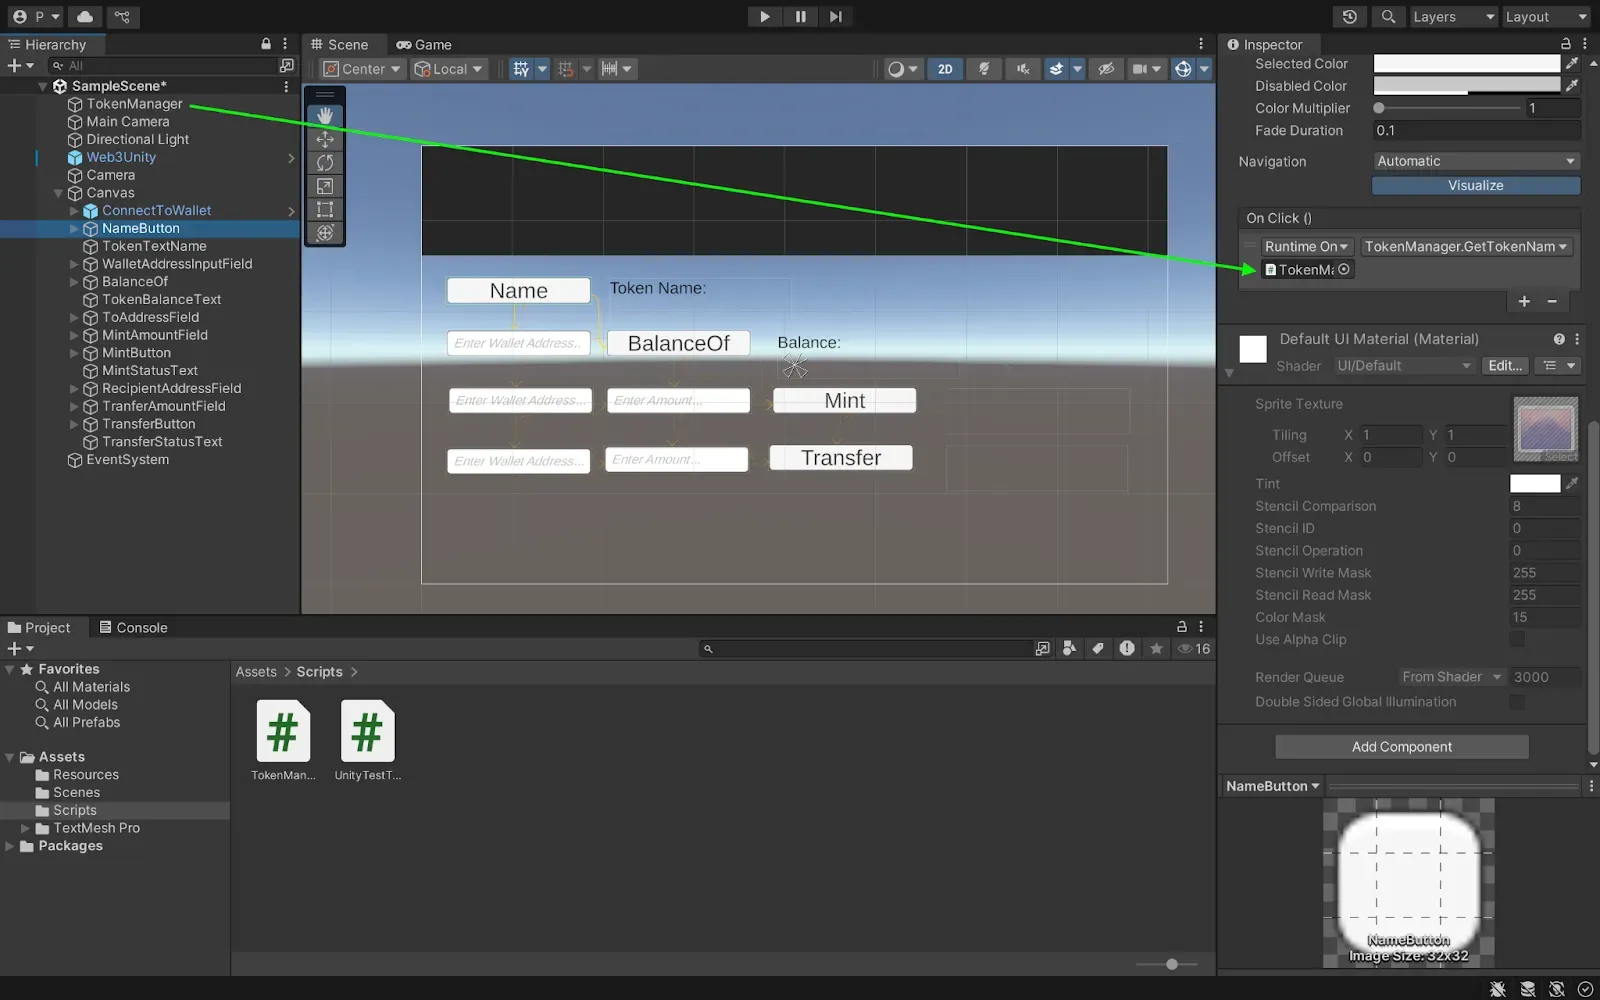
- Repeat step 1–3 for the buttons below and change their reception to:
- BalanceOf → GetTokenBalance()
- Mint → MintTokens()
- Transfer → TransferTokens()
WebGL Build Settings
In this section, we will configure our dApp for the web deployment:
- Go to File → Build Settings → WebGL → Switch Platform
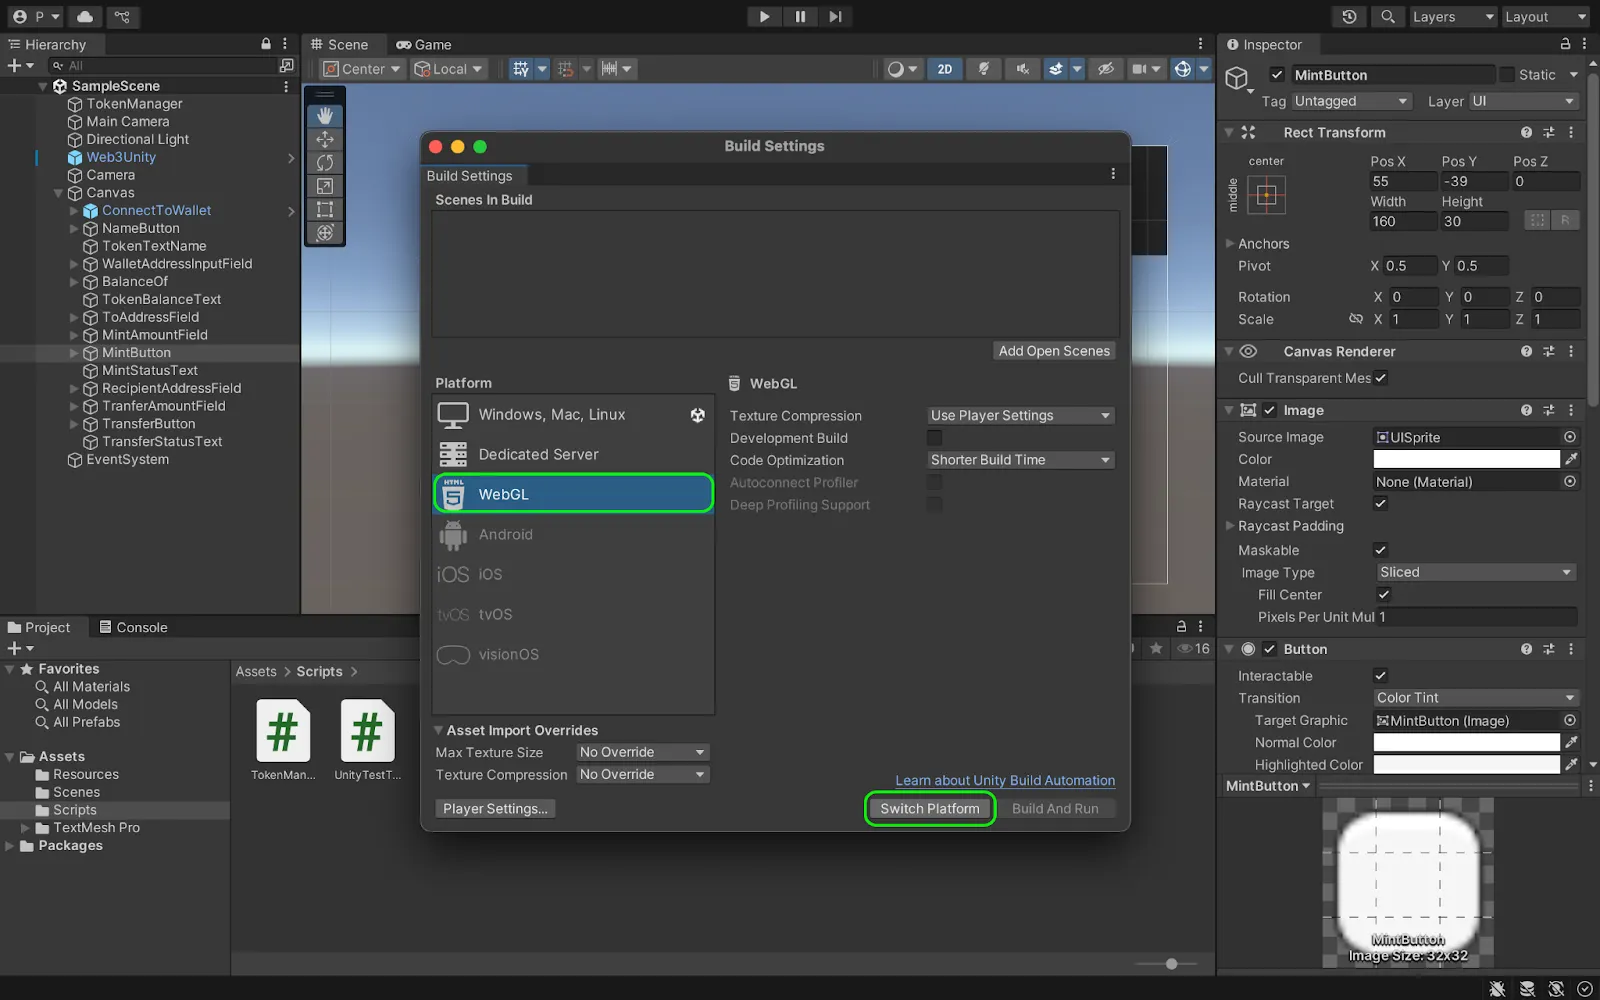
- Unity will prompt you to install required components:
- Async Utilities & WebGL Threading Patcher (click Yes)
- web3.unity WebGL templates (click Yes)
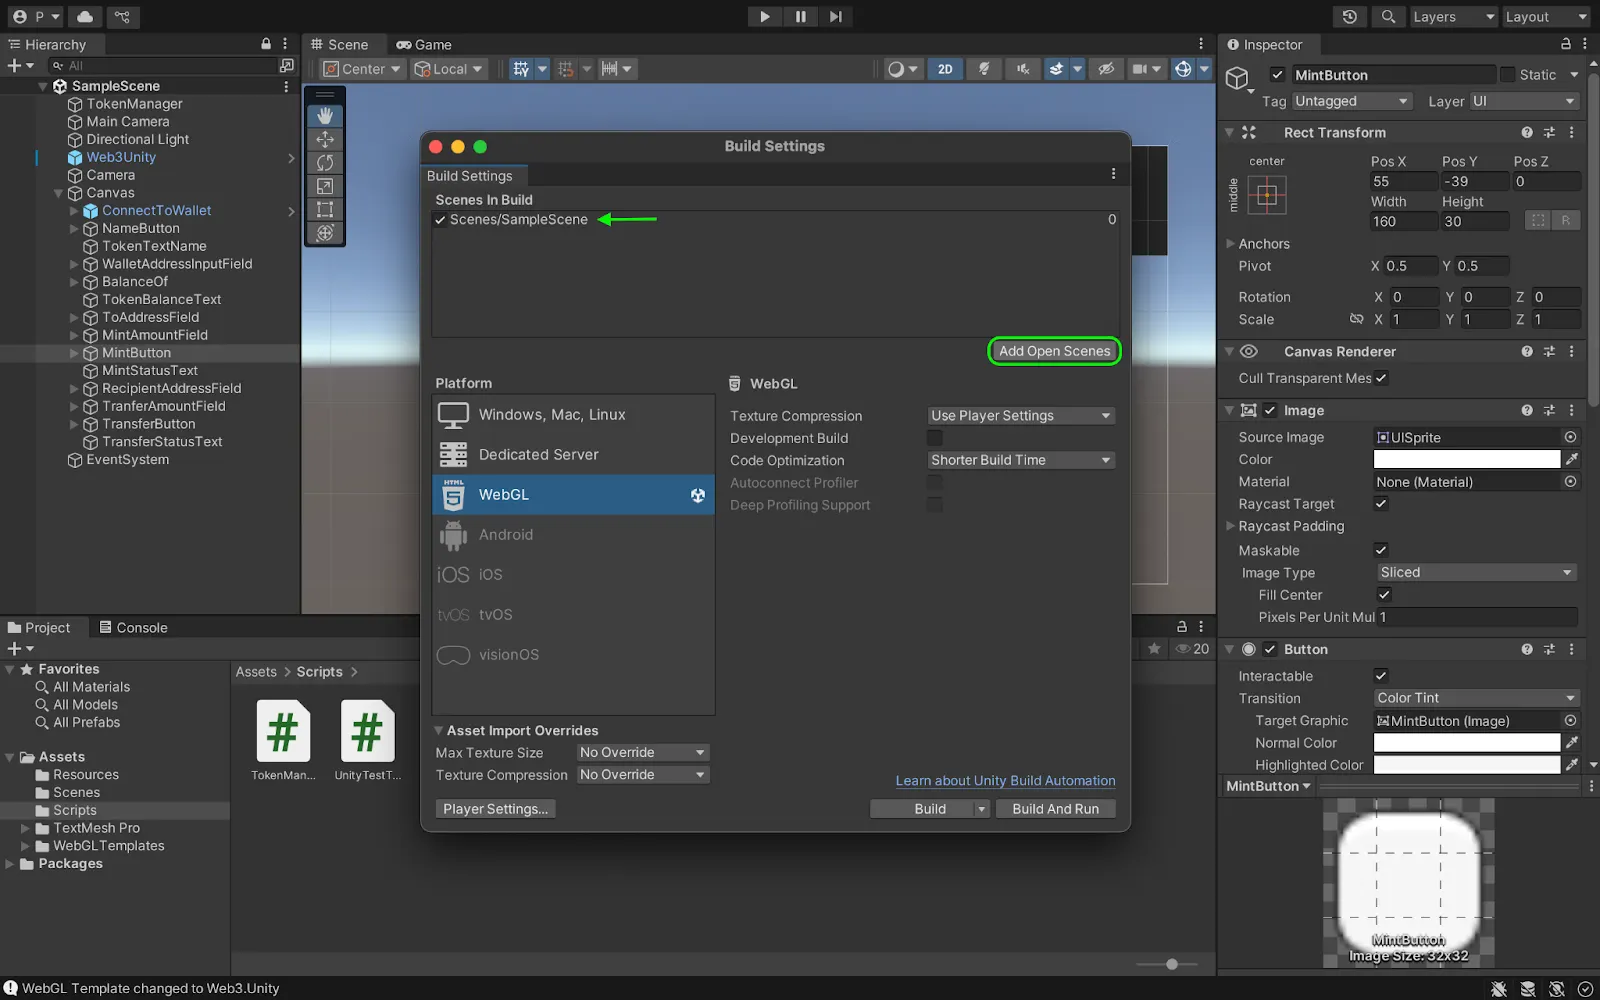
- From the same window, click on Add Open Scenes (top right) to add the SampleScene as the first scene to appear when we run the game.
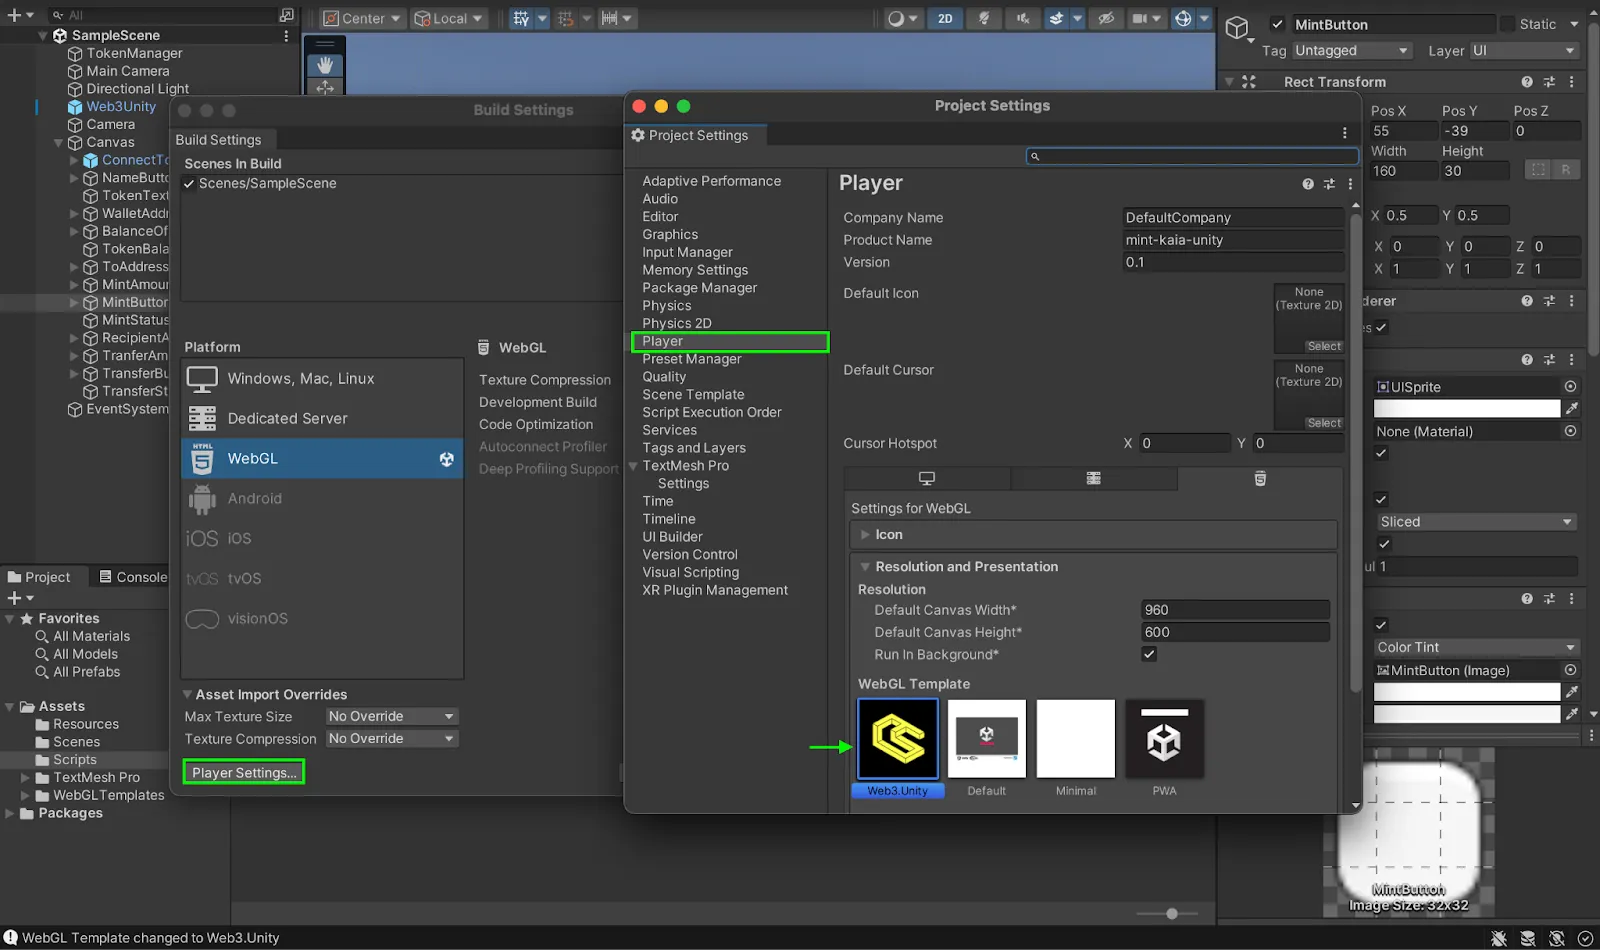
- From the same window, click on Player Settings → Player → Resolution and Presentation, under WebGL Template, select the one titled Web3.Unity.
Testing and running game application
In this section, we will test the various token functionalities in the game application. To see this in action, follow the steps below:
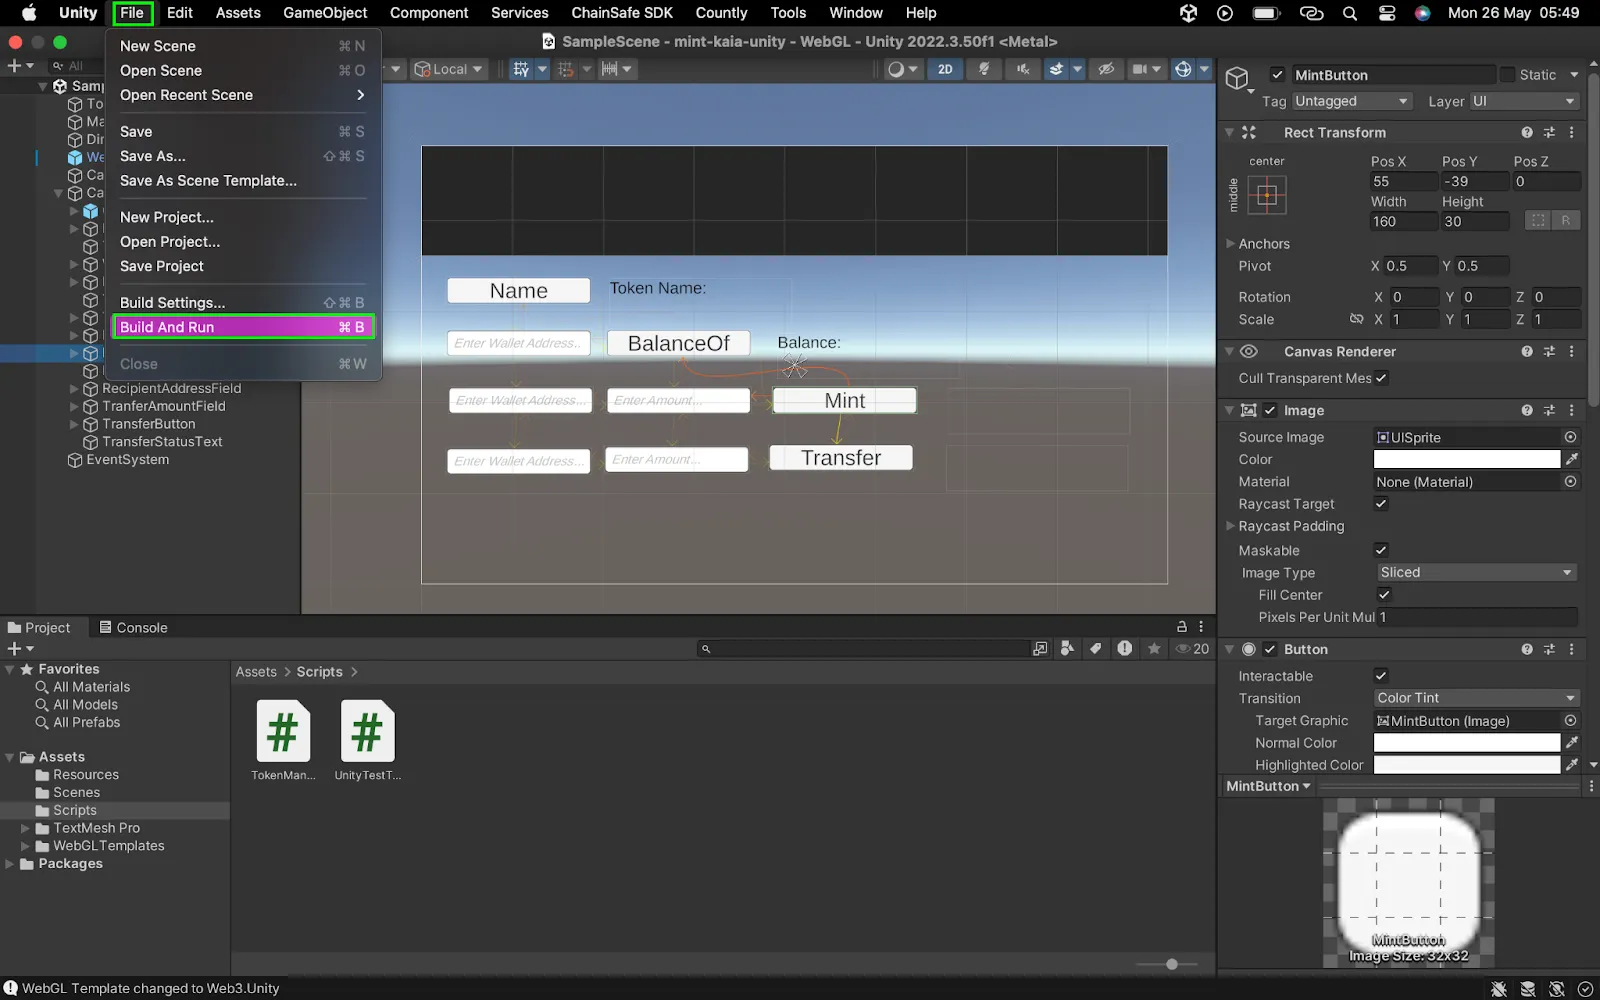
- Build and run the project: Navigate to File → Build and Run
- Save your WebGL build when prompted
- If prompted about stripping level, select “Minimal”
- When the project builds and run, it opens a tab in your browser — SampleScene
- Click on Login to connect Metamask.
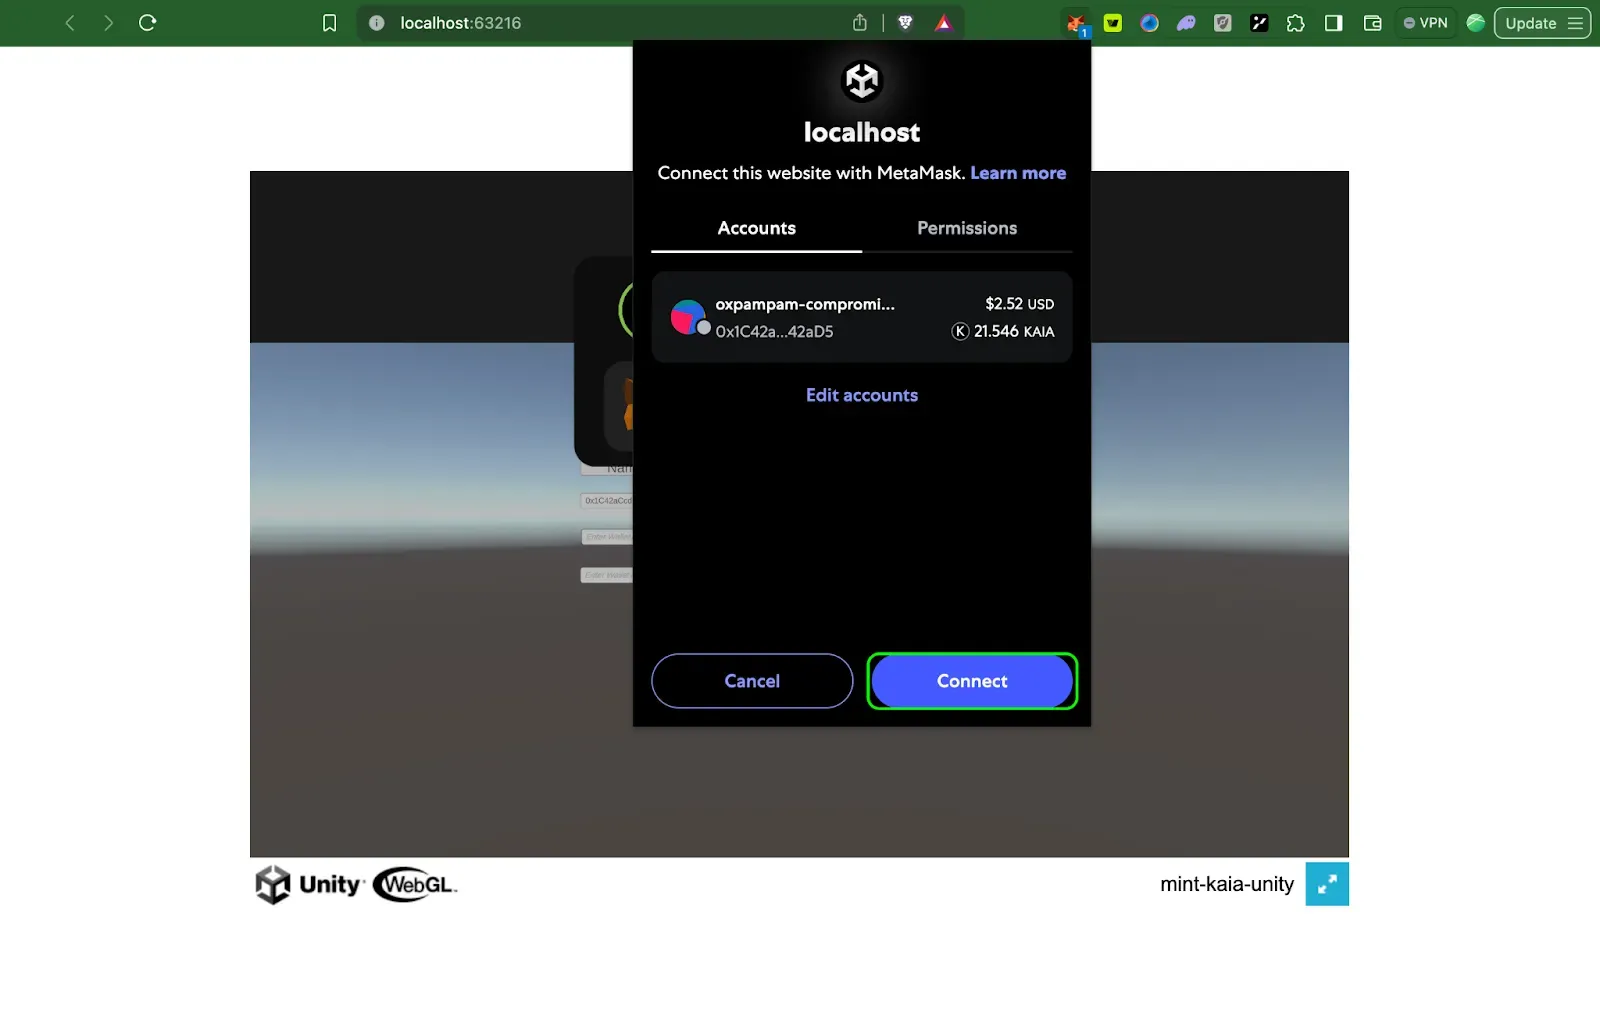
- Once connected, test all the token functionalities:
- Get the token name
- Check balances
- Mint new tokens
- Transfer tokens between addresses
Conclusion
Congratulations! You’ve successfully created a Unity application that interacts with fungible tokens on the Kaia blockchain. This foundation opens up many possibilities:
- In game economies powered by custom tokens
- Player rewards through automated token minting
- Item trading via secure token transfers
- Cross-game compatibility using standardized tokens
This is just the beginning of your Web3 gaming journey. Traditional games run independently, but Web3 games connect to the blockchain to verify transactions. The speed of these transactions directly impacts gameplay. Kaia blockchain offers up to 4,000 transactions per second with immediate finality, making it ideal for responsive Web3 gaming experiences.
Visit ChainSafe Documentation to learn more about connecting Unity games to the blockchain and Kaia Dev Forum if you have any questions.