How to Token-Gate a Unity game using Chainsafe and Thirdweb on Kaia
Introduction

Introduction
Token gating is a mechanism that grants holders of specific tokens (fungible or non-fungible) exclusive access to content, events, experiences, and more. Think of these tokens as the key to accessing the world of exclusivity. As it is, token gating wields the immutable, decentralized and transparent nature of blockchain and smart contracts to give members of a community exclusive experiences. That said, once a member attempts to access the token-gated content or experience, the system checks their digital wallet to confirm if the required token is present. If the user’s wallet contains the required token, access is granted; otherwise, it is denied.
This exciting innovation is a powerful tool for creating exclusivity and rewarding loyal community members, which in turn fosters a strong sense of community among members. In the past years, token-gating has been applied and implemented for the following use cases:
- Exclusive communities and Discord channels:In this case, access to all community channels, or some, is restricted to token holders. A popular example of this is Developer DAO, a DAO on a mission to accelerate the education and impact of a new wave of web3 builders. To access the Developer DAO Discord, you need to hold one of either the original Devs for Revolution (D4R) NFT or at least 400 CODE tokens.
- Online experiences: Online experiences can also be token-gated. From token-gated metaverse spaces to online webinars and community meetups, this model is exemplified by platforms such as SandBox and Decentraland, which allow holders of specific tokens access to exclusive areas in their metaverse or game.
- Token-gated contents: access to articles, video content, and educational resources can also be token-gated, hence giving the user an exclusive experience. An example of this is The Block, which token-gates access to exclusive articles.
- Real-life events: Access to special events in real life has been transformed by the exciting feature that token-gating brings. Simply put, token gating can be used to manage access to exclusive concerts, VIP parties, and conferences. This model is exemplified in scenarios where NFT communities such as Deadfellaz and Bored Ape Yacht Club have hosted token-gated events where attendance is based on owning the required NFT.
Token gating is redefining access and exclusivity in online communities and beyond, and as such, it is a transformative concept in the digital asset space. In this tutorial, you will build a token-gated Unity game using ChainSafe SDK and Thirdweb on Kaia chain.
Prerequisites
- The newest version of Unity
- A Metamask wallet
- Testnet KAIA from Kaia Faucet
- A Thirdweb Account
Getting Started
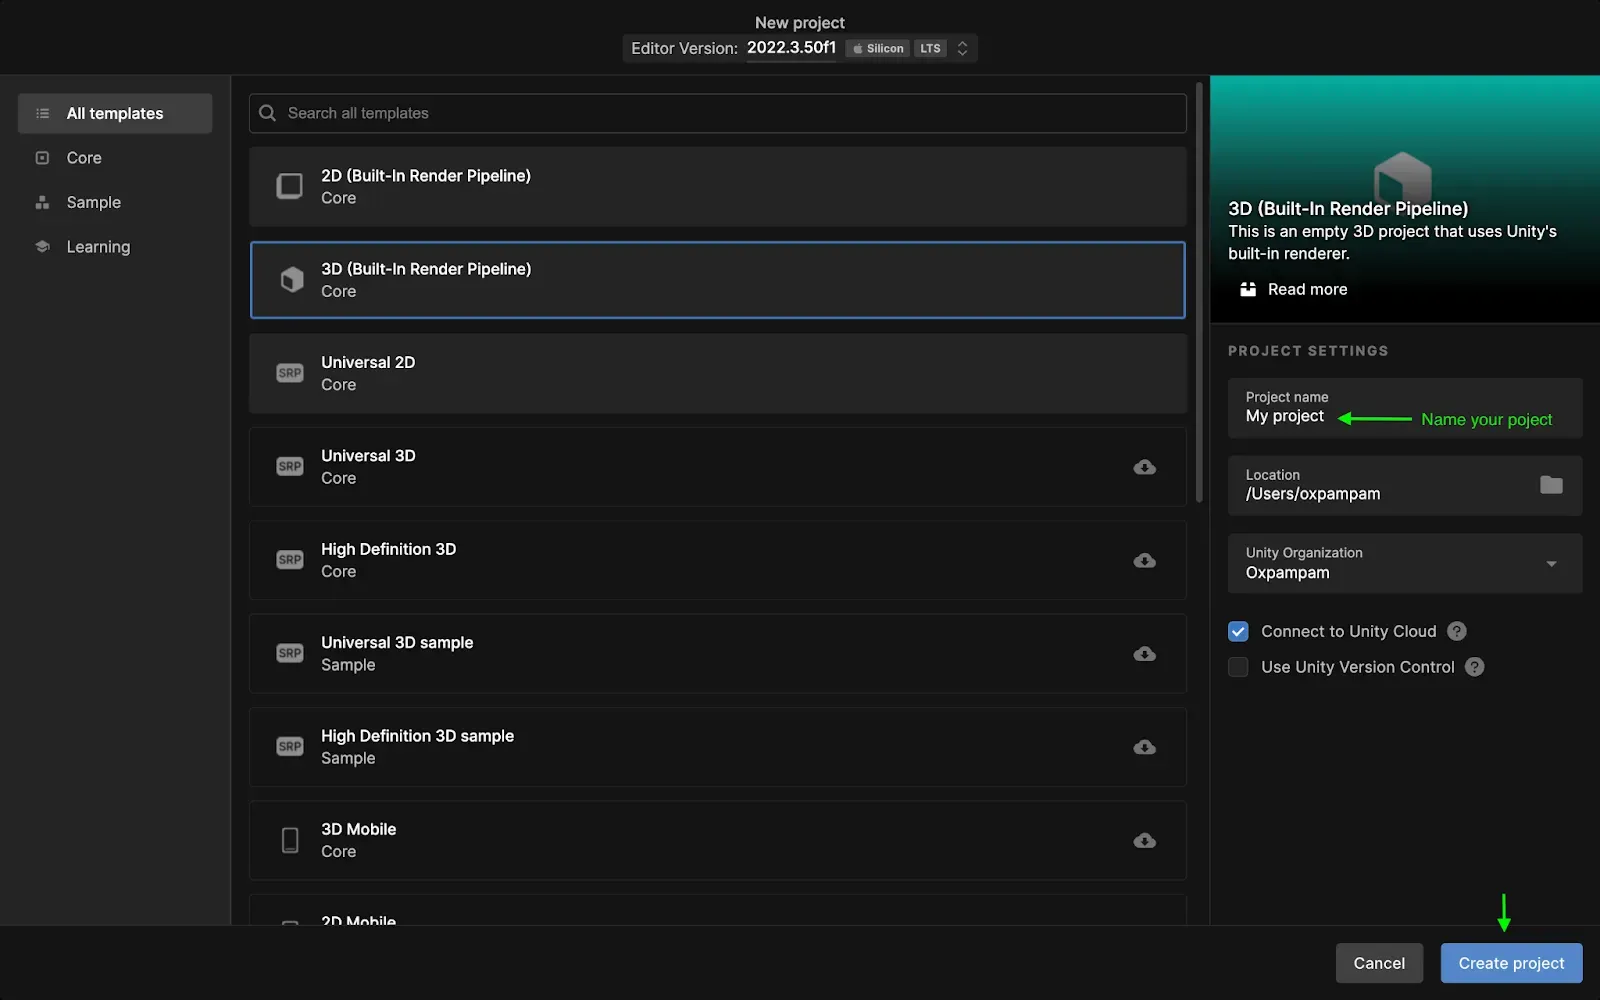
Create a new Unity3D project
To create a new project, do these:
- Navigate to the Projects tab,
- Click on the New project button.
- Select All templates. We will use a 3D template,
- Click on Create project.
Setup web3.unity
- Navigate to chainsafe docs and follow the getting started instructions to download the web3.unity SDK.
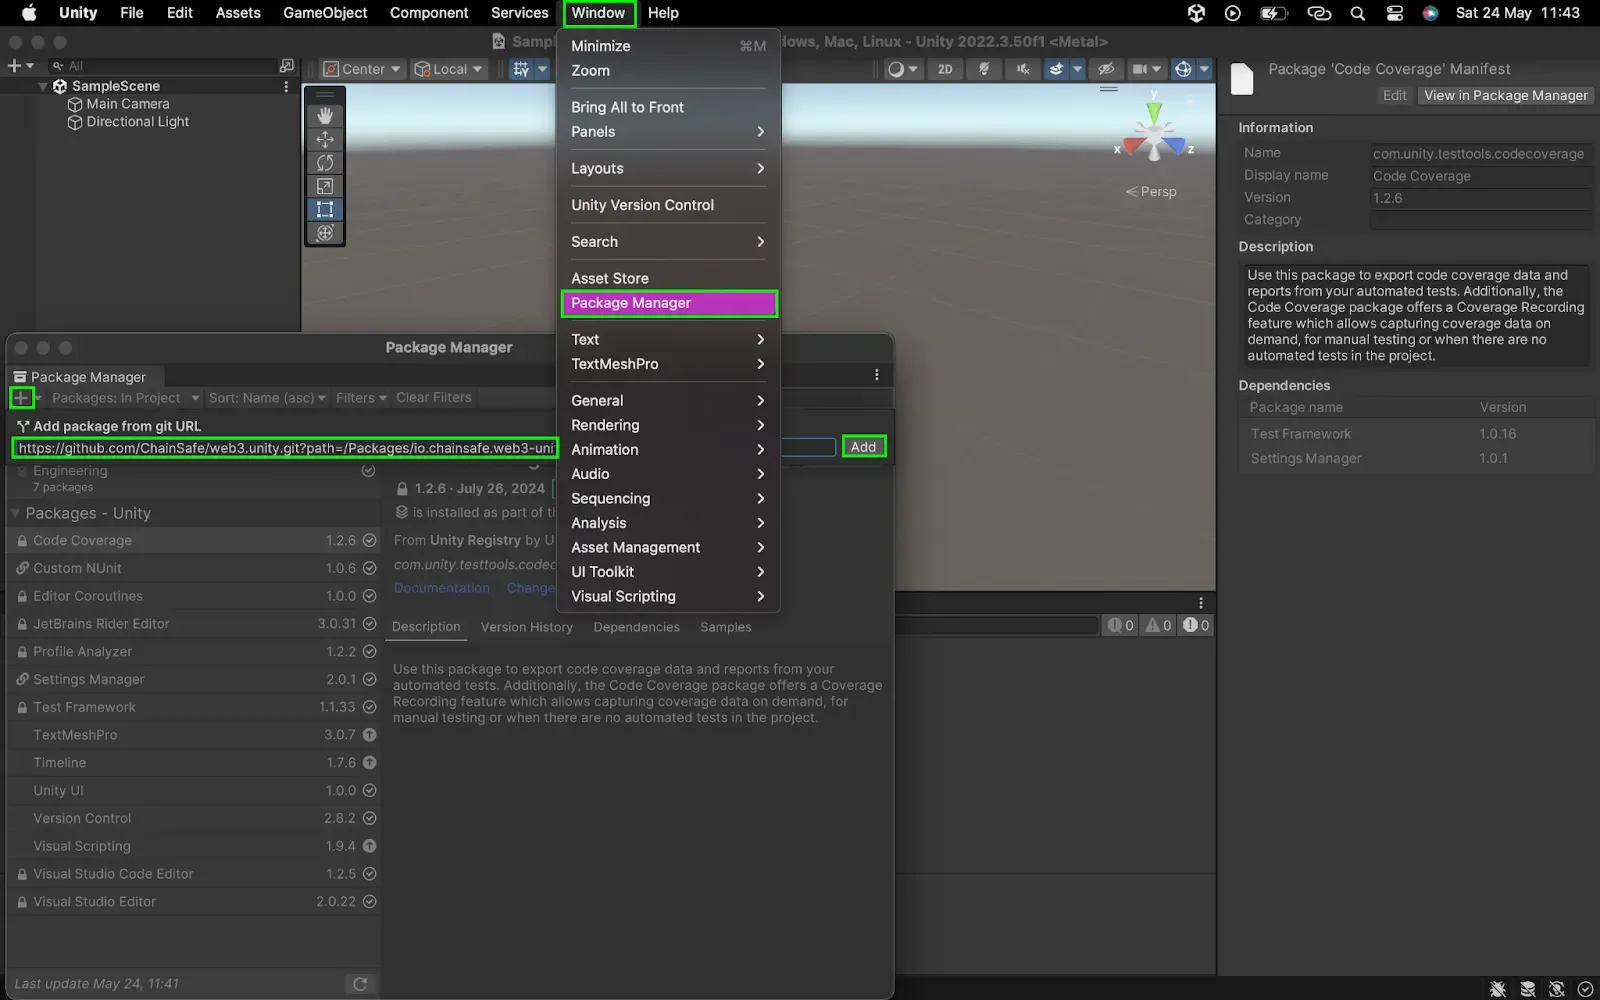
:::note
While setting up your Unity project, you are required to register your project with ChainSafe in order to successfully build with the SDK. In the case where you get a ChainSafeServerSettings prompt while importing the ChainSafe SDK in the step above, complete the next steps.
:::
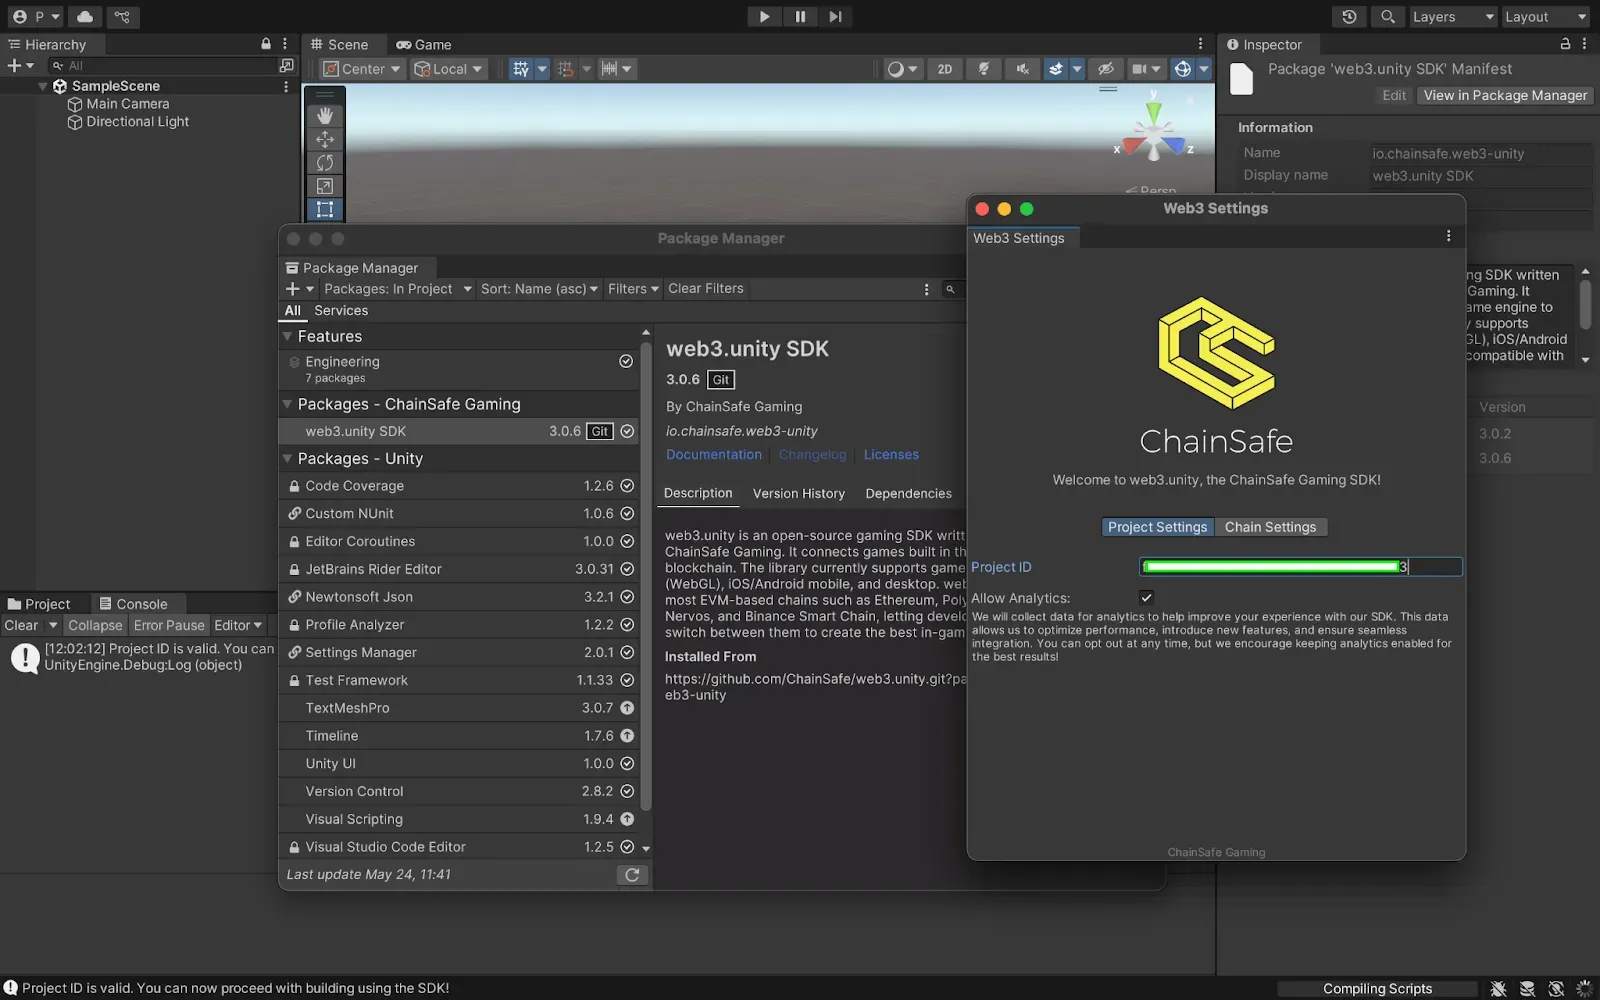
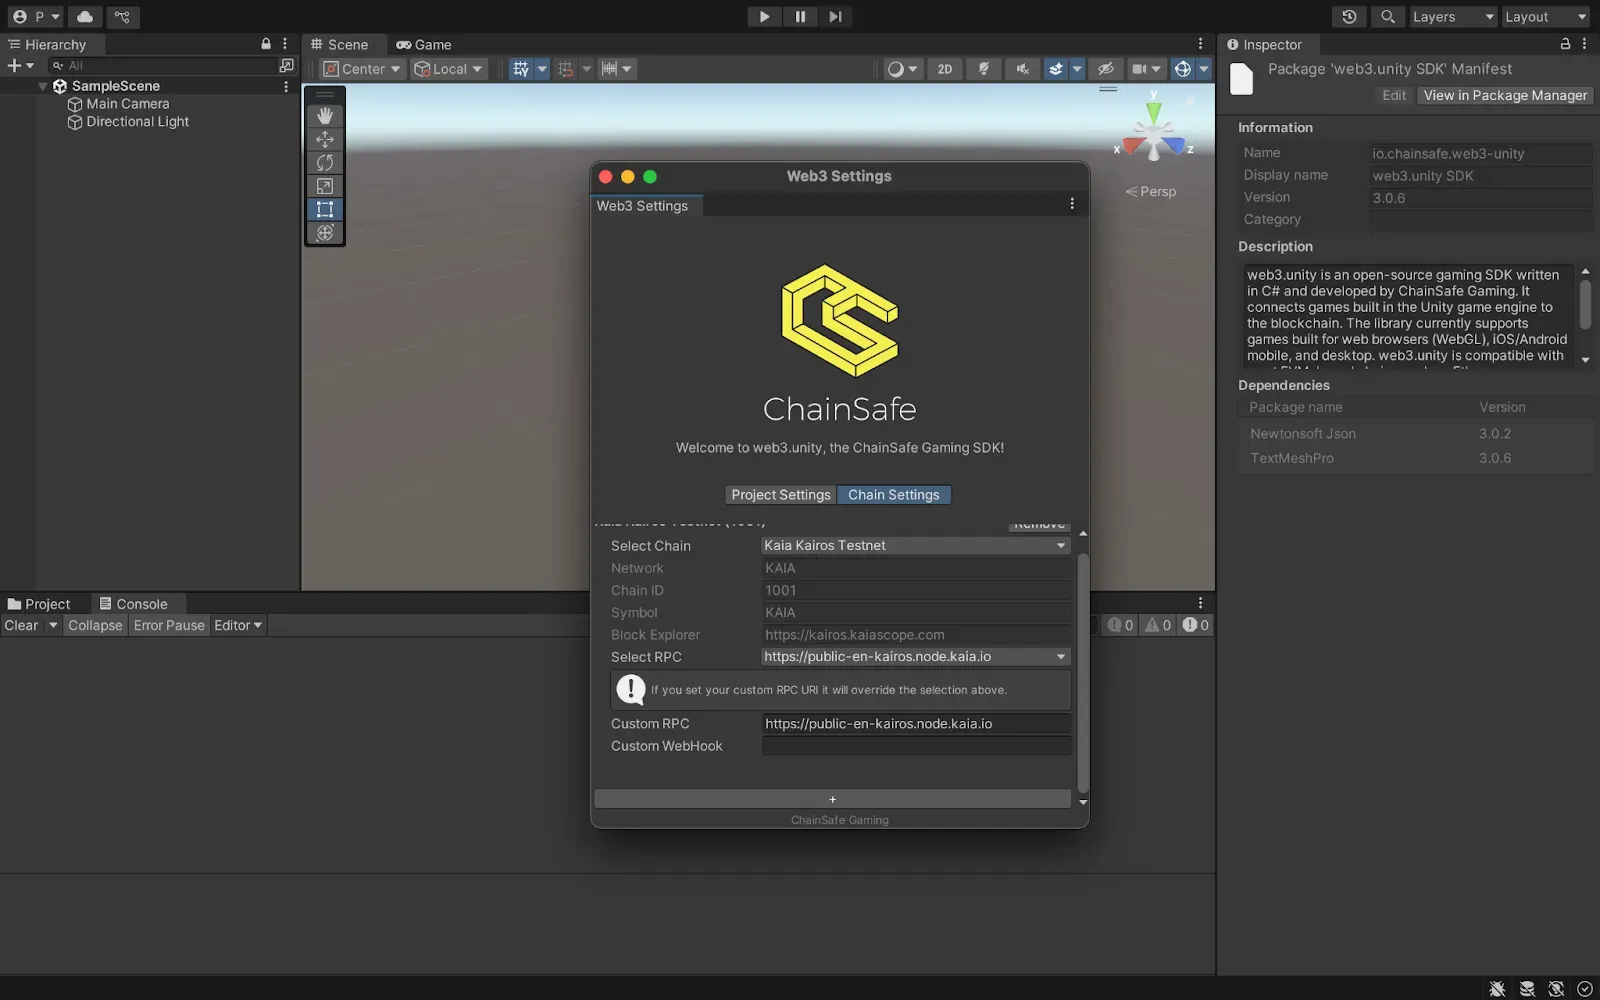
- Navigate to the chainsafe dashboard to create your project and grab your project ID.
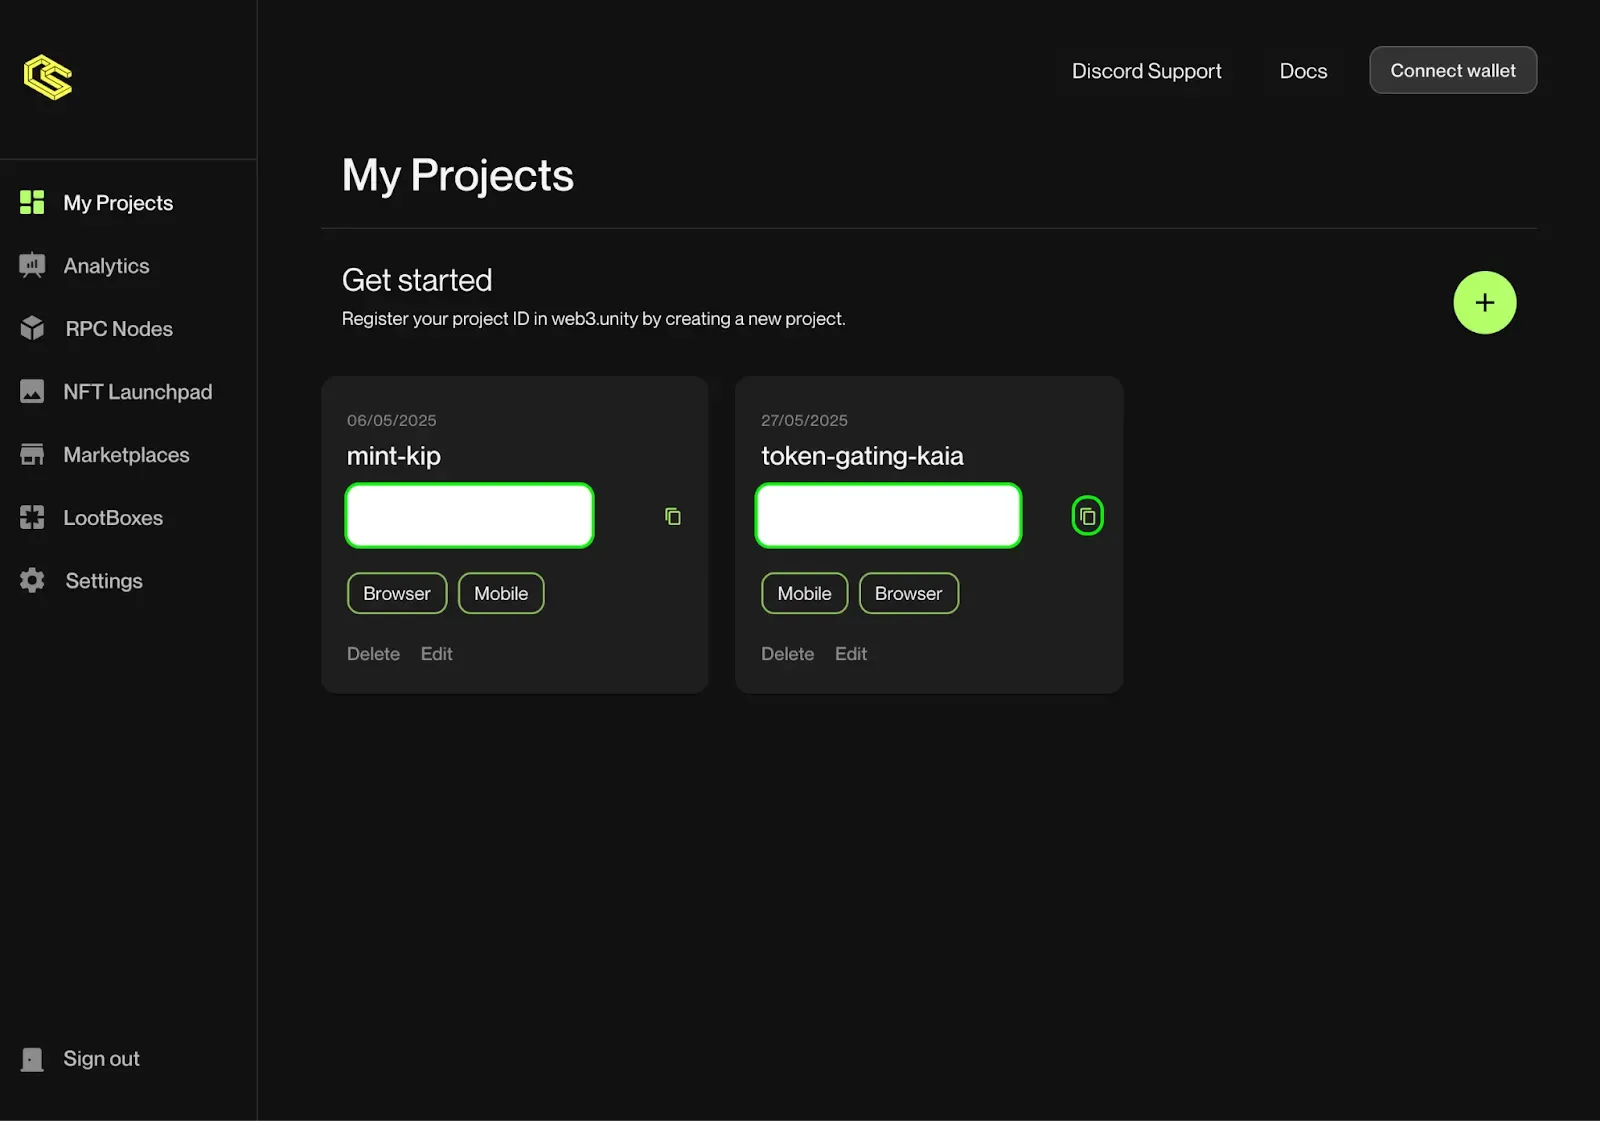
- Paste your project ID into your network settings and configure the chain to Kaia Kairos Testnet
Setting Up the Game Scene
We need to prepare our scene for Web3 functionality:
Loading the Scene
- Under Assets > Scenes, double click on SampleScene. This will be where all our token functionality lives
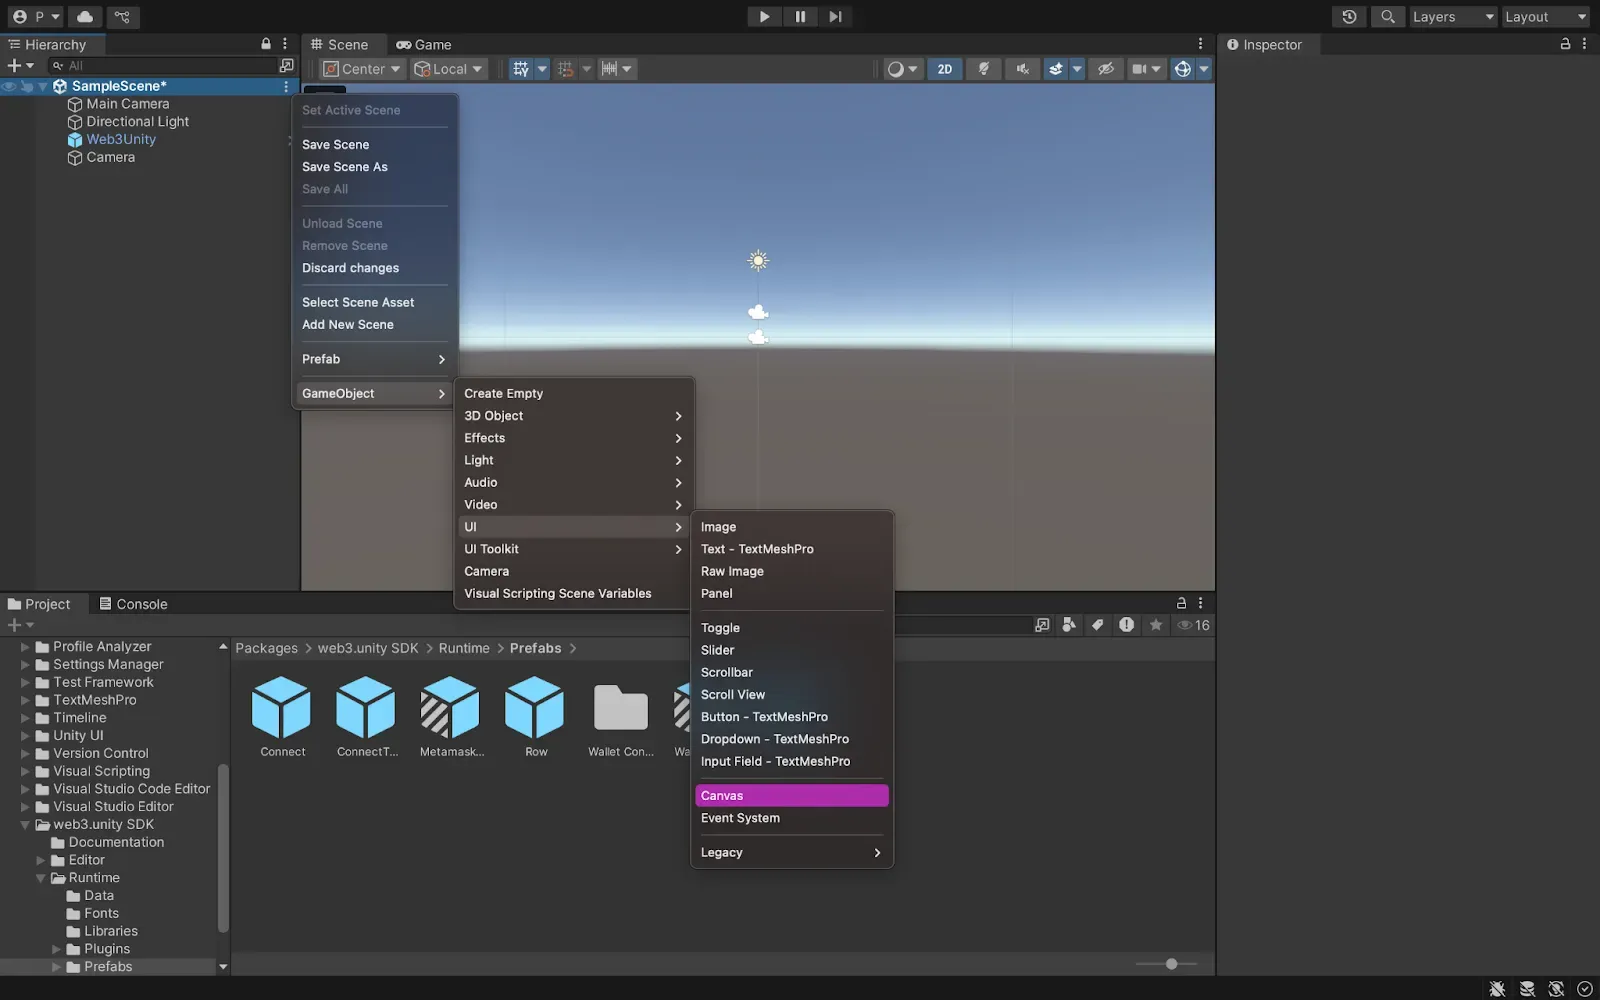
Adding Web3Unity Prefab
- Navigate to Packages > web3.unity SDK > Runtime > Prefabs
- Drag the Web3Unity Prefab into your scene hierarchy
- Go to Connection Handler and expand the connection provider dropdown
- Click “Add Provider” under MetaMask to add MetaMask as the wallet provider
Creating the UI Canvas
- Right click in the scene hierarchy
- Navigate to GameObject > UI > Canvas
- Copy the ConnectToWallet prefab from Packages > web3.unity SDK > Runtime > Prefabs
- Paste it as a child of the Canvas
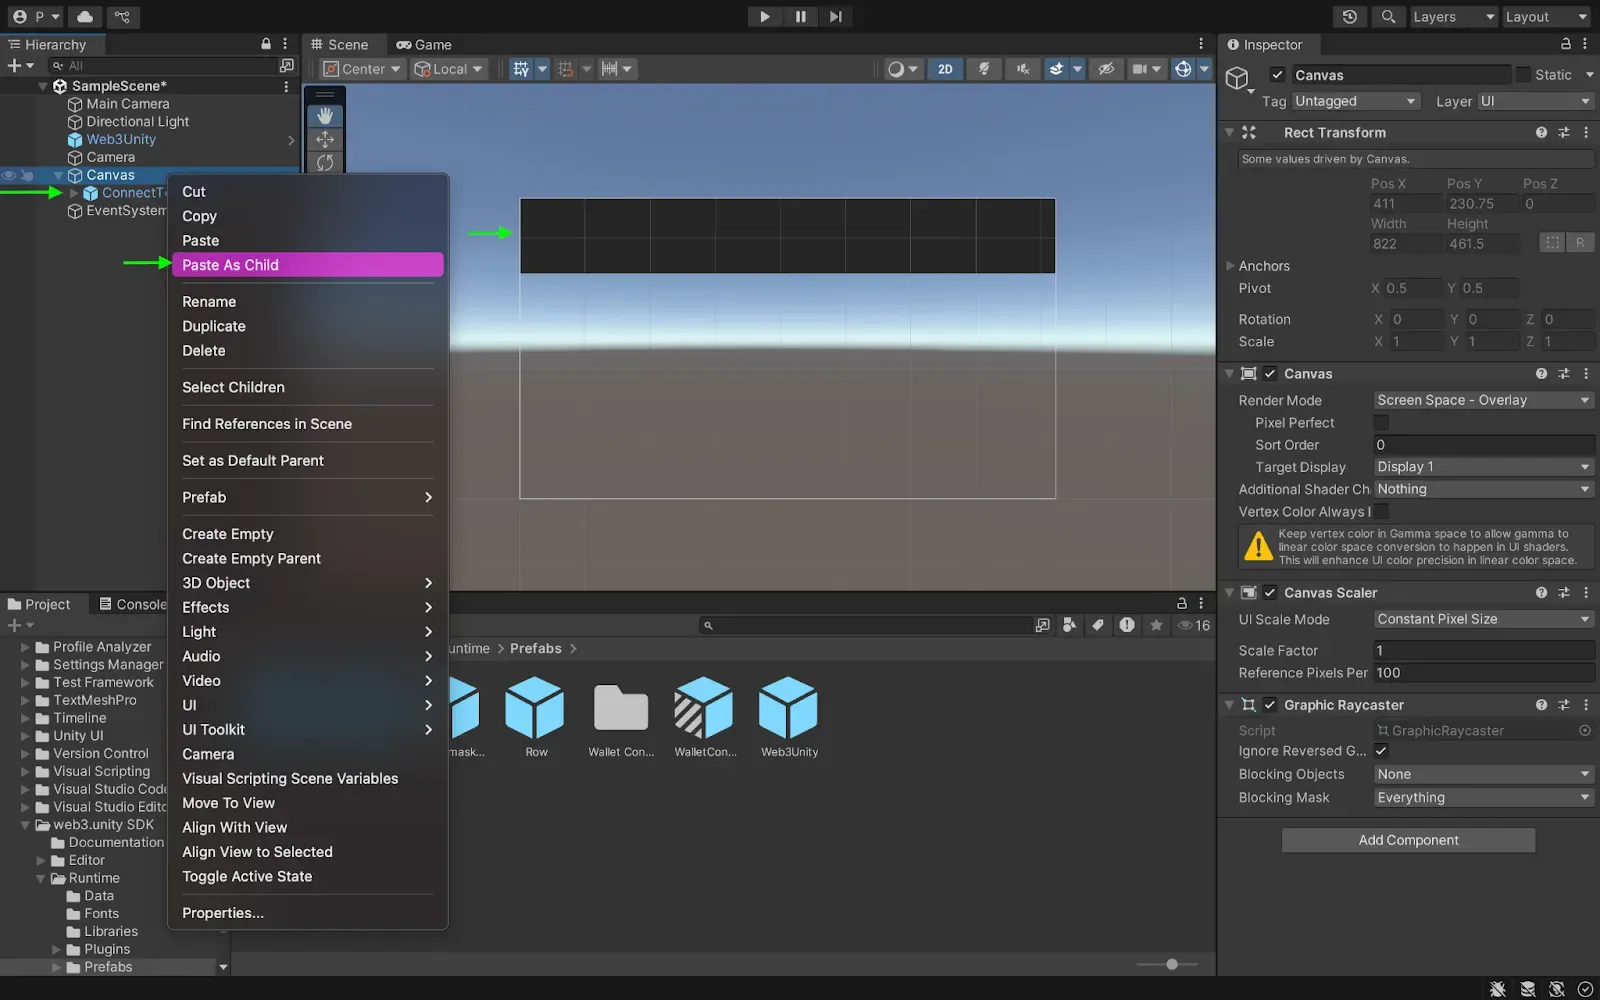
This prefab handles all blockchain connections and wallet management
Creating and deploying NFT smart contract using Thirdweb
In this section we will deploy an NFT drop contract using the thirdweb dashboard. This contract allows players to claim an NFT having fulfilled the claim condition set by the creator of the NFT. We would create and deploy the NFT drop contracts in the following steps:
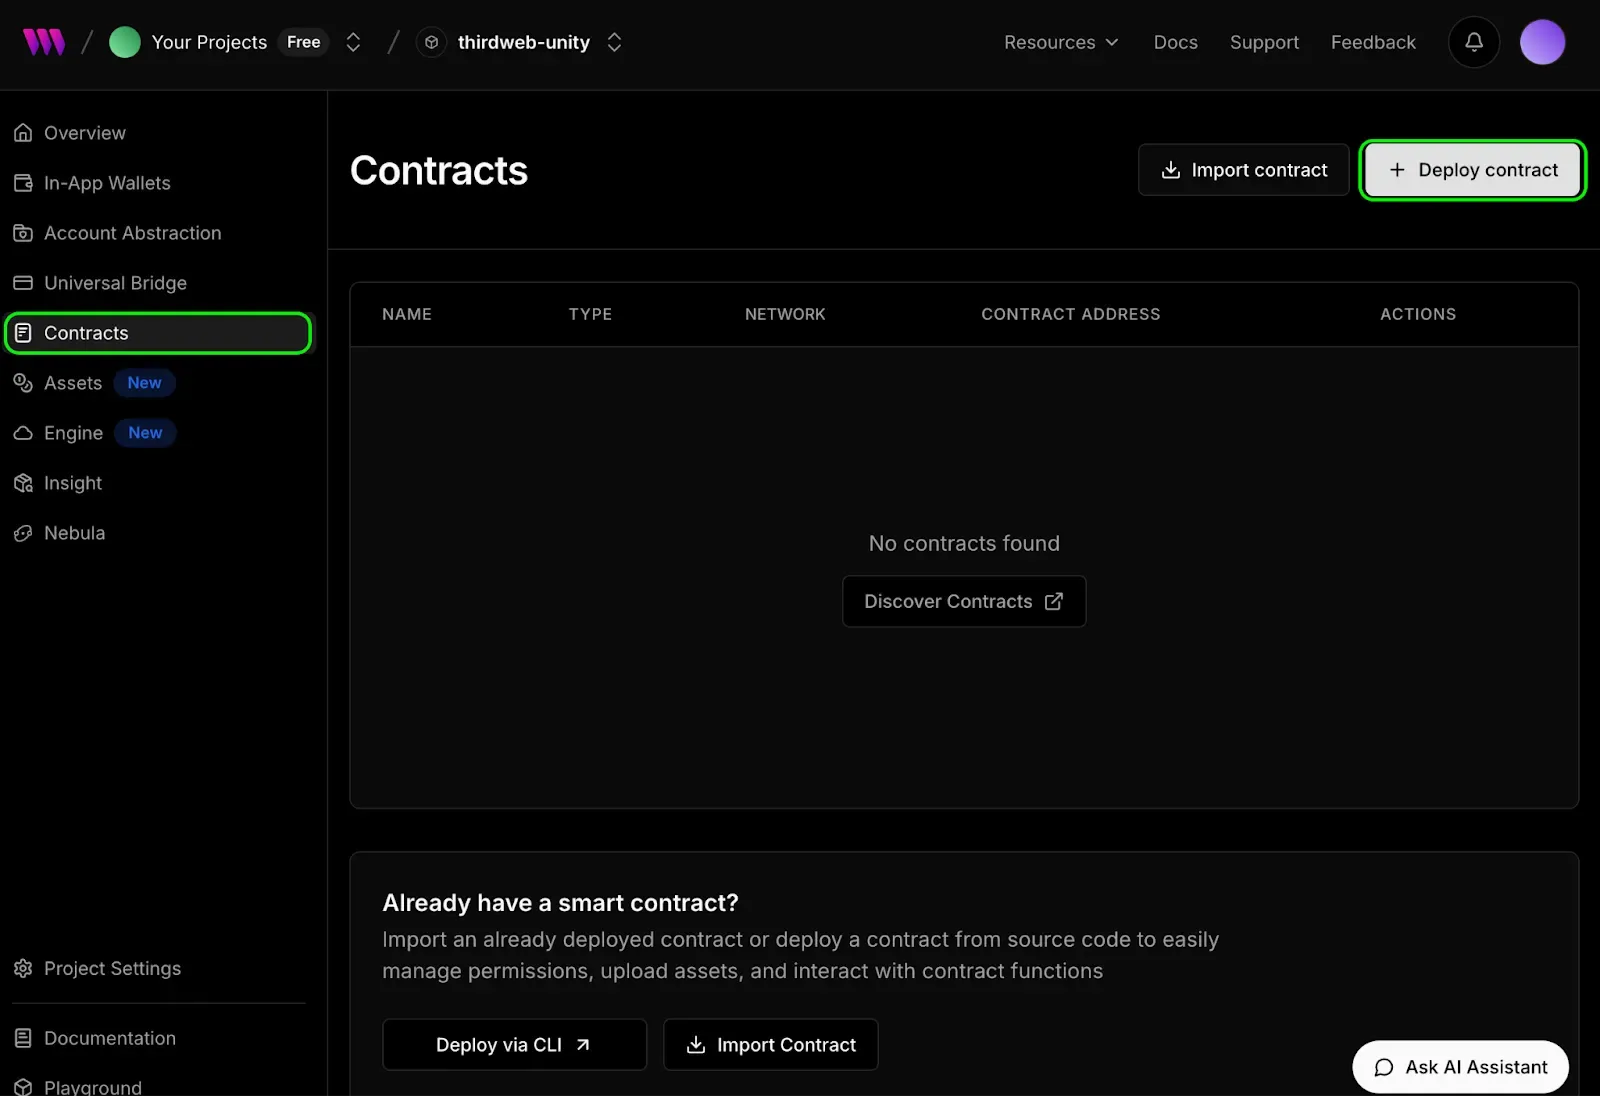
- Navigate to the contracts tab in your created project interface and click the Deploy Contract button
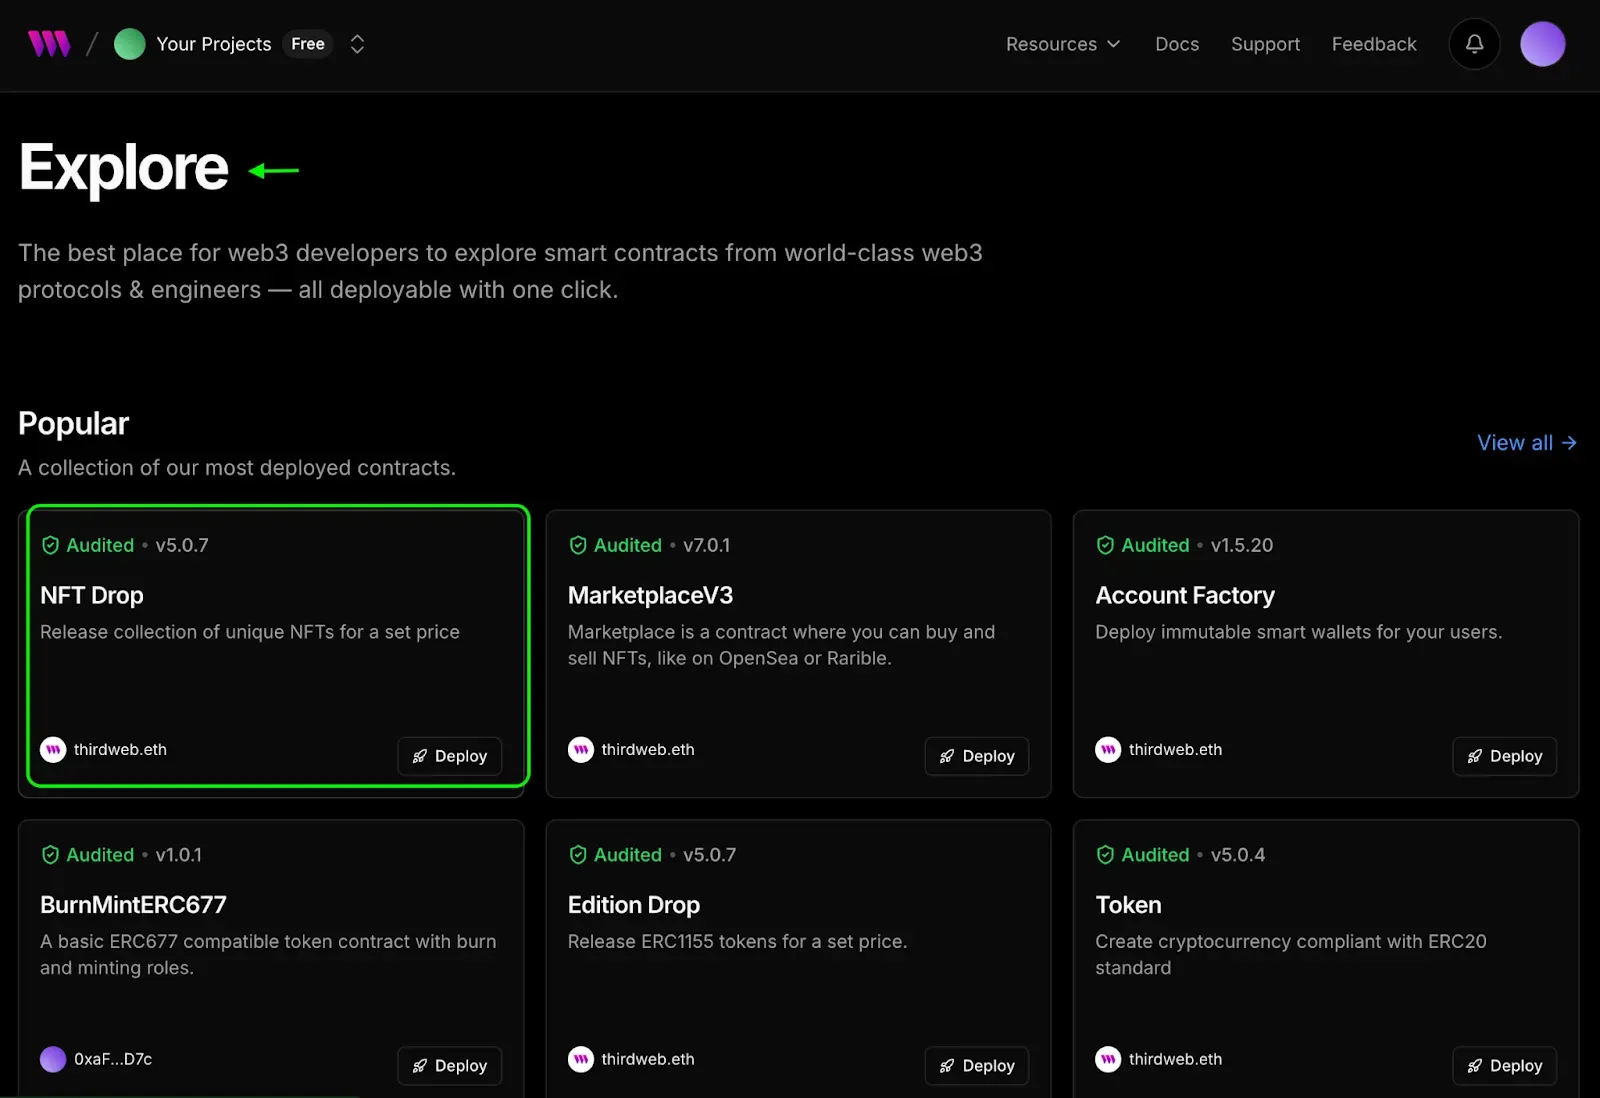
- Select the NFT Drop contract in the explore page
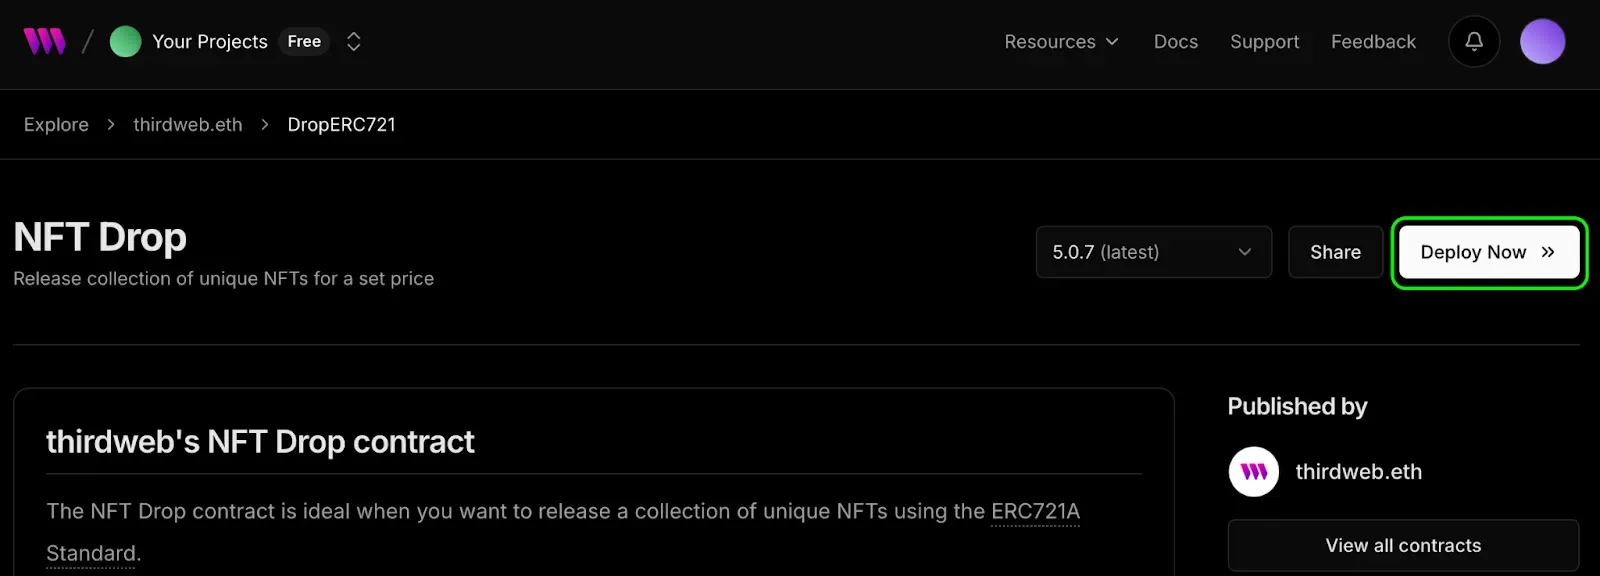
- Click on the Deploy Now button
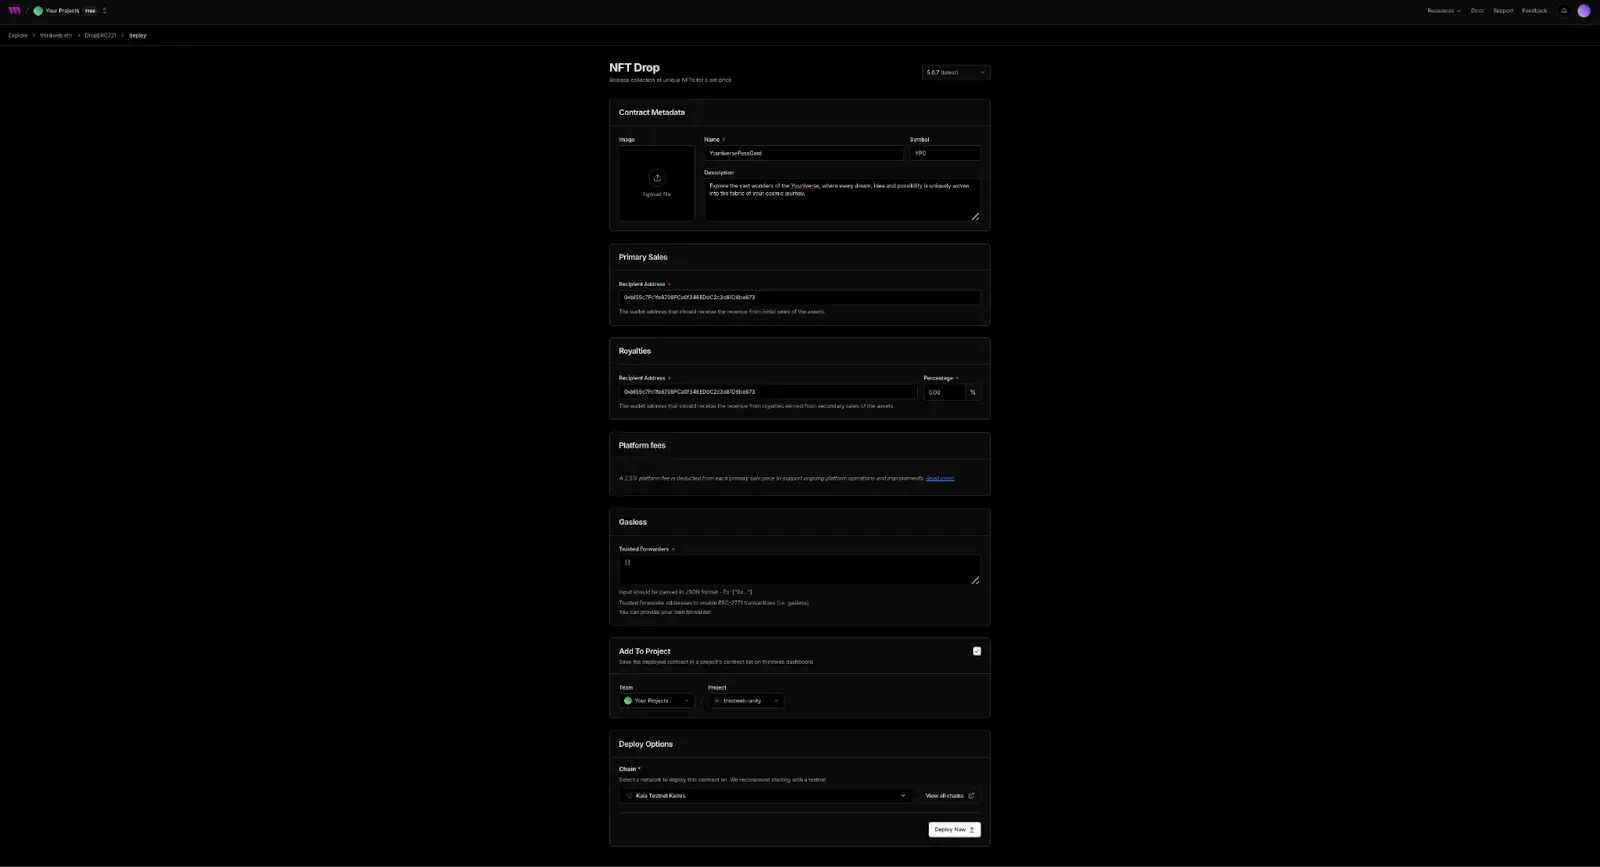
- Fill in the contract parameters such as NAME (YouniversePassCard), SYMBOL (YPC), Description etc, configure the chain (Kaia Testnet Kairos) you want to deploy to and hit the Deploy Now button.
- Confirm the transaction and wait for your contract to be deployed and added to the contract dashboard.
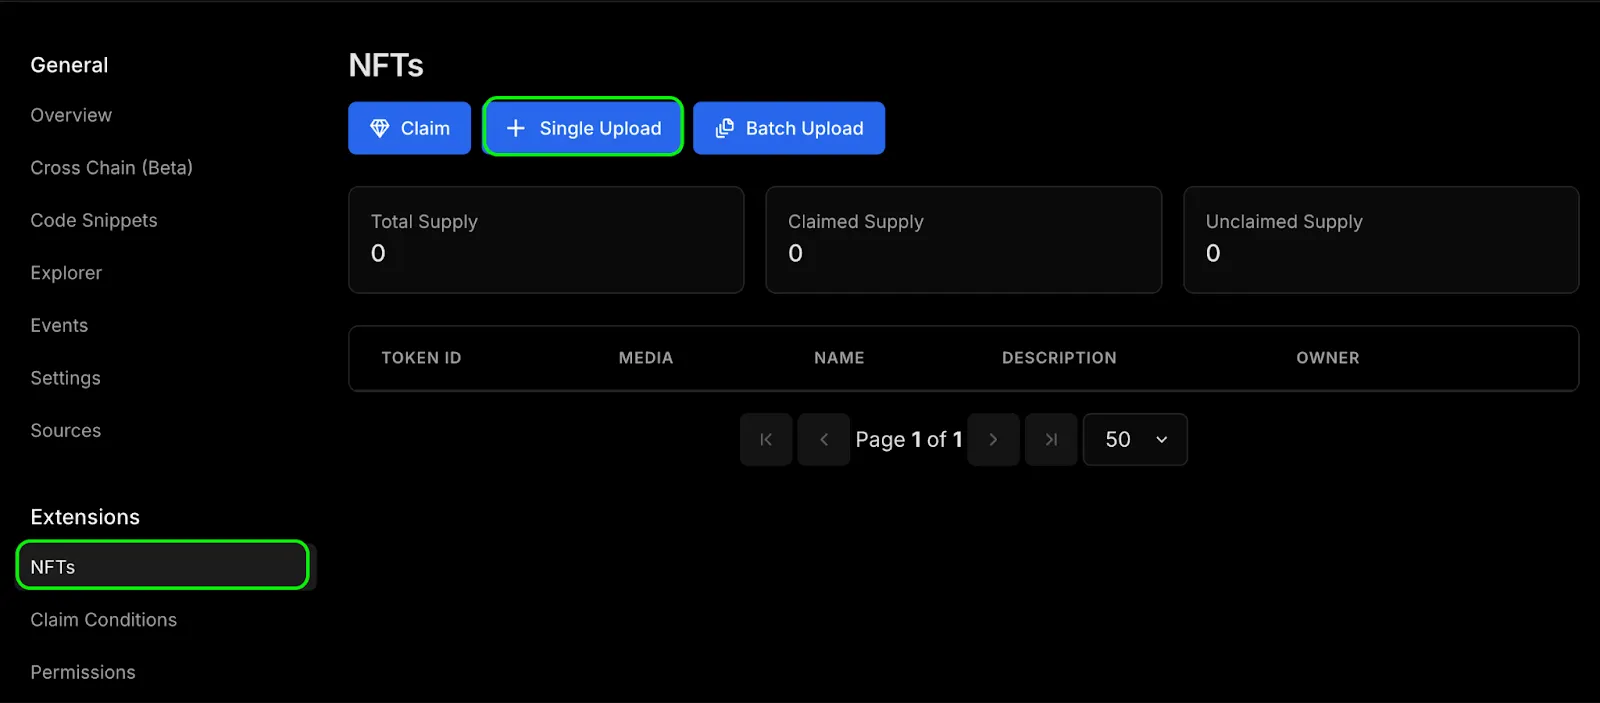
- Once the newly deployed contract dashboard is loaded, navigate to NFT section to lazy-mint new tokens by clicking the Single Upload button
- Fill in the metadata of the NFT you want to mint
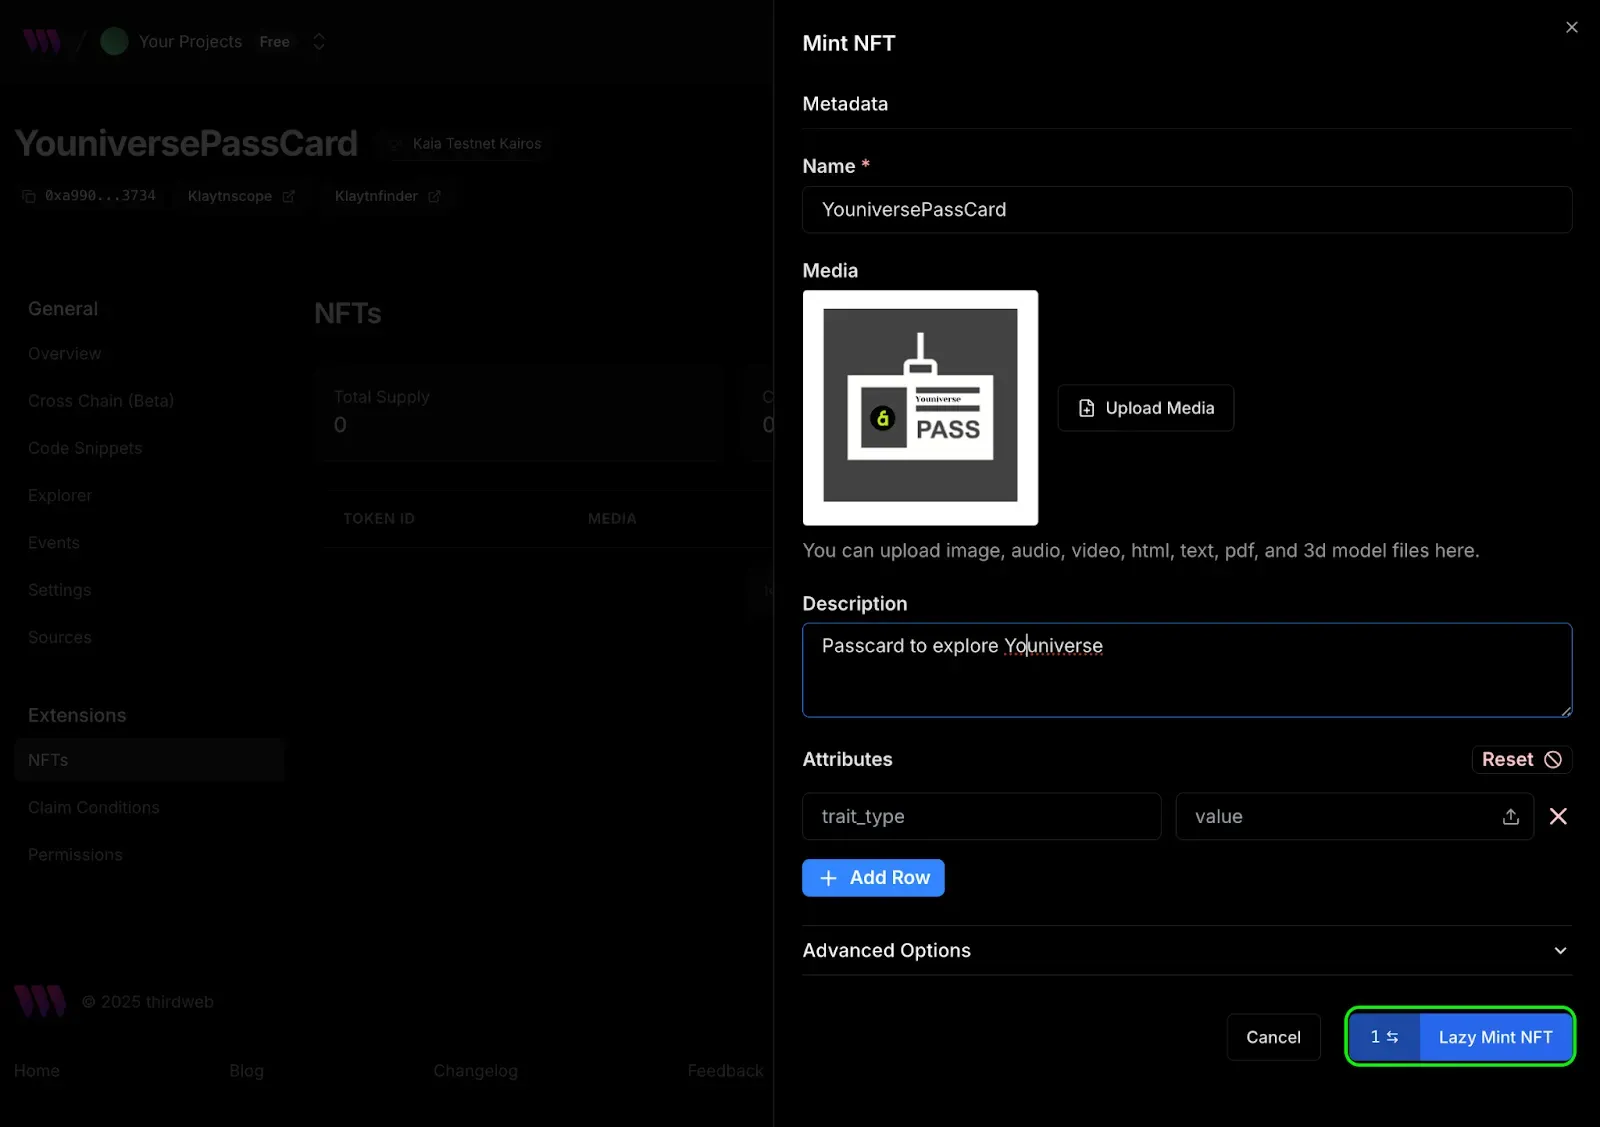
- Confirm the transaction and wait for the mint process to be completed.
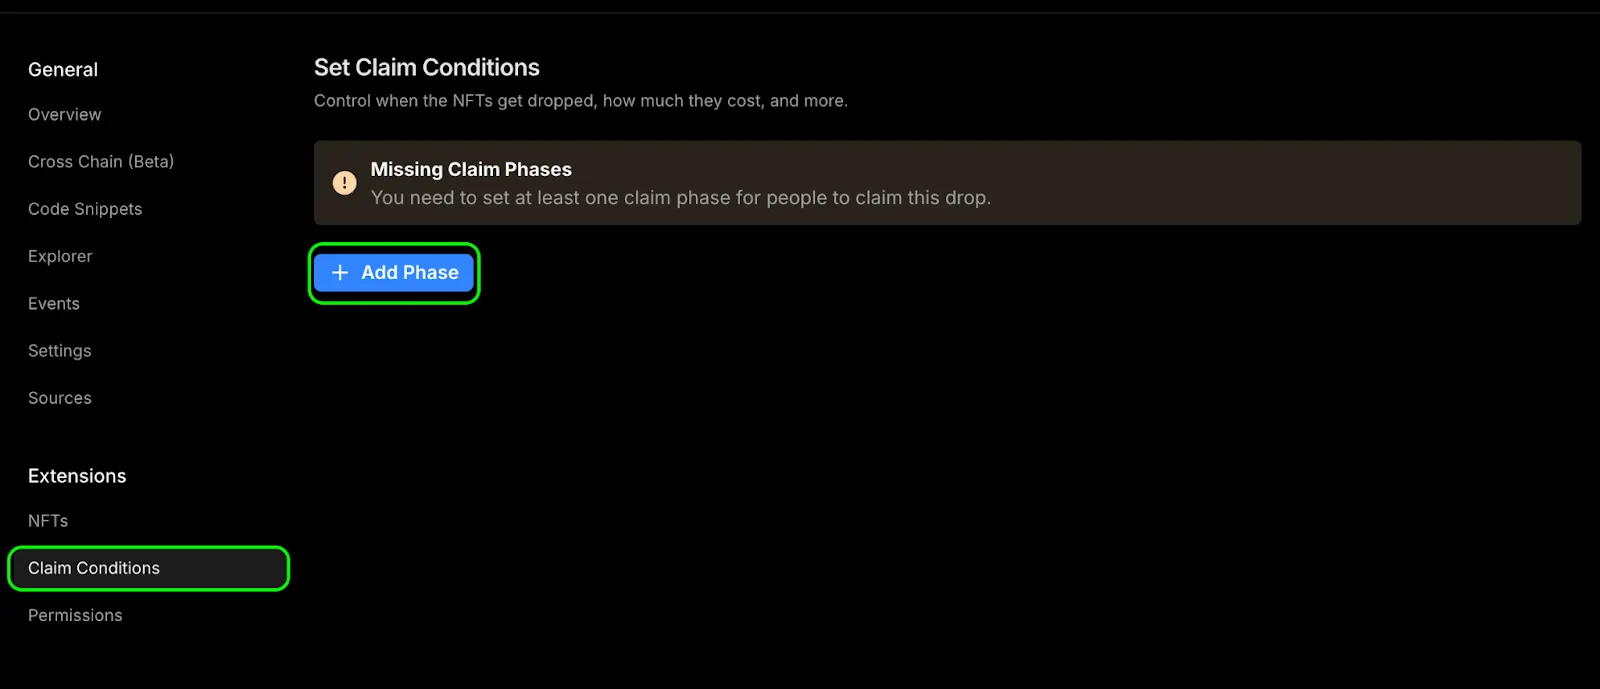
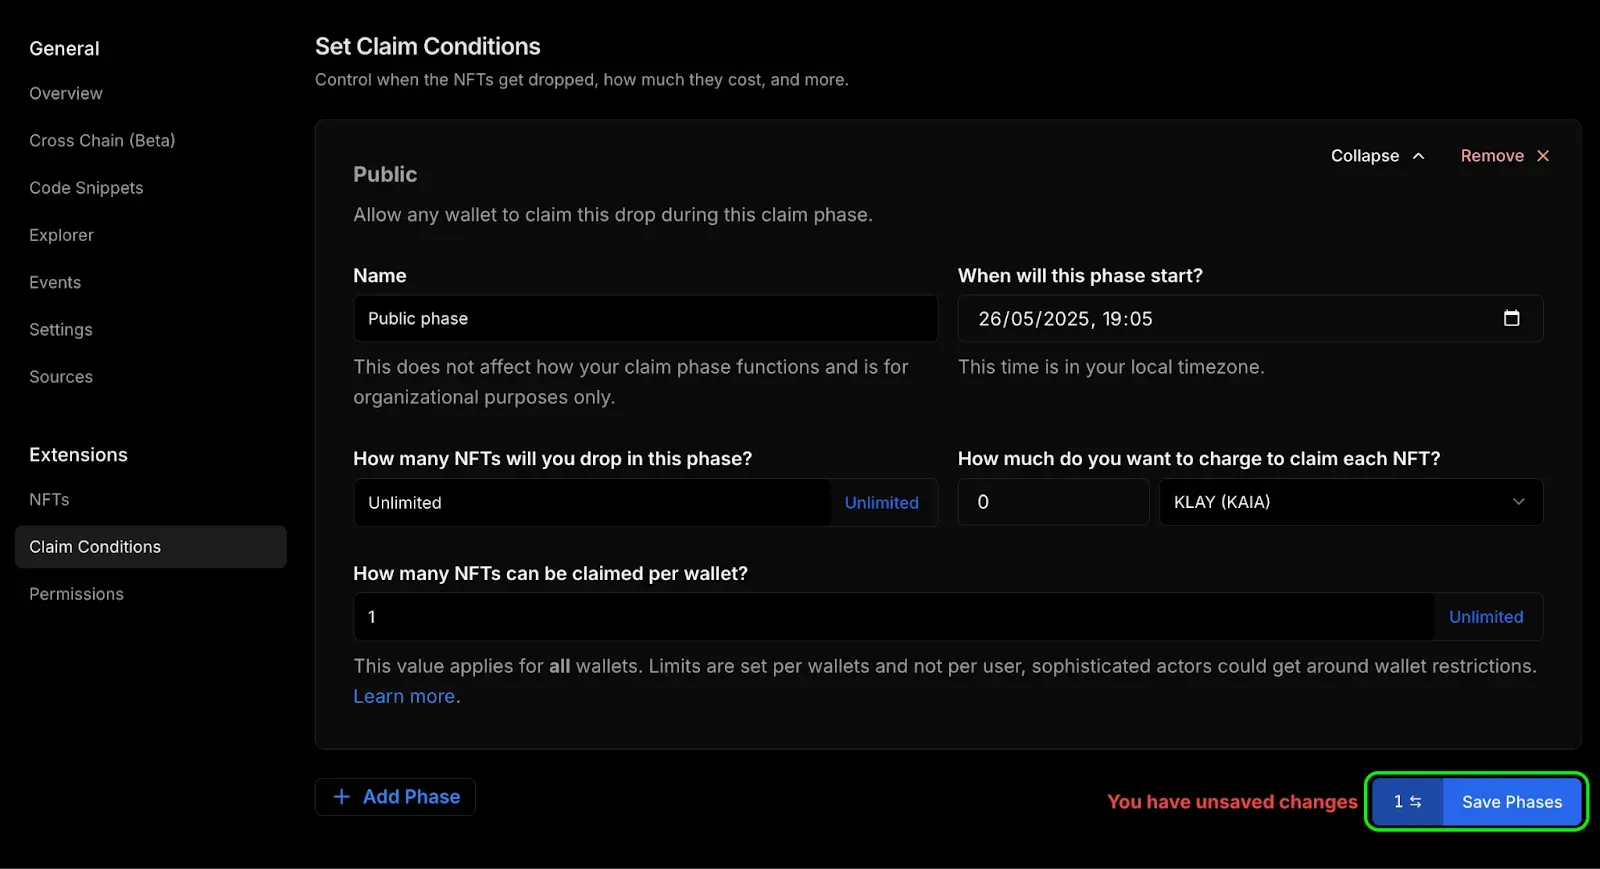
Next is to set the claim condition for the newly minted NFT so that game players can easily claim. To set the claim condition, do the following:
- Navigate to the Claim Condition section under the extension tab and click the Add Phase button
- Select the Public option from the add phase option
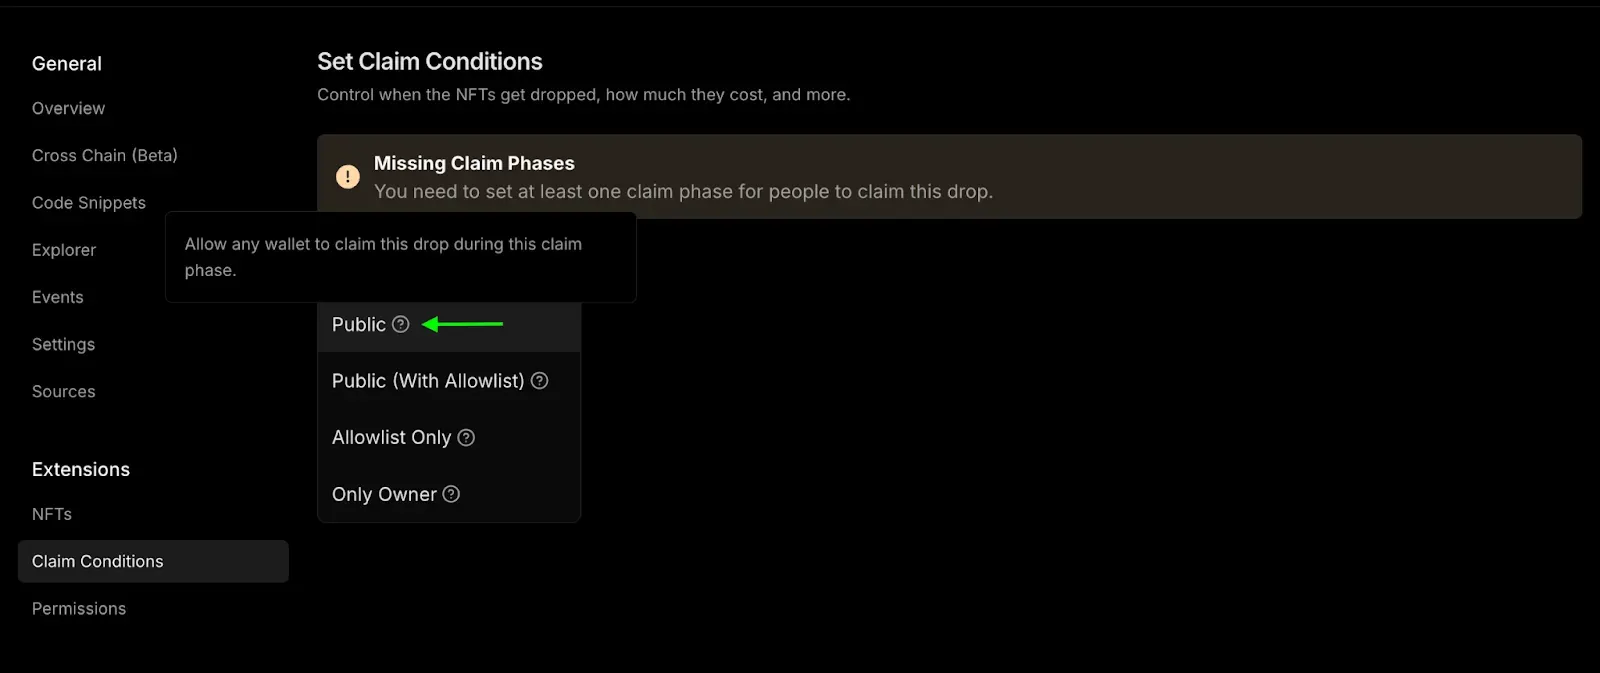
- Fill in the claim conditions you want during this claim phase. As you can see below, we did set the following:
- How many NFTs will you drop in this phase: Unlimited
- How much do you want to charge to claim each NFT: 0 KAIA
- How many NFTs can be claimed per wallet: 1
- Click the Save Phases button to save this claim phase.
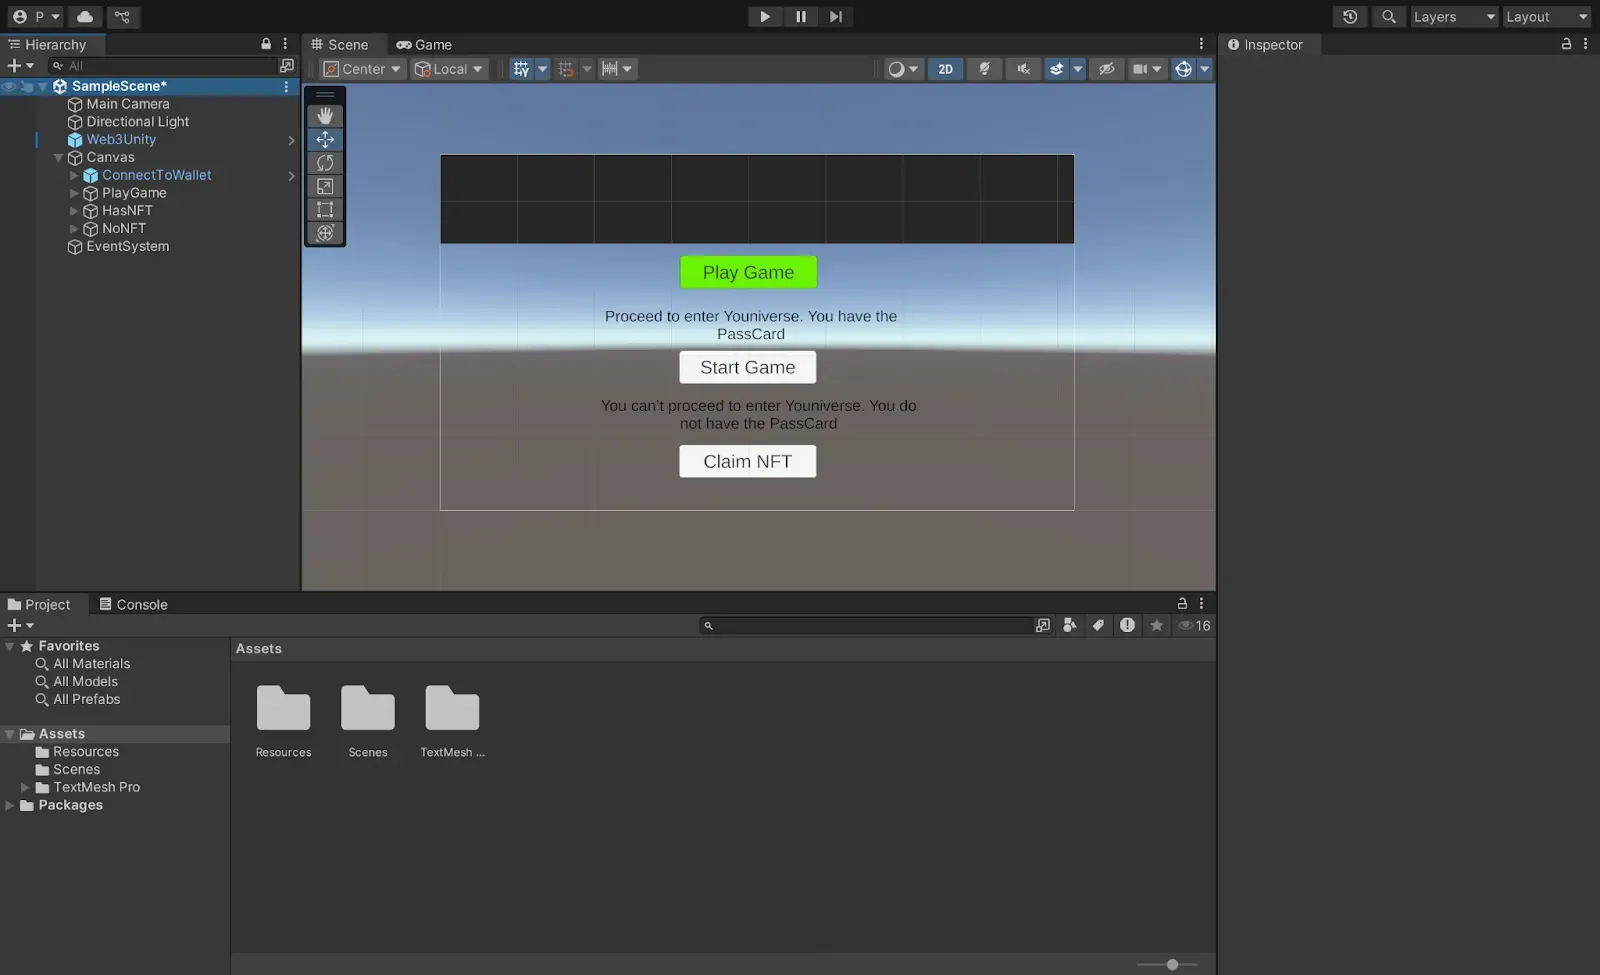
Creating game objects
In this section, we will create 3 game objects with their corresponding sub-components, which are:
a. playGame: This is a button component which when clicked checks if the player has the Youniverse PassCard NFT or not and is eligible to start the game.
b. hasNFT: This is a combination of text and button UI components. It is displayed when the player has the PassCard NFT
c. noNFT : This is a combination of text and button UI components. It is displayed when the player doesn’t have the PassCard NFT.
To create the playGame component,
- Right-click on the Canvas, click on UI → Button (Text Mesh Pro) and rename the button to PlayGame
- Make sure to rename the Text UI component to “Play Game”
To create the hasNFT component,
- Right-click on the Canvas component, click on UI → Text Mesh Pro and rename the text object to HasNFT
- Make sure to fill the text object with the text you want the player to see if verified to have a PassCard NFT. For example “Proceed to enter Youniverse. You have the PassCard”
- Right-click on the HasNFT component, click on UI → Button (Text Mesh Pro) and rename the text to StartGame. This button allows passCard NFT owners to start the game.
- Make sure to rename the Button Text to Start Game.
To create the noNFT component,
- Right-click on the Canvas component, click on UI → Text Mesh Pro and rename the text object to NoNFT
- Make sure to fill the text object with the text you want the player to see if verified not to have a PassCard NFT. For example “You can’t proceed to enter Youniverse. You do not have the PassCard”
- Right-click on the NoNFT component, click on UI → Button (Text Mesh Pro) and rename the text to ClaimNFT. This button allows non-passCard NFT holders to be able to claim one.
- Make sure to rename the Button Text to Claim NFT.
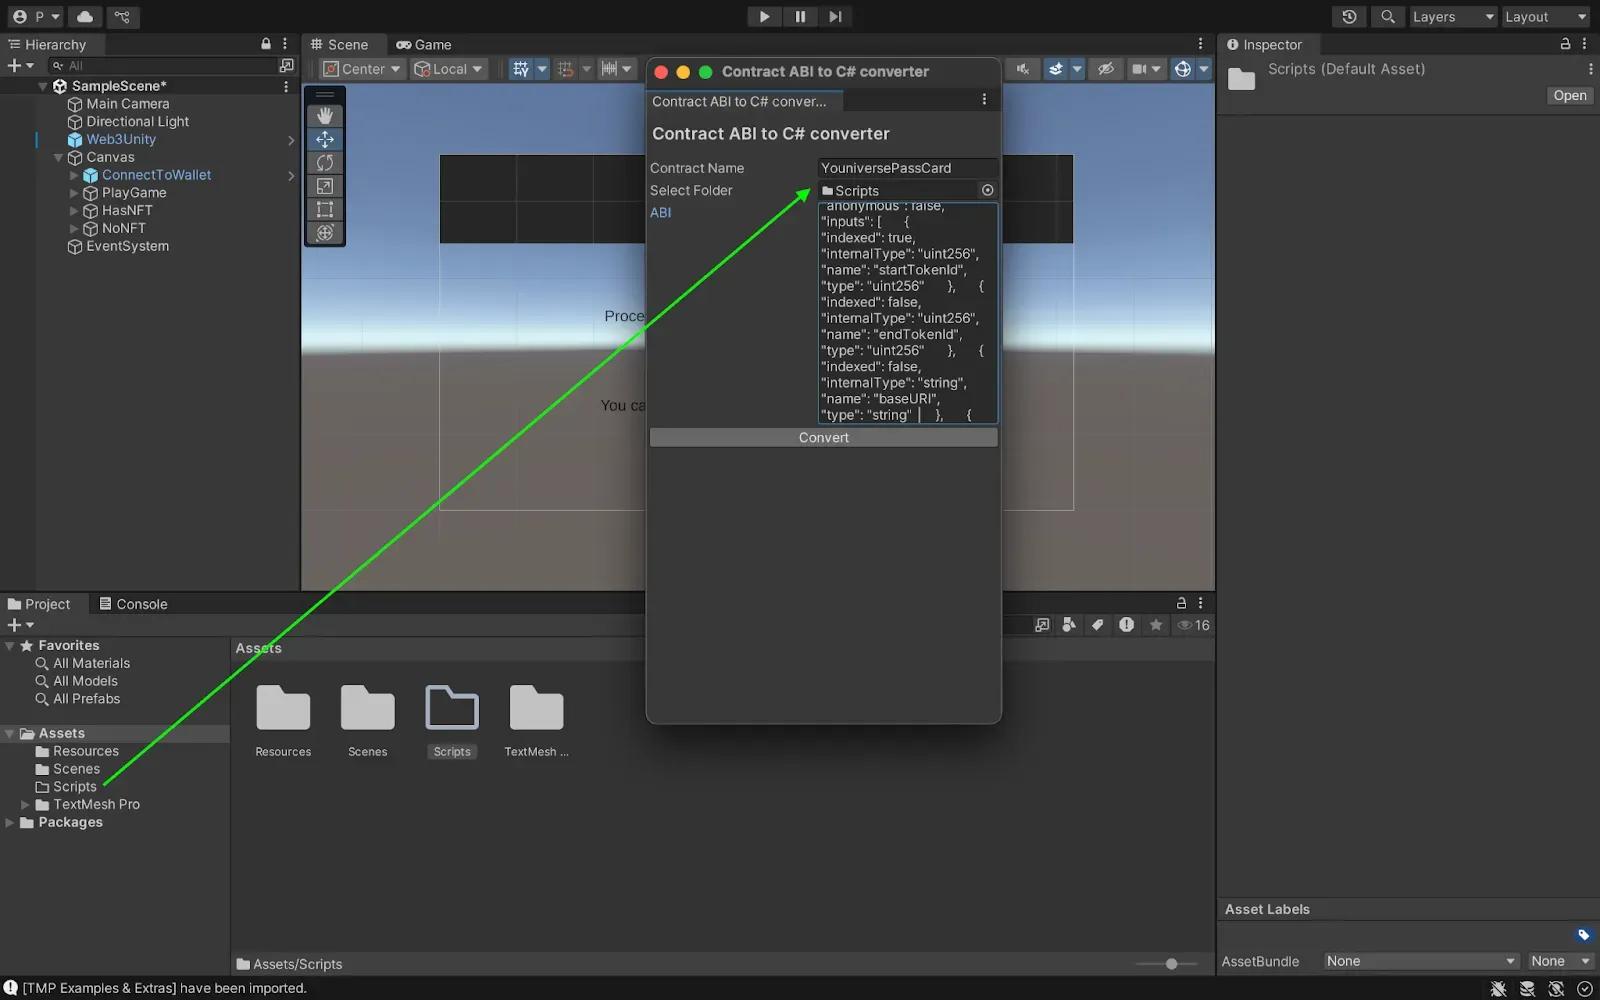
Converting solidity calls to C#
In this section, we will encapsulate all of our contract ABI into more user-friendly, statically typed methods:
- Navigate to Sources Tab on your Thirdweb contract dashboard, Click on the ABI drop down button, and copy the contract ABI for NFT contract
> image - In Unity, navigate to ChainSafe SDK > Contract ABI To C# Generator
- Name your file YouniversePassCard, create a folder called Scripts in your Assets folder, drag and drop the Scripts folder into the folder section, and paste in your ABI. Click convert.
Implementing TokenGating Script
In this step we will create a comprehensive script that handles all token-gating operations. To do so, follow the steps below:
- Create a TokenGating script in your Scripts folder.
- Copy and paste the code below in your newly created scripts file:
using System;
using System.Collections;
using System.Collections.Generic;
using UnityEngine;
using UnityEngine.UI;
using TMPro;
using ChainSafe.Gaming.UnityPackage;
using ChainSafe.Gaming.UnityPackage.Connection;
using ChainSafe.Gaming.Web3;
using ChainSafe.Gaming.Evm.Contracts.Custom;
using System.Numerics;
using System.Threading.Tasks;
using UnityEngine.SceneManagement;
public class YouniversePassCardGate : MonoBehaviour
{
    [Header("Contract Configuration")]
    [SerializeField] private string nftContractAddress;
    [SerializeField] private string connectedWalletAddress;

    [Header("Game UI Components")]
    [SerializeField] private Button playGameButton;

    [Header("Has NFT Component")]
    [SerializeField] private TMP_Text hasNFTText;
    [SerializeField] private Button startGameButton;

    [Header("No NFT Component")]
    [SerializeField] private TMP_Text noNFTText;
    [SerializeField] private Button claimNFTButton;

    [Header("Status Components")]
    [SerializeField] private TMP_Text statusText;

    [Header("Game Configuration")]
    [SerializeField] private string gameSceneName = "GameScene";
    [SerializeField] private string claimCurrency = "0xeeeeeeeeeeeeeeeeeeeeeeeeeeeeeeeeeeeeeeee";

    // Contract and state variables
    private YouniversePassCard nftContract;
    private bool isInitialized = false;
    private bool hasPassCard = false;
    private bool isClaiming = false;
    private void Awake()
    {
        Web3Unity.Web3Initialized += OnWeb3Initialized;

        // Setup button events
        if (playGameButton != null)
            playGameButton.onClick.AddListener(OnPlayGameClicked);

        if (startGameButton != null)
            startGameButton.onClick.AddListener(OnStartGameClicked);

        if (claimNFTButton != null)
            claimNFTButton.onClick.AddListener(OnClaimNFTClicked);

        // Initially show only the play game button
        HideAllComponents();
        ShowPlayGameComponent();
    }
    private async void OnWeb3Initialized((Web3 web3, bool isLightweight) data)
    {
        try
        {
            UpdateStatus("Connecting to blockchain...", Color.yellow);

            // Wait for wallet connection if needed
            if (string.IsNullOrEmpty(data.web3.Signer.PublicAddress))
            {
                UpdateStatus("Waiting for wallet connection...", Color.yellow);
                await WaitForWalletConnection(data.web3);
            }

            // Initialize NFT contract
            nftContract = await data.web3.ContractBuilder.Build<YouniversePassCard>(nftContractAddress);
            connectedWalletAddress = data.web3.Signer.PublicAddress;

            if (string.IsNullOrEmpty(connectedWalletAddress))
            {
                throw new Exception("No wallet address found. Please connect your wallet.");
            }

            isInitialized = true;
            UpdateStatus("Connected successfully!", Color.green);

            if (playGameButton != null)
                playGameButton.interactable = true;

            Debug.Log($"PassCard Gate initialized for wallet: {connectedWalletAddress}");
        }
        catch (Exception ex)
        {
            UpdateStatus($"Connection failed: {ex.Message}", Color.red);
            Debug.LogError($"PassCard gate initialization error: {ex.Message}");

            await Task.Delay(3000);
            UpdateStatus("Please connect your wallet using the ChainSafe connection UI", Color.yellow);
        }
    }
    private async Task WaitForWalletConnection(Web3 web3, int timeoutSeconds = 30)
    {
        int elapsed = 0;
        while (string.IsNullOrEmpty(web3.Signer.PublicAddress) && elapsed < timeoutSeconds)
        {
            UpdateStatus($"Waiting for wallet connection... ({elapsed}s)", Color.yellow);
            await Task.Delay(1000);
            elapsed++;
        }

        if (string.IsNullOrEmpty(web3.Signer.PublicAddress))
        {
            throw new Exception("Wallet connection timeout. Please use the ChainSafe wallet connection UI.");
        }
    }
    public async void OnPlayGameClicked()
    {
        if (!isInitialized)
        {
            UpdateStatus("Please wait for connection to complete", Color.yellow);
            return;
        }
        UpdateStatus("Checking PassCard NFT...", Color.yellow);
        HideAllComponents();

        try
        {
            hasPassCard = await CheckPassCardOwnership();

            if (hasPassCard)
            {
                ShowHasNFTComponent();
            }
            else
            {
                ShowNoNFTComponent();
            }
        }
        catch (Exception ex)
        {
            UpdateStatus($"Error checking NFT: {ex.Message}", Color.red);
            Debug.LogError($"PassCard check error: {ex.Message}");
            ShowPlayGameComponent();
        }
    }
    private async Task<bool> CheckPassCardOwnership()
    {
        try
        {
            var balance = await nftContract.BalanceOf(connectedWalletAddress);
            return balance > 0;
        }
        catch (Exception ex)
        {
            Debug.LogError($"Error checking PassCard ownership: {ex.Message}");
            return false;
        }
    }
    private void ShowPlayGameComponent()
    {
        if (playGameButton != null)
        {
            playGameButton.gameObject.SetActive(true);
            playGameButton.interactable = isInitialized;
        }
    }
    private void ShowHasNFTComponent()
    {
        if (hasNFTText != null)
        {
            hasNFTText.gameObject.SetActive(true);
            hasNFTText.text = "Proceed to enter Youniverse. You have the PassCard";
        }

        if (startGameButton != null)
        {
            startGameButton.gameObject.SetActive(true);
            startGameButton.interactable = true;
        }

        UpdateStatus("Welcome, PassCard holder!", Color.green);
    }
    private void ShowNoNFTComponent()
    {
        if (noNFTText != null)
        {
            noNFTText.gameObject.SetActive(true);
            noNFTText.text = "You can't proceed to enter Youniverse. You do not have the PassCard";
        }

        if (claimNFTButton != null)
        {
            claimNFTButton.gameObject.SetActive(true);
            claimNFTButton.interactable = true && !isClaiming;
        }

        UpdateStatus("PassCard required to play", Color.red);
    }
    private void HideAllComponents()
    {
        if (playGameButton != null) playGameButton.gameObject.SetActive(false);
        if (hasNFTText != null) hasNFTText.gameObject.SetActive(false);
        if (startGameButton != null) startGameButton.gameObject.SetActive(false);
        if (noNFTText != null) noNFTText.gameObject.SetActive(false);
        if (claimNFTButton != null) claimNFTButton.gameObject.SetActive(false);
    }
    private void OnStartGameClicked()
    {
        StartGameMethod();
    }
    public async void OnClaimNFTClicked()
    {
        if (!isInitialized)
        {
            UpdateStatus("Please wait for connection to complete", Color.yellow);
            return;
        }
        if (isClaiming)
        {
            UpdateStatus("Claiming in progress, please wait...", Color.yellow);
            return;
        }
        UpdateStatus("Refreshing contract state...", Color.yellow);
        await RefreshContractState();

        await ClaimPassCard();
    }
    private async Task RefreshContractState()
    {
        try
        {
            await Task.Delay(1000);

            var nextTokenToClaim = await nftContract.NextTokenIdToClaim();
            var totalSupply = await nftContract.TotalSupply();

            if (nextTokenToClaim == 0 && totalSupply > 0)
            {
                UpdateStatus("NFTs found but claim state syncing... Trying anyway.", new Color(1f, 0.6f, 0f));
            }
            else if (nextTokenToClaim > 0)
            {
                UpdateStatus("NFTs ready to claim!", Color.green);
            }
        }
        catch (Exception ex)
        {
            Debug.LogWarning($"Could not refresh contract state: {ex.Message}");
        }
    }
    private void StartGameMethod()
    {
        UpdateStatus("Starting game...", Color.green);

        if (!string.IsNullOrEmpty(gameSceneName))
        {
            SceneManager.LoadScene(gameSceneName);
        }
        else
        {
            UpdateStatus("Game started! Welcome to Youniverse!", Color.green);
        }
    }
    private async Task ClaimPassCard()
    {
        isClaiming = true;

        try
        {
            UpdateStatus("Claiming your PassCard...", Color.yellow);

            if (claimNFTButton != null)
                claimNFTButton.interactable = false;
            BigInteger initialBalance = await nftContract.BalanceOf(connectedWalletAddress);

            UpdateStatus("Preparing claim transaction...", Color.yellow);

            // Create allowlist proof with correct structure
            var allowlistProof = new ChainSafe.Gaming.Evm.Contracts.Custom.Tuple
            {
                Proof = new byte[0][], // Empty proof array for public claim
                QuantityLimitPerWallet = BigInteger.One, // 1 per wallet limit
                PricePerToken = BigInteger.Zero, // Free claim
                Currency = claimCurrency // Native currency
            };

            byte[] data = new byte[0]; // Empty data

            try
            {
                UpdateStatus("Please check MetaMask and approve the transaction", new Color(1f, 0.8f, 0f));

                var claimTask = nftContract.Claim(
                    connectedWalletAddress,
                    BigInteger.One,
                    claimCurrency,
                    BigInteger.Zero,
                    allowlistProof,
                    data
                );

                UpdateStatus("Transaction sent - waiting for blockchain confirmation...", Color.yellow);
                await Task.Delay(5000);

            }
            catch (Exception claimEx)
            {
                Debug.LogWarning($"Claim call exception (may be normal): {claimEx.Message}");
                UpdateStatus("Transaction processing - checking results...", Color.yellow);
            }

            await VerifyClaimSuccessWithRetries(initialBalance);
        }
        catch (Exception ex)
        {
            string errorMessage = GetUserFriendlyError(ex.Message);
            UpdateStatus($"Error claiming PassCard: {errorMessage}", Color.red);
            Debug.LogError($"Claim error: {ex.Message}");
        }
        finally
        {
            isClaiming = false;

            if (claimNFTButton != null && claimNFTButton.gameObject.activeInHierarchy)
                claimNFTButton.interactable = true;
        }
    }
    private string GetUserFriendlyError(string technicalError)
    {
        if (technicalError.Contains("execution reverted"))
        {
            if (technicalError.Contains("Already claimed") || technicalError.Contains("already minted"))
                return "You have already claimed your PassCard";
            else if (technicalError.Contains("Max supply") || technicalError.Contains("sold out"))
                return "All PassCards have been claimed";
            else if (technicalError.Contains("Not eligible") || technicalError.Contains("not allowed"))
                return "You are not eligible to claim a PassCard";
            else if (technicalError.Contains("Claim not active") || technicalError.Contains("not started"))
                return "Claiming is not currently active";
            else
                return "Claim conditions not met. Please check if claiming is available.";
        }
        else if (technicalError.Contains("insufficient funds"))
        {
            return "Insufficient funds for transaction gas";
        }
        else if (technicalError.Contains("user rejected"))
        {
            return "Transaction was rejected";
        }
        else
        {
            return "Transaction failed. Please try again.";
        }
    }
    private async Task VerifyClaimSuccessWithRetries(BigInteger initialBalance)
    {
        const int maxRetries = 10;
        const int delayBetweenRetries = 3000;

        for (int attempt = 1; attempt <= maxRetries; attempt++)
        {
            try
            {
                if (attempt <= 3)
                {
                    UpdateStatus($"Waiting for MetaMask confirmation... ({attempt}/3)", new Color(1f, 0.8f, 0f));
                }
                else if (attempt <= 6)
                {
                    UpdateStatus($"Transaction pending - checking blockchain... ({attempt}/{maxRetries})", Color.yellow);
                }
                else
                {
                    UpdateStatus($"Still checking transaction status... ({attempt}/{maxRetries})", Color.yellow);
                }

                await Task.Delay(delayBetweenRetries);

                BigInteger newBalance = await nftContract.BalanceOf(connectedWalletAddress);

                if (newBalance > initialBalance)
                {
                    BigInteger claimedAmount = newBalance - initialBalance;
                    UpdateStatus($"🎉 PassCard claimed successfully! You now own {claimedAmount} PassCard(s)", Color.green);

                    hasPassCard = true;

                    await Task.Delay(2000);
                    HideAllComponents();
                    ShowHasNFTComponent();

                    return;
                }

                if (attempt == maxRetries)
                {
                    UpdateStatus("Transaction not detected. Check MetaMask - you may need to retry or the transaction might still be processing.", new Color(1f, 0.6f, 0f));
                }
            }
            catch (Exception ex)
            {
                Debug.LogWarning($"Verification attempt {attempt} failed: {ex.Message}");

                if (attempt <= 3)
                {
                    UpdateStatus("Connecting to blockchain... Please ensure MetaMask transaction was approved.", new Color(1f, 0.8f, 0f));
                }
                else if (attempt == maxRetries)
                {
                    UpdateStatus("Unable to verify transaction. Please check MetaMask and refresh if needed.", Color.red);
                }
            }
        }
    }
    private void UpdateStatus(string message, Color color)
    {
        if (statusText != null)
        {
            statusText.text = message;
            statusText.color = color;
        }
        Debug.Log($"[PassCardGate] {message}");
    }
    // Public methods for external access
    public bool HasPassCard()
    {
        return hasPassCard && isInitialized;
    }
    public bool IsSystemReady()
    {
        return isInitialized;
    }
    public void RefreshPassCardStatus()
    {
        if (isInitialized)
        {
            OnPlayGameClicked();
        }
    }
    // Get additional NFT information
    public async Task<string> GetNFTName()
    {
        if (!isInitialized) return "Not connected";
        try
        {
            return await nftContract.Name();
        }
        catch (Exception ex)
        {
            Debug.LogError($"Error getting NFT name: {ex.Message}");
            return "Unknown";
        }
    }
    public async Task<string> GetNFTSymbol()
    {
        if (!isInitialized) return "Not connected";
        try
        {
            return await nftContract.Symbol();
        }
        catch (Exception ex)
        {
            Debug.LogError($"Error getting NFT symbol: {ex.Message}");
            return "Unknown";
        }
    }
    public async Task<BigInteger> GetTotalSupply()
    {
        if (!isInitialized) return 0;
        try
        {
            return await nftContract.TotalSupply();
        }
        catch (Exception ex)
        {
            Debug.LogError($"Error getting total supply: {ex.Message}");
            return 0;
        }
    }
    private void OnDestroy()
    {
        Web3Unity.Web3Initialized -= OnWeb3Initialized;
        if (nftContract != null)
        {
            nftContract.DisposeAsync().AsTask().Wait();
        }
    }
}
Setting Up the TokenGatingManager GameObject
- Create the TokenGatingManager Object:
- Right-click in the Hierarchy window (root level).
- Select “Create Empty Object”.
- Name it “TokenGatingManager”.
- Attach Your Script:
- Select the TokenManager GameObject.
- In Inspector, click Add Component.
- Search for and select “TokenGating”.
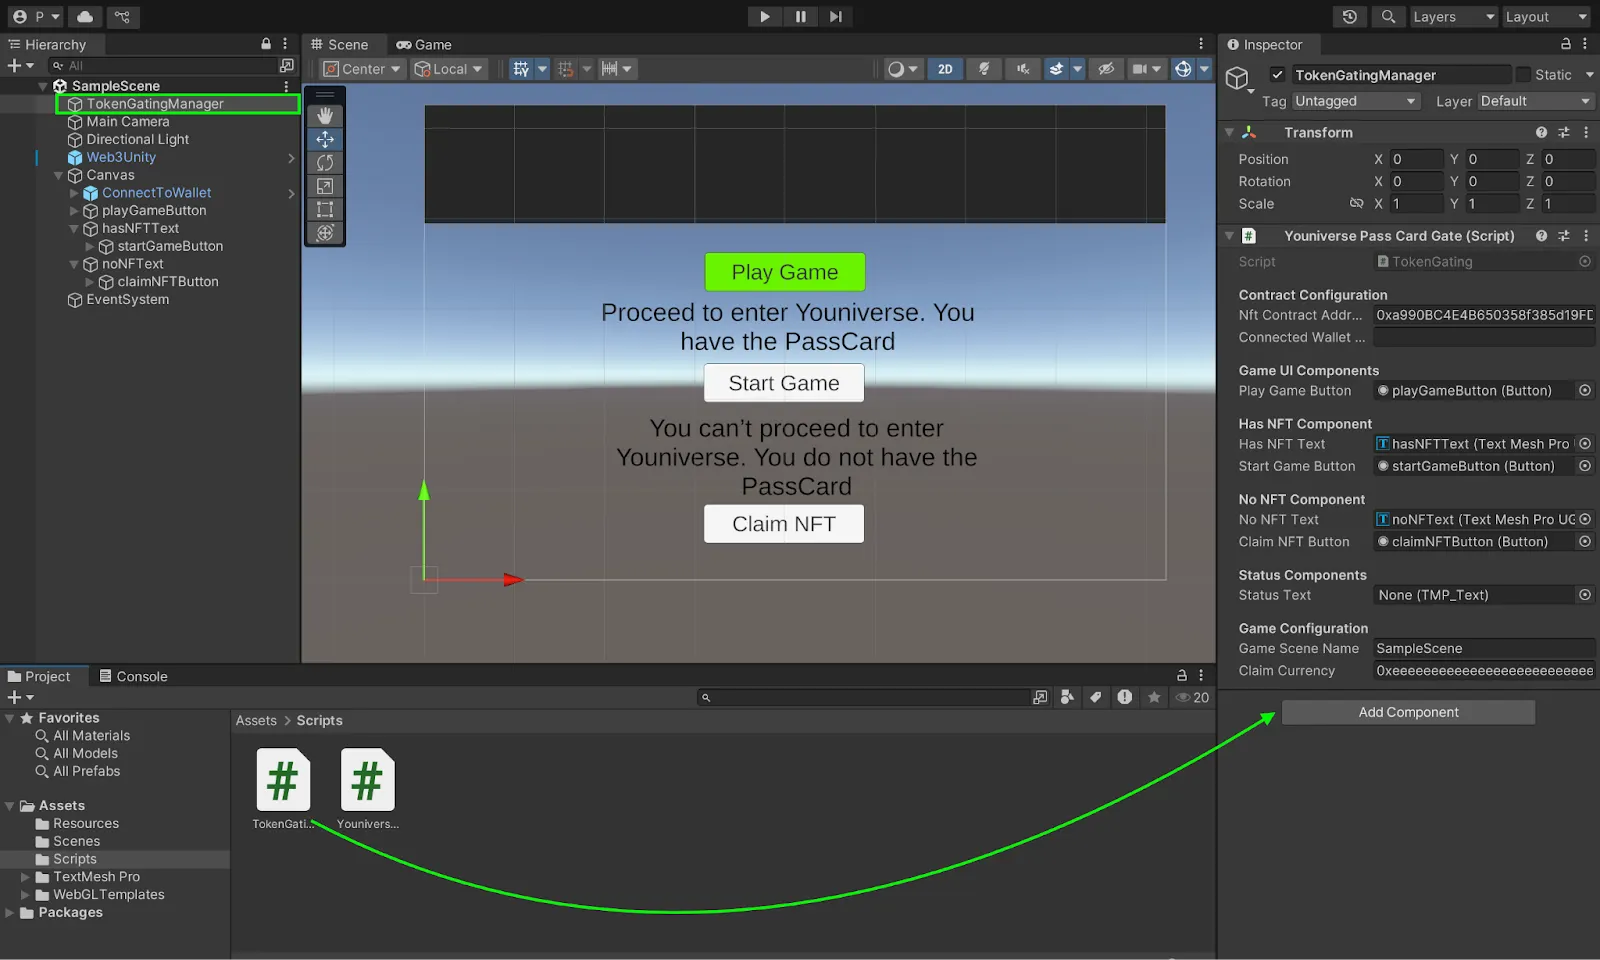
3. Connect UI Elements:
- With TokenGatingManager selected, look in the Inspector.
- Drag and drop your UI elements from the Hierarchy to the corresponding fields:
– playGameButton
– HasNFTText
– NoNFTText - Set your contract address and default wallet address (leave empty; will be auto-filled).
- Set your SampleScene name
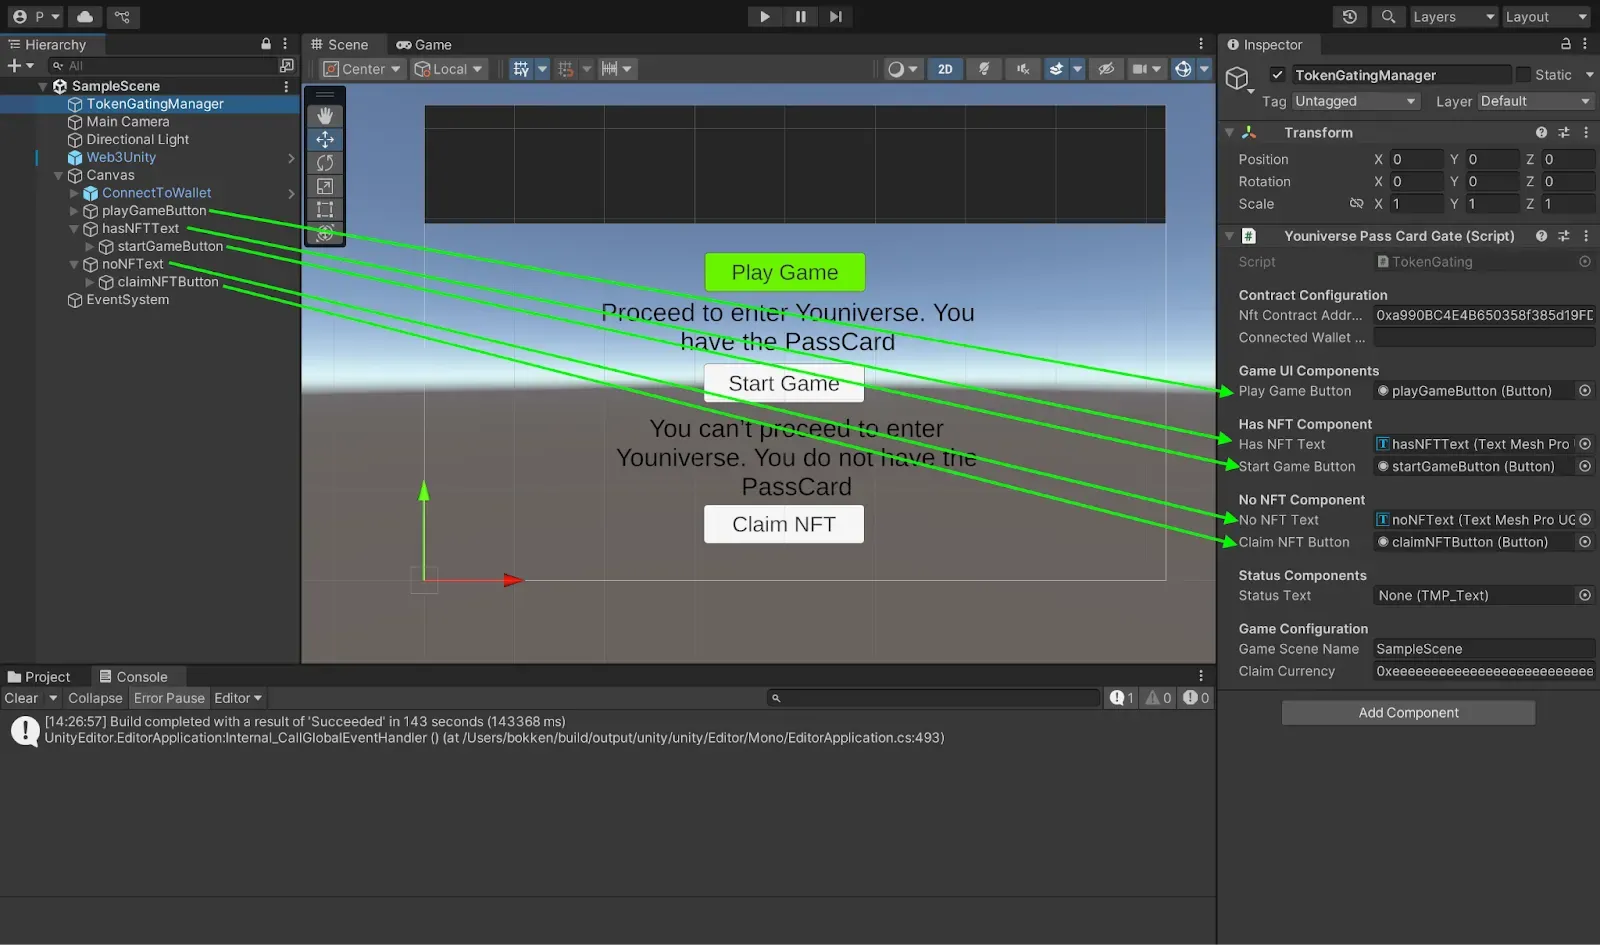
:::note
No need to connect the buttons to the scripts. This connection is done automatically in the Awake() function in our TokenManager script file.
:::
WebGL Build Settings
In this section, we will configure our dApp for the web deployment:
- Go to File → Build Settings → WebGL → Switch Platform
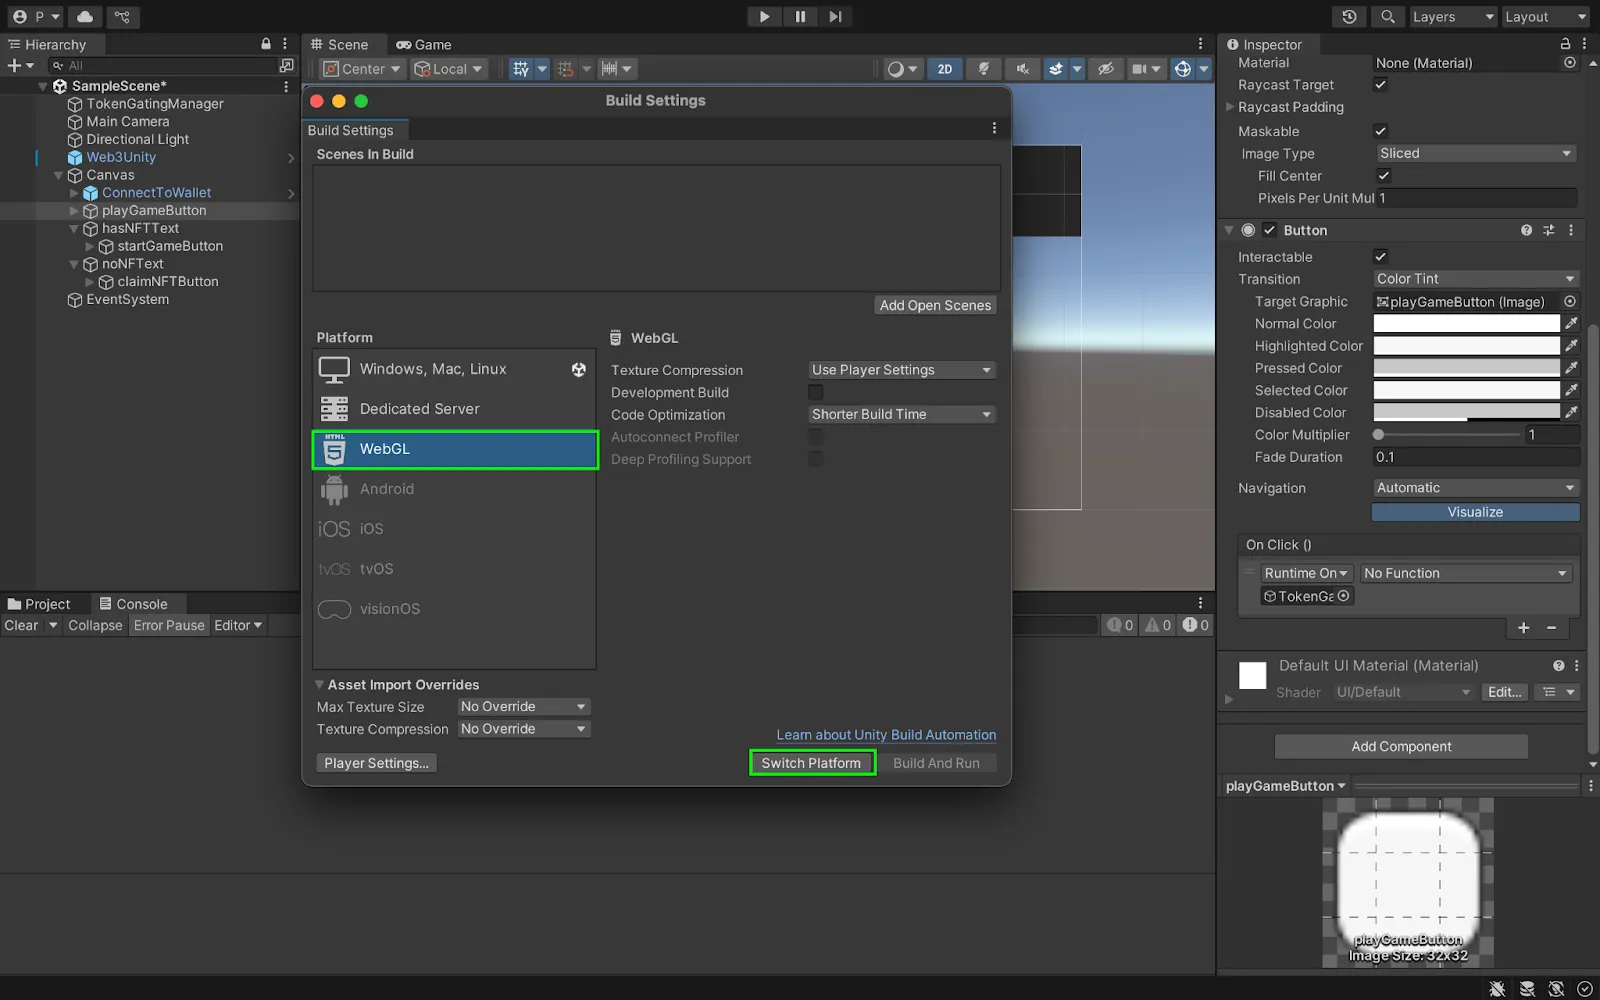
- Unity will prompt you to install required components:
– Async Utilities & WebGL Threading Patcher (click Yes)
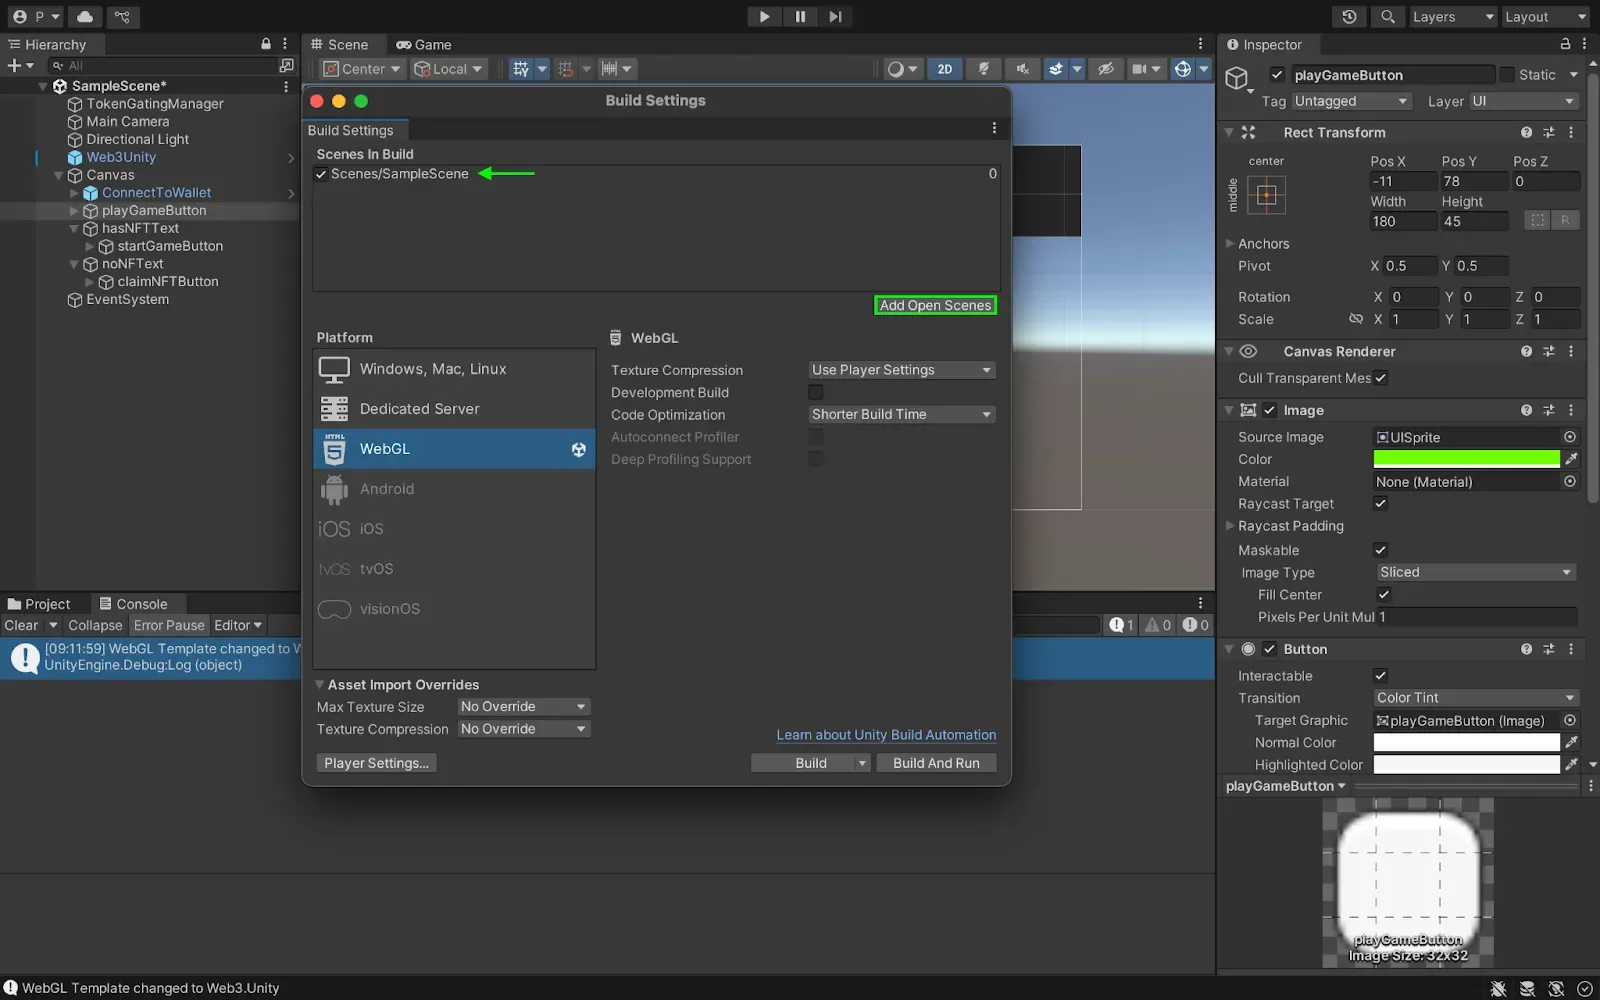
– web3.unity WebGL templates (click Yes) - From the same window, click on Add Open Scenes (top right) to add the SampleScene as the first scene to appear when we run the game.
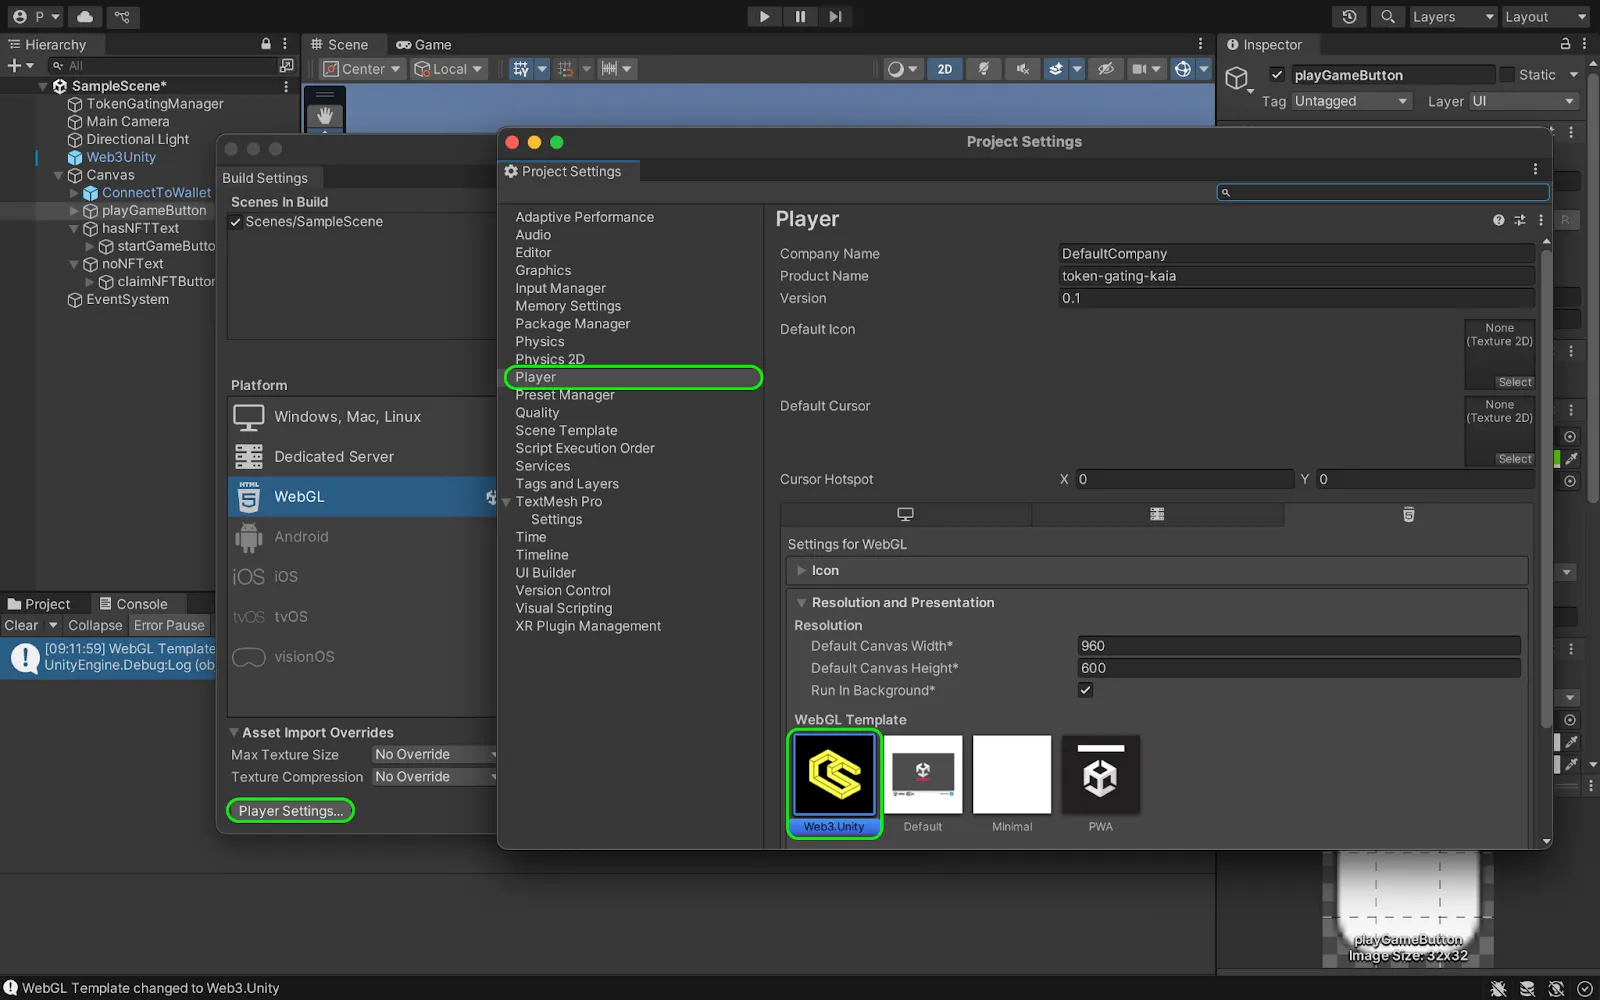
- From the same window, click on Player Settings → Player → Resolution and Presentation, under WebGL Template, select the one titled Web3.Unity.
Testing and running token-gating application
In this section, we will test the various token-gating functionalities in our game application. To see this in action, follow the steps below:
- Build and run the project: Navigate to File → Build and Run
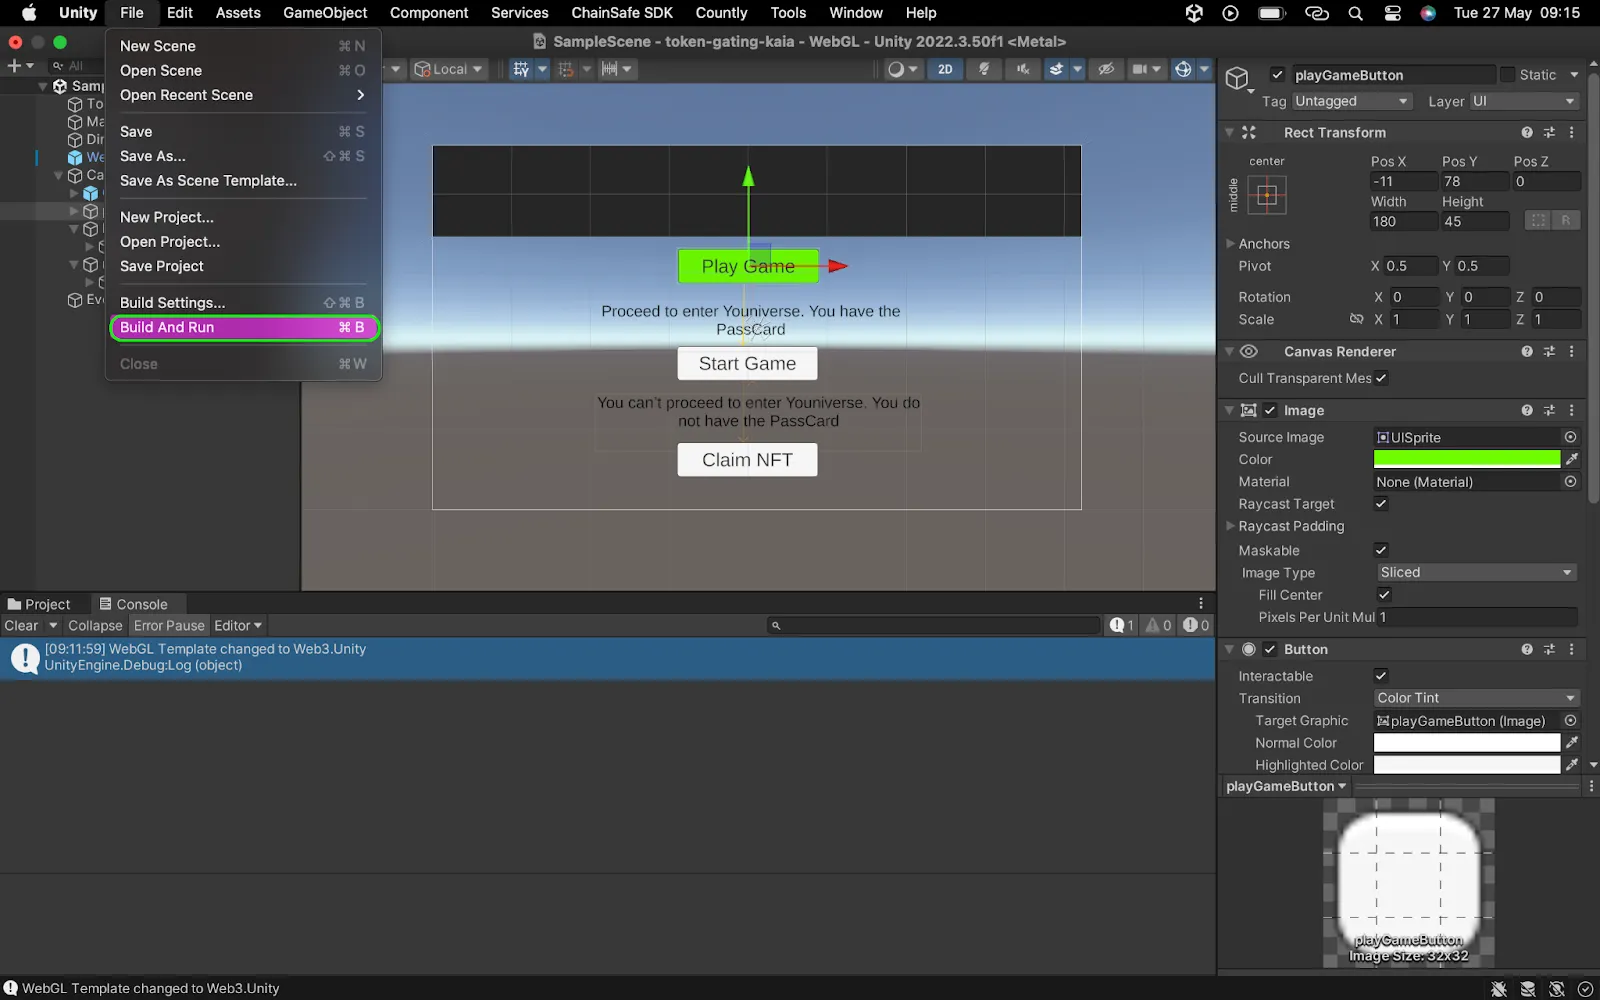
- Save your WebGL build when prompted
- If prompted about stripping level, select “Minimal”
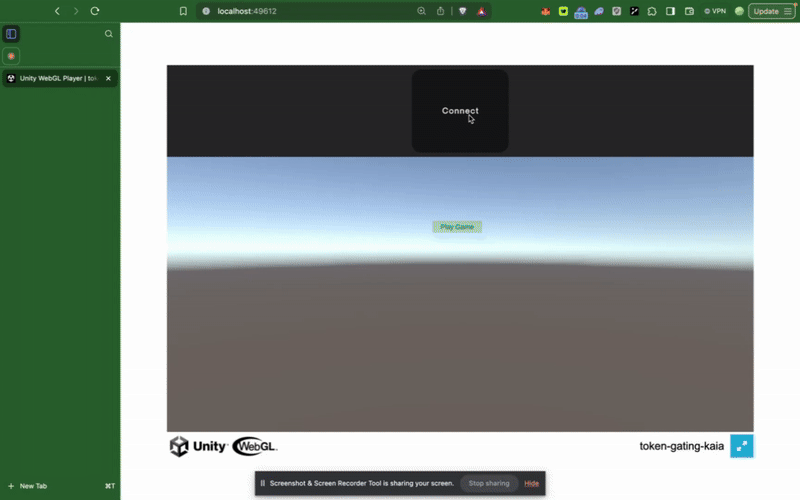
- When the project builds and run, it opens a tab in your browser — SampleScene
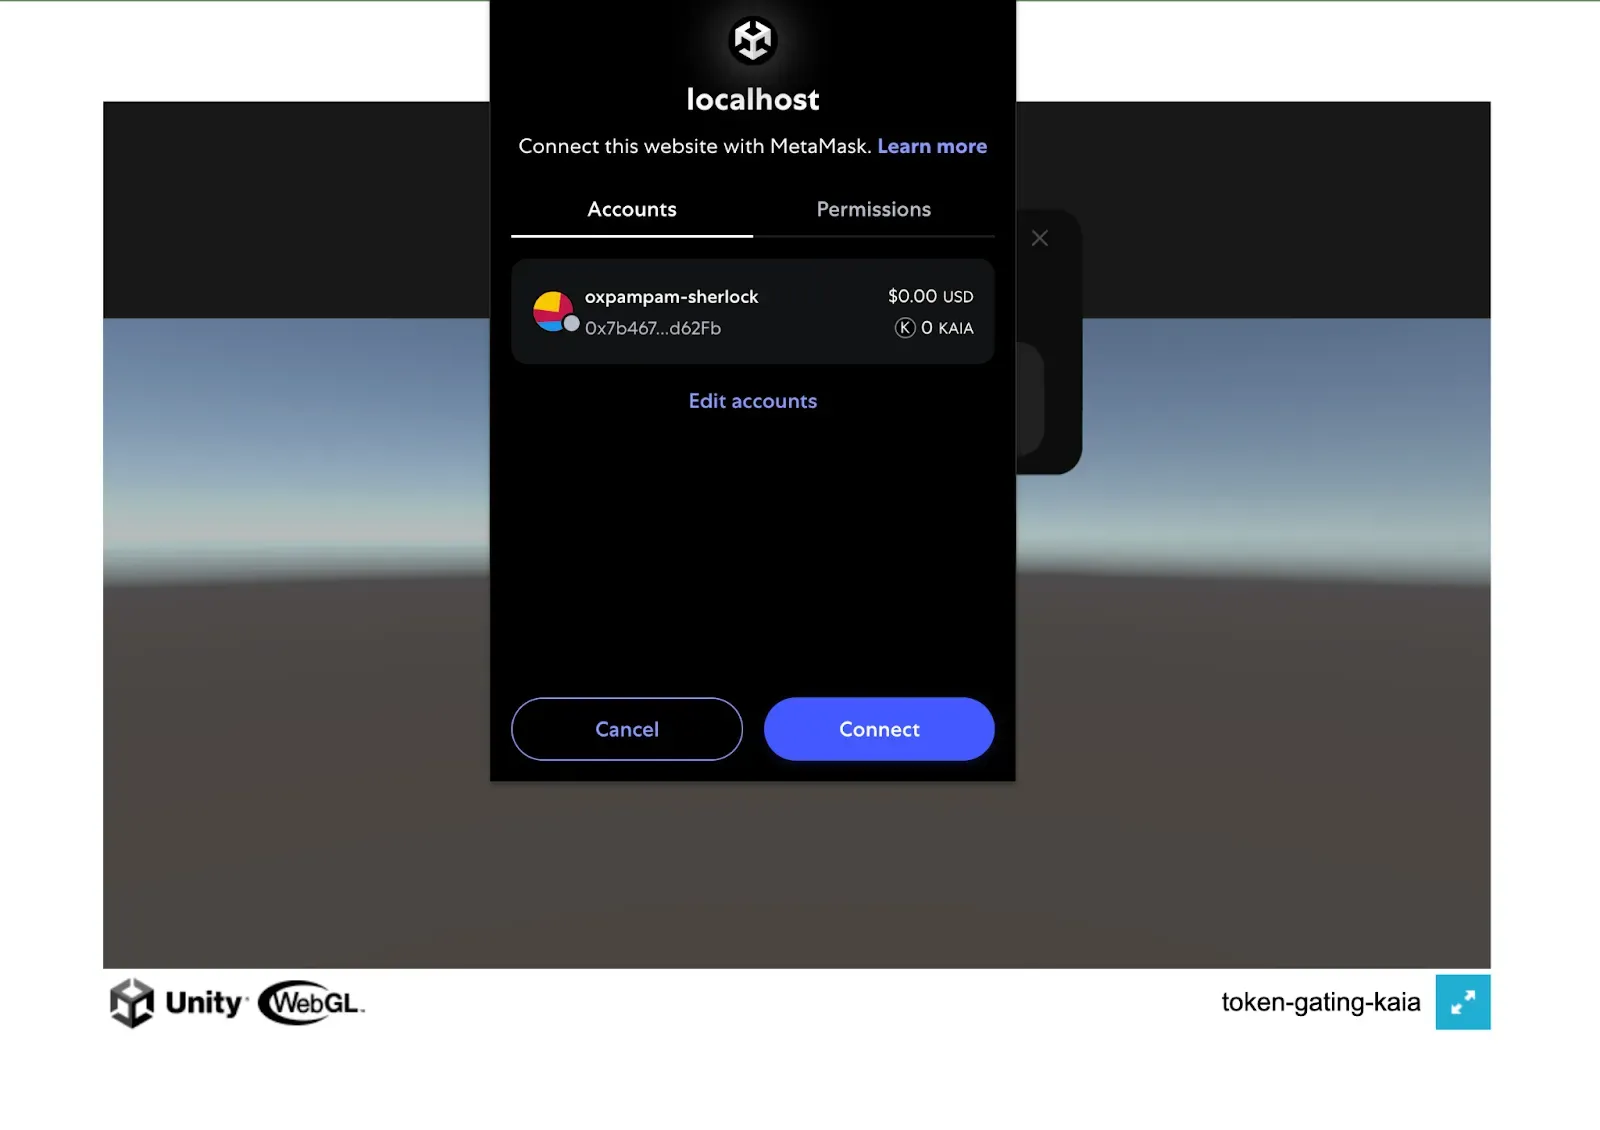
- Click on Login to connect Metamask.
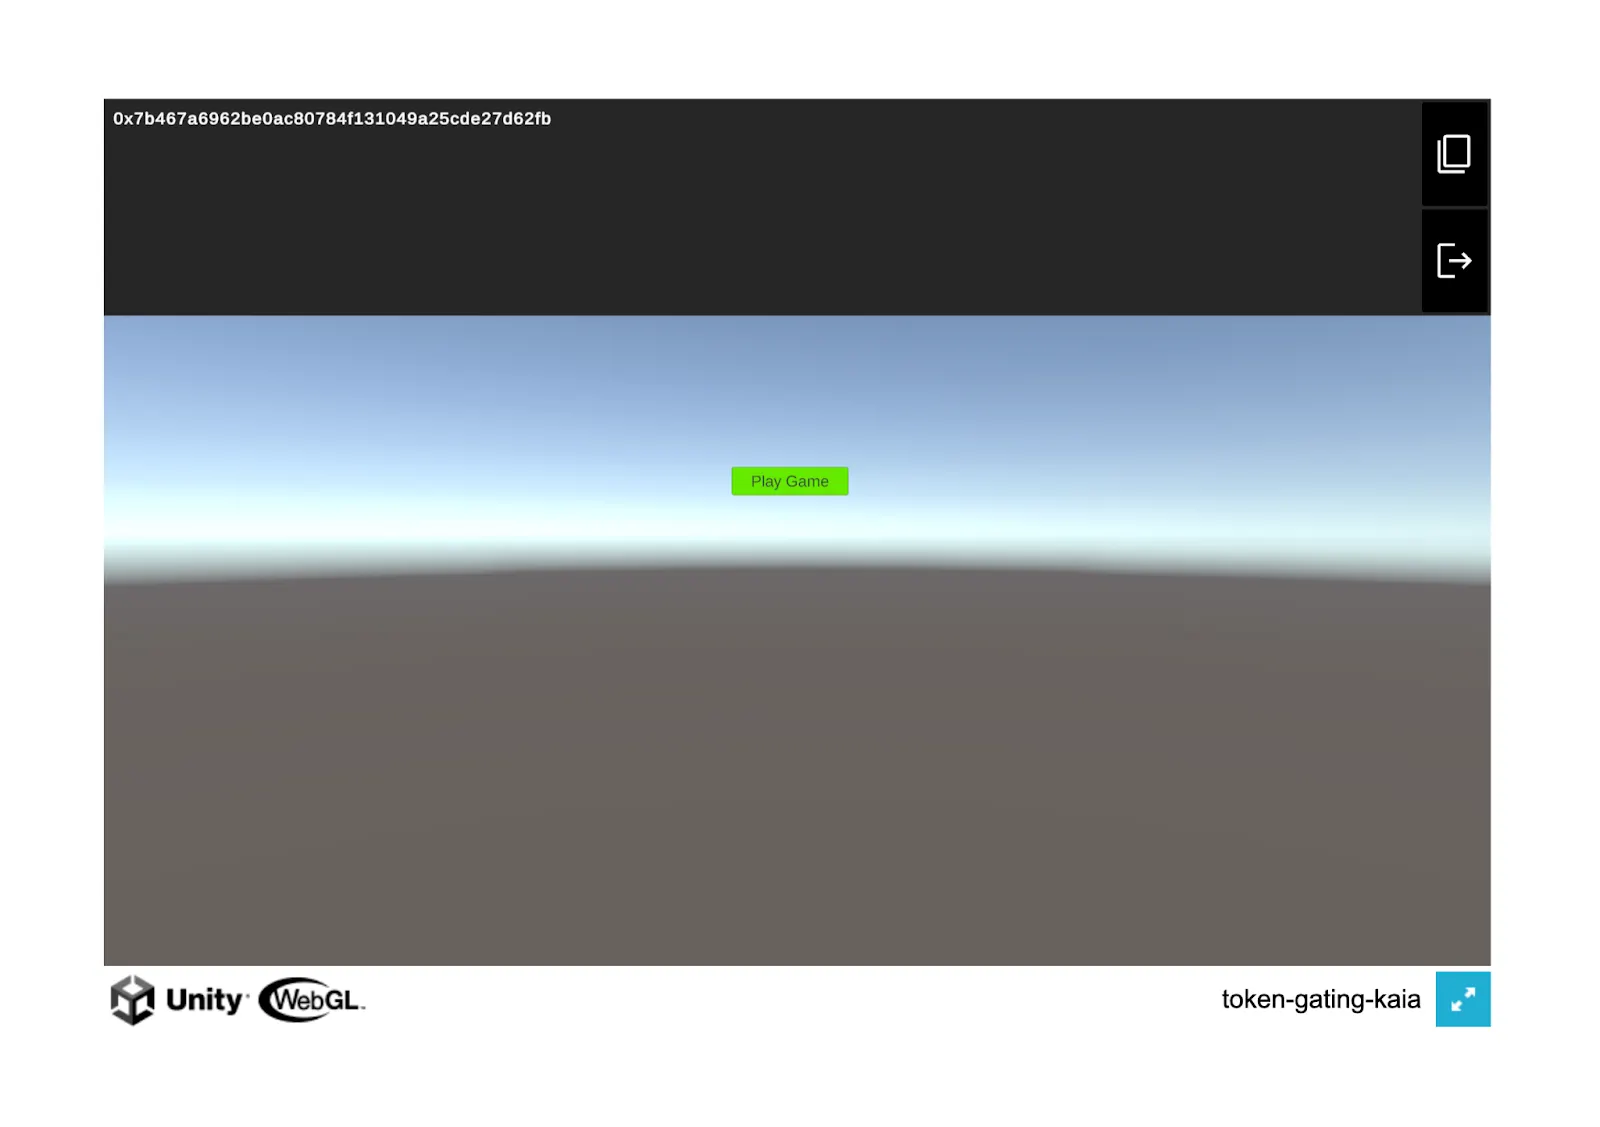
- Once connected, test all the token-gating functionalities:
– Click on the Play Game button to confirm if the player is eligible.
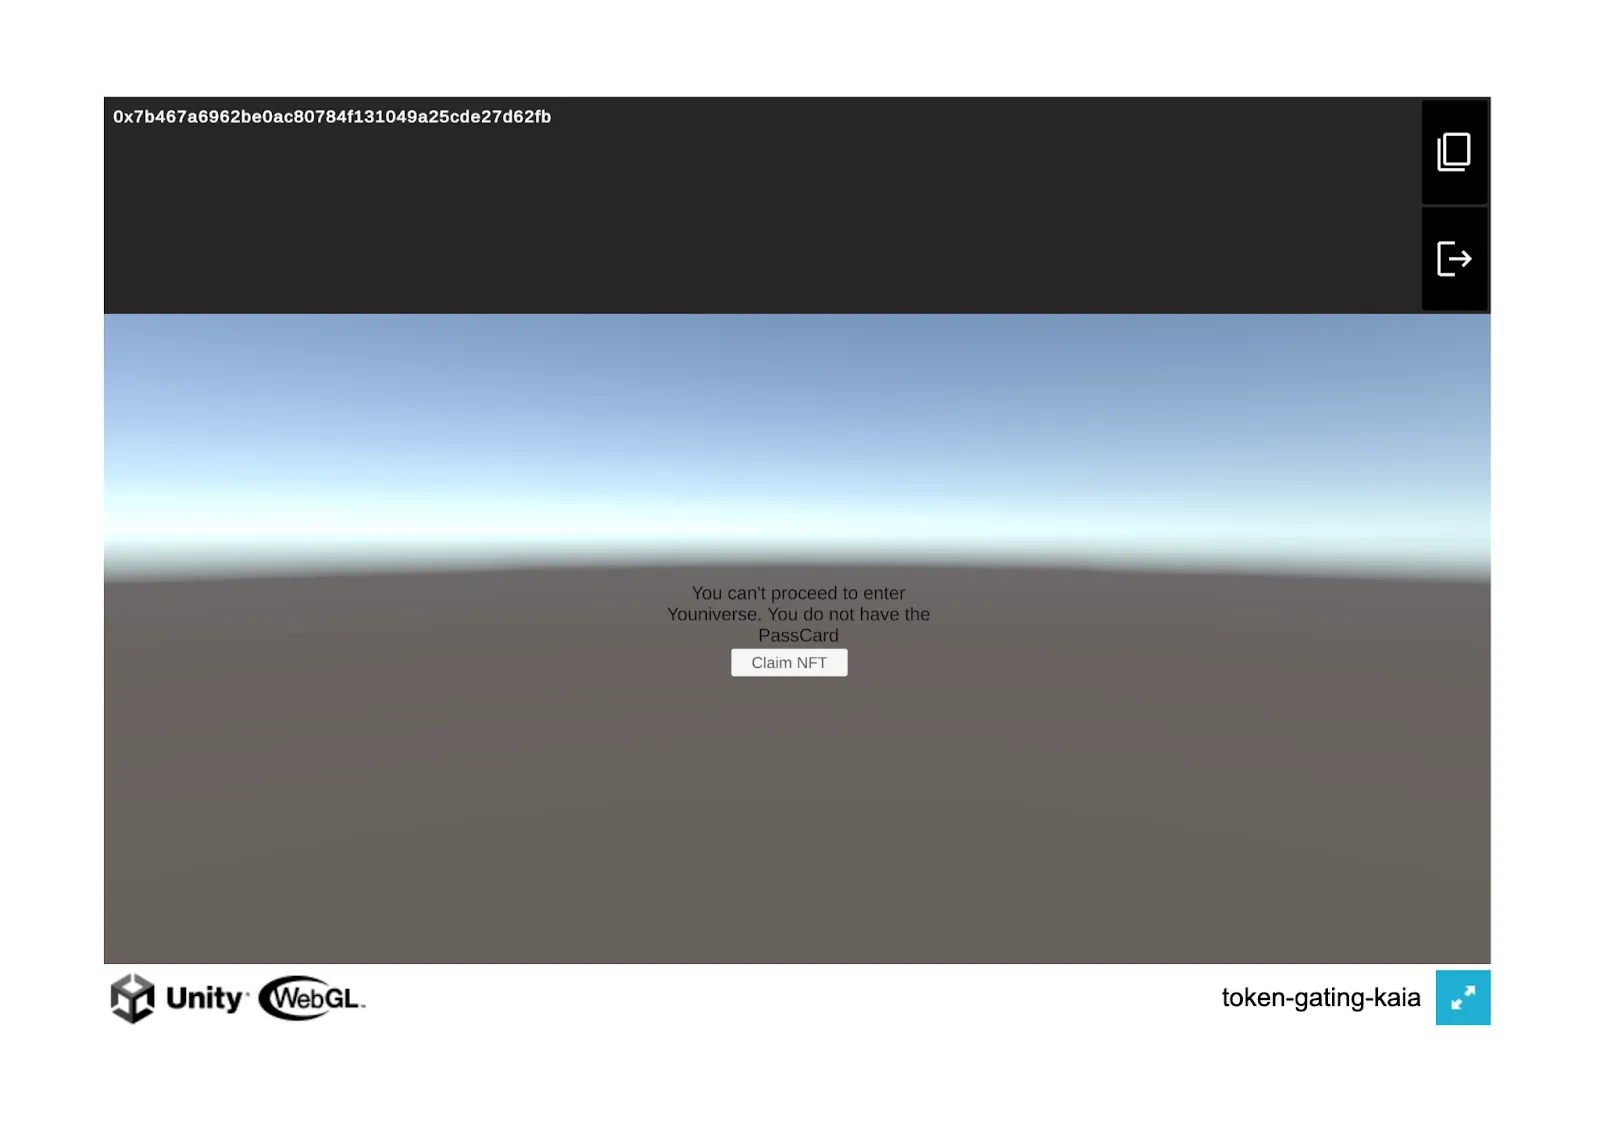
- If the player is not eligible, you should see this prompt on your screen and a button to claim a Youniverse PassCard NFT. Once an ineligible player claims the NFT, he/she would be able to start the game
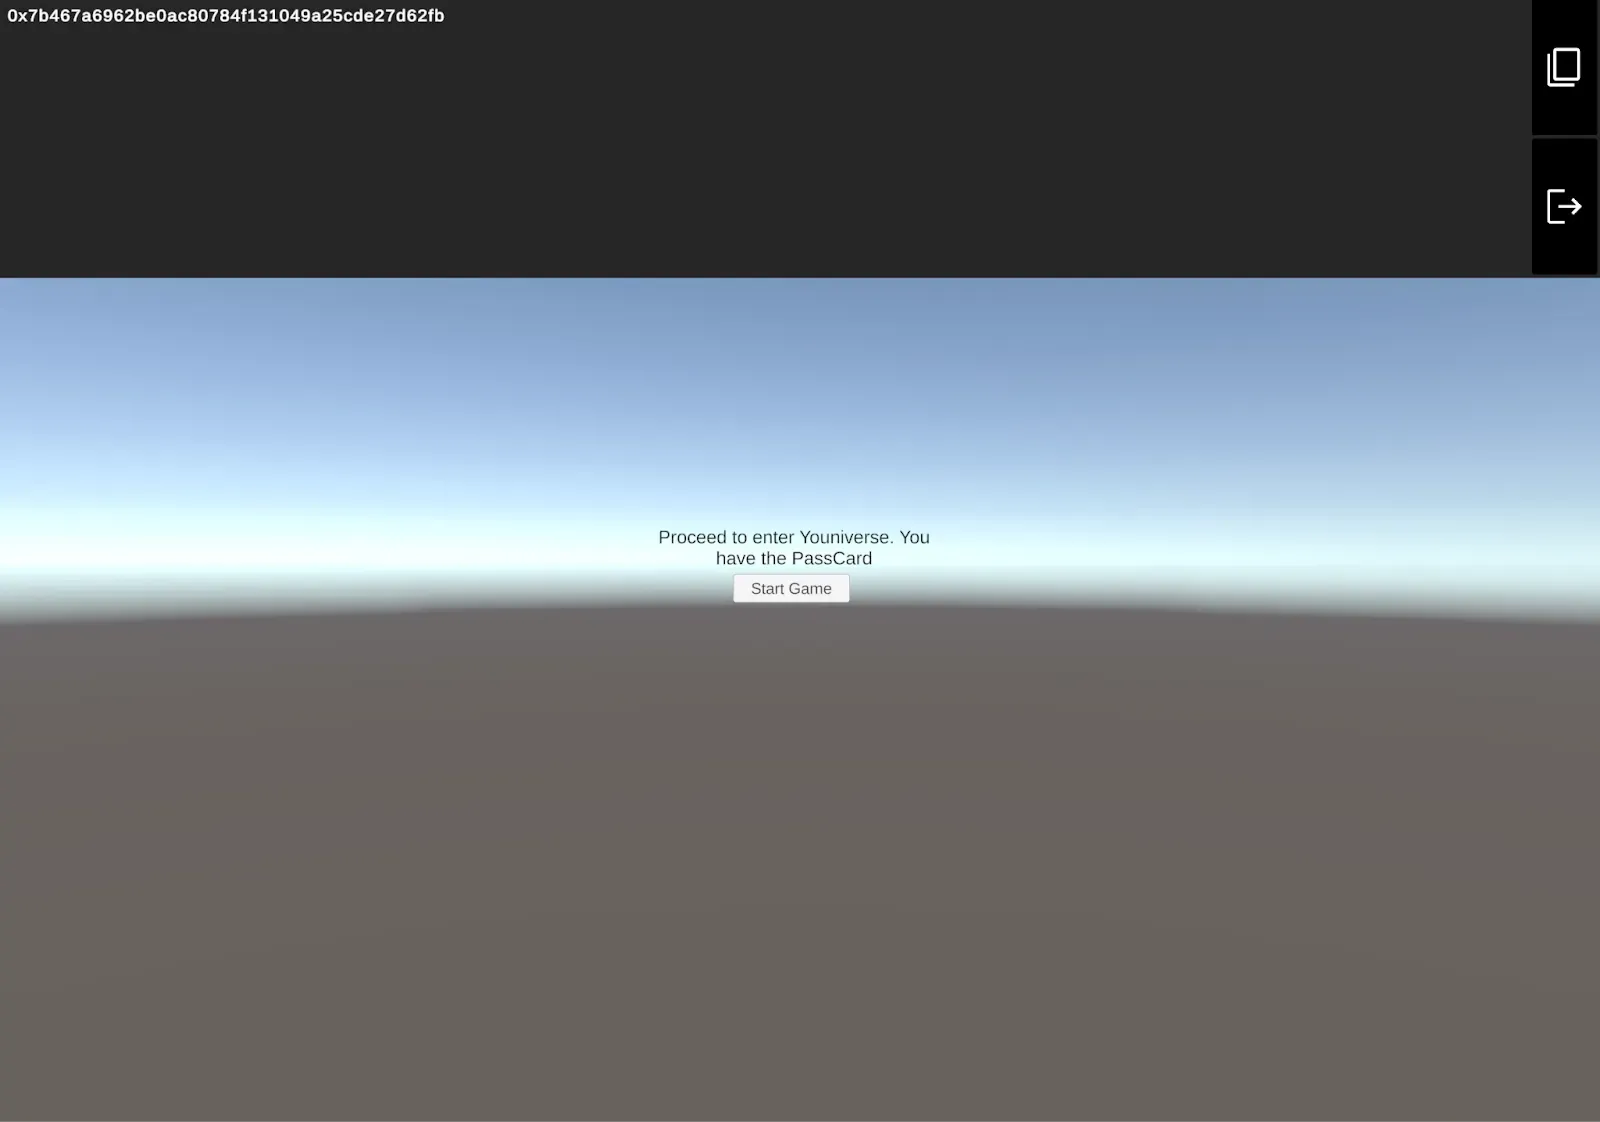
- If a player is eligible, you should see the message below on your screen and a button to start the game.
Conclusion
Congratulations on successfully token-gating your Unity game application. In this tutorial, we learnt the concept of token-gating, how it is applied in the real world, and how to make your Unity game application token-gated.
From here, you could also explore some other options in your game like adding a functionality to the start game button. If you want more information, visit Kaia Documentation and Chainsafe Documentation. If you have any questions, visit Kaia Dev Forum.