How to Index KIP7 Transfer on Kaia using Envio + Quicknode
Introduction


Introduction
Indexing smart contracts is a fundamental component for building fast and high-performing decentralized applications. With indexers, developers can aggregate application-specific data for quick access, extract complex blockchain data in easily queryable formats, and much more, hence unlocking faster speed and data reliability for end-users and developers alike.
In this article, I’ll introduce you to Envio, a modern, dev-friendly, speed-optimized blockchain indexing solution, and demonstrate how you can use it to index smart contracts on Kaia using QuickNode RPC Endpoint as a data source.
Prerequisites
Before we start indexing, you’ll need the following prerequisites installed.
Getting Started
In this guide, we will launch a basic KIP7 smart contract on Kairos Testnet and primarily index its transfers. Furthermore, we will utilize Envio to index data via an RPC URL. Though this might be suitable for smaller applications, as in this guide, it is recommended to use the HyperSync feature coming to Kaia for blazing-fast indexing.
Launching a Smart Contract
Let’s start by launching a sample KIP7 smart contract on Kairos Testnet. You can easily bootstrap a basic KIP7 contract on Kaia Contract Wizard or simply use this contract deployed and verified on Kaiascan:0x1f1d5027a1e5817d807458008ca6af5c9ad98354.
Installing Envio
You can install Envio by running the command below:
npm i -g envioInitializing an indexer
Now that we have envio and the prerequisites installed, the next thing is to initialize the indexer and generate a boilerplate to index the transfers in the KIP7 contract.
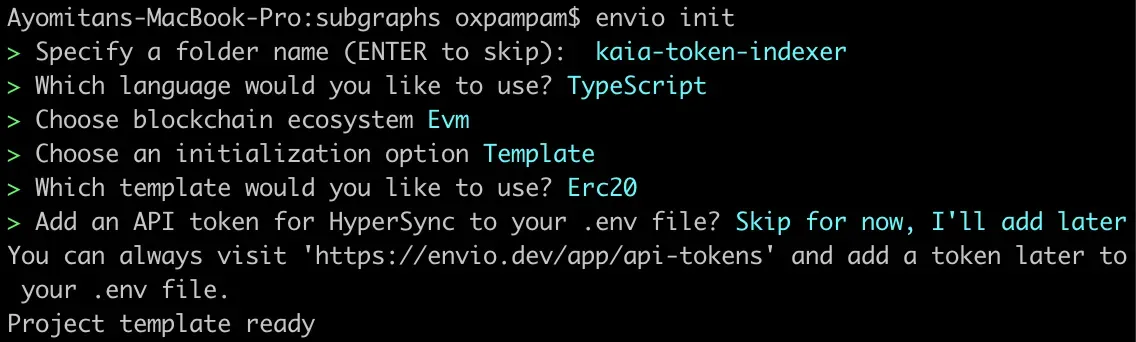
Follow the steps below to initialize the indexer:
- Open your terminal in an empty project and run the command below:
envio init2. Give your indexer a name (e.g. “kaia-token-indexer”).
3. Choose your preferred language (typescript) and blockchain ecosystem (EVM).
4. Choose an initialization option (Template)
5. Select the preferred template you’d like to use (ERC20)
Configuring Indexer.
Indexers generated using the templates will work without any further configuration. However, in this case, we will be illustrating the use of QuickNode RPC as a data source, and also adding two more events to the indexer to demonstrate how to set up an indexer with multiple events. This approach showcases the flexibility of the indexing process and provides a more comprehensive example. For these reasons, we will have to configure the following files:
1. Modifying config.yaml
# yaml-language-server: $schema=./node_modules/envio/evm.schema.json
name: erc20indexer
description: ERC-20 indexer
networks:
  - id: 1001 # Kairos Testnet
    rpc_config:
      url: https://responsive-green-emerald.kaia-kairos.quiknode.pro/ # RPC URL that will be used to subscribe to blockchain data on this network
      initial_block_interval: 10000 # Integer
      backoff_multiplicative: 0.8 # Float
      acceleration_additive: 2000 # Integer
      interval_ceiling: 10000 # Integer
      backoff_millis: 5000 # Integer
      query_timeout_millis: 20000 # Integer
    start_block: 166803165
    contracts:
      - name: Evoor
        abi_file_path: ./abis/evoor-abi.json
        address: "0x1F1D5027A1E5817D807458008Ca6Af5C9AD98354" #EVR
        handler: src/EventHandlers.ts
        events:
          - event: "Approval(address indexed owner, address indexed spender, uint256 value)"
          - event: "Transfer(address indexed from, address indexed to, uint256 value)"
          - event: OwnershipTransferred(address indexed previousOwner, address indexed newOwner)
# Rollback on reorg mode currently incurs a performance hit on historical sync
# while developing an indexer we recommend setting this to false
rollback_on_reorg: false
As you can see in the config.yaml file, we have added QuickNode RPC Endpoint, specified the contract address, path for contract ABI, and other details used in the indexing process.
2. Modifying schema.graphql
type TokenApproval {
  id: ID!
  owner: String!
  spender: String!
  value: BigInt!
}
type TokenOwnershipTransferred {
  id: ID!
  previousOwner: String!
  newOwner: String!
}
type TokenTransfer {
  id: ID!
  from: String!
  to: String!
  value: BigInt!
}
Once you have set up your config file and the schema, you are ready to generate the indexing code required to write the event handlers.
Run the following command:
envio codegen3. Modifying EventHandlers.ts
import { Evoor, TokenApproval, TokenOwnershipTransferred, TokenTransfer } from "generated";
Evoor.Approval.handler(async ({ event, context }) => {
  const entity: TokenApproval = {
    id: `${event.chainId}_${event.block.number}_${event.logIndex}`,
    owner: event.params.owner,
    spender: event.params.spender,
    value: event.params.value,
  };
  context.TokenApproval.set(entity);
});
Evoor.OwnershipTransferred.handler(async ({ event, context }) => {
  const entity: TokenOwnershipTransferred = {
    id: `${event.chainId}_${event.block.number}_${event.logIndex}`,
    previousOwner: event.params.previousOwner,
    newOwner: event.params.newOwner,
  };
  context.TokenOwnershipTransferred.set(entity);
});
Evoor.Transfer.handler(async ({ event, context }) => {
  const entity: TokenTransfer = {
    id: `${event.chainId}_${event.block.number}_${event.logIndex}`,
    from: event.params.from,
    to: event.params.to,
    value: event.params.value,
  };
  context.TokenTransfer.set(entity);
  }
);
Starting the Indexer
To start the indexer, run the command below in your terminal:
envio dev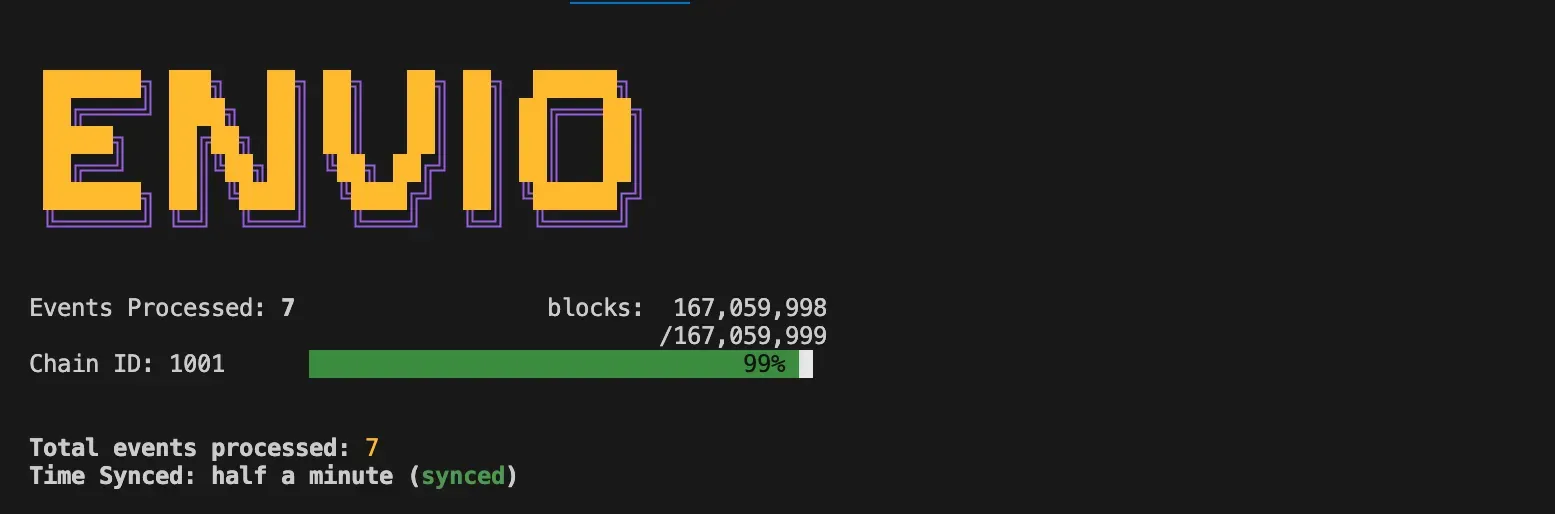
You can also stop the index with the command below in your terminal:
envio stopAccessing the Indexed Data
Now that we have our data indexed, let’s access the indexed data! To do that, follow the steps below:
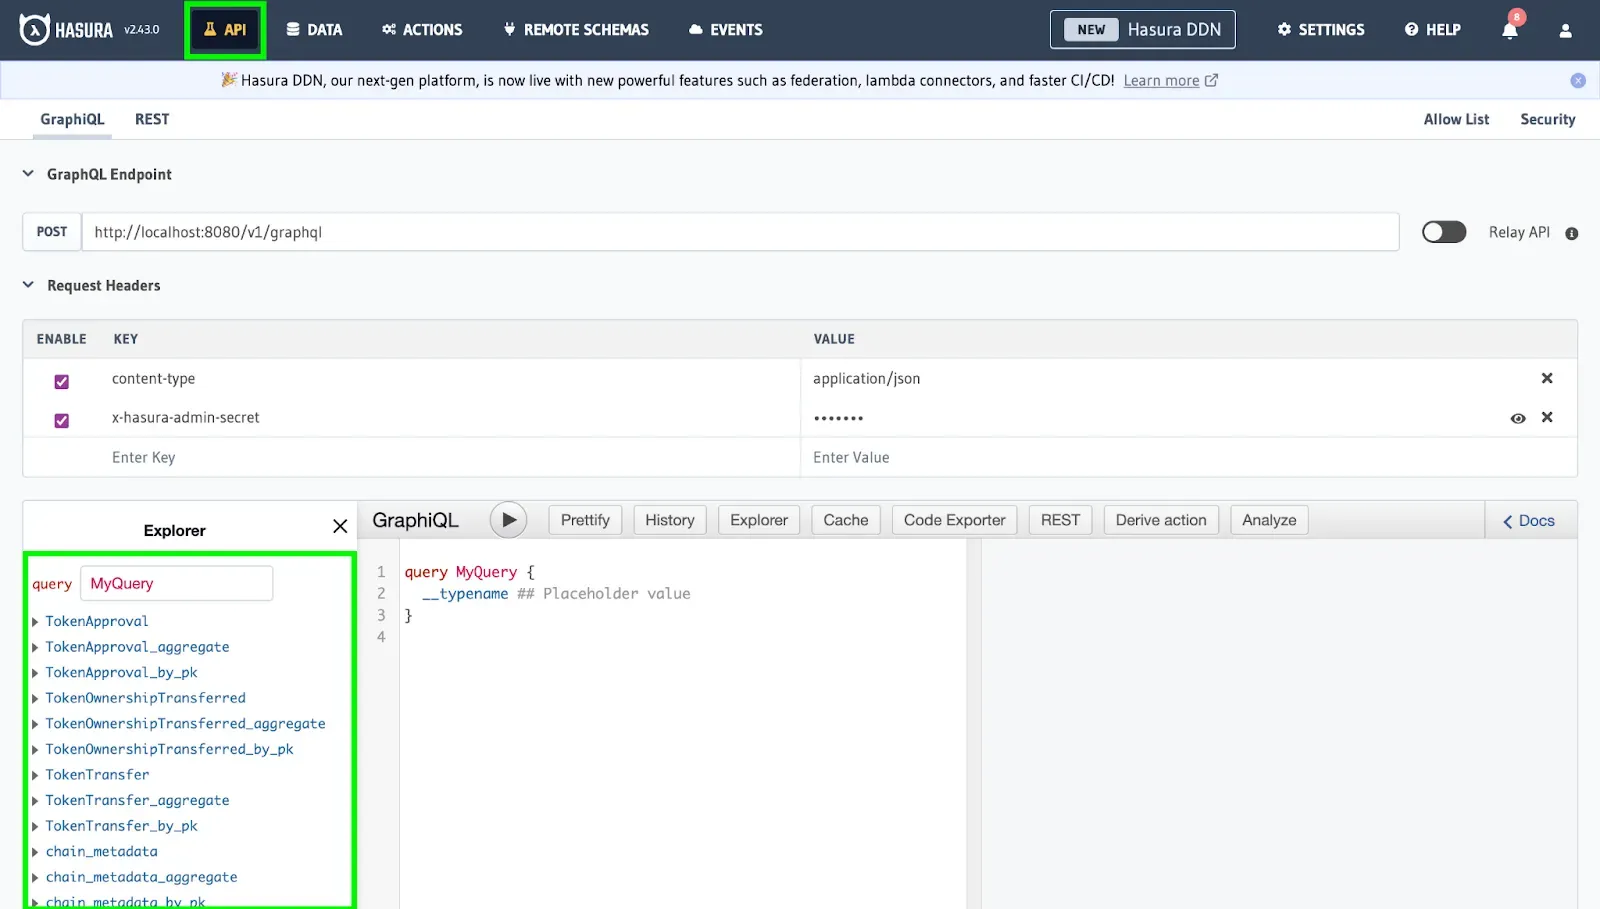
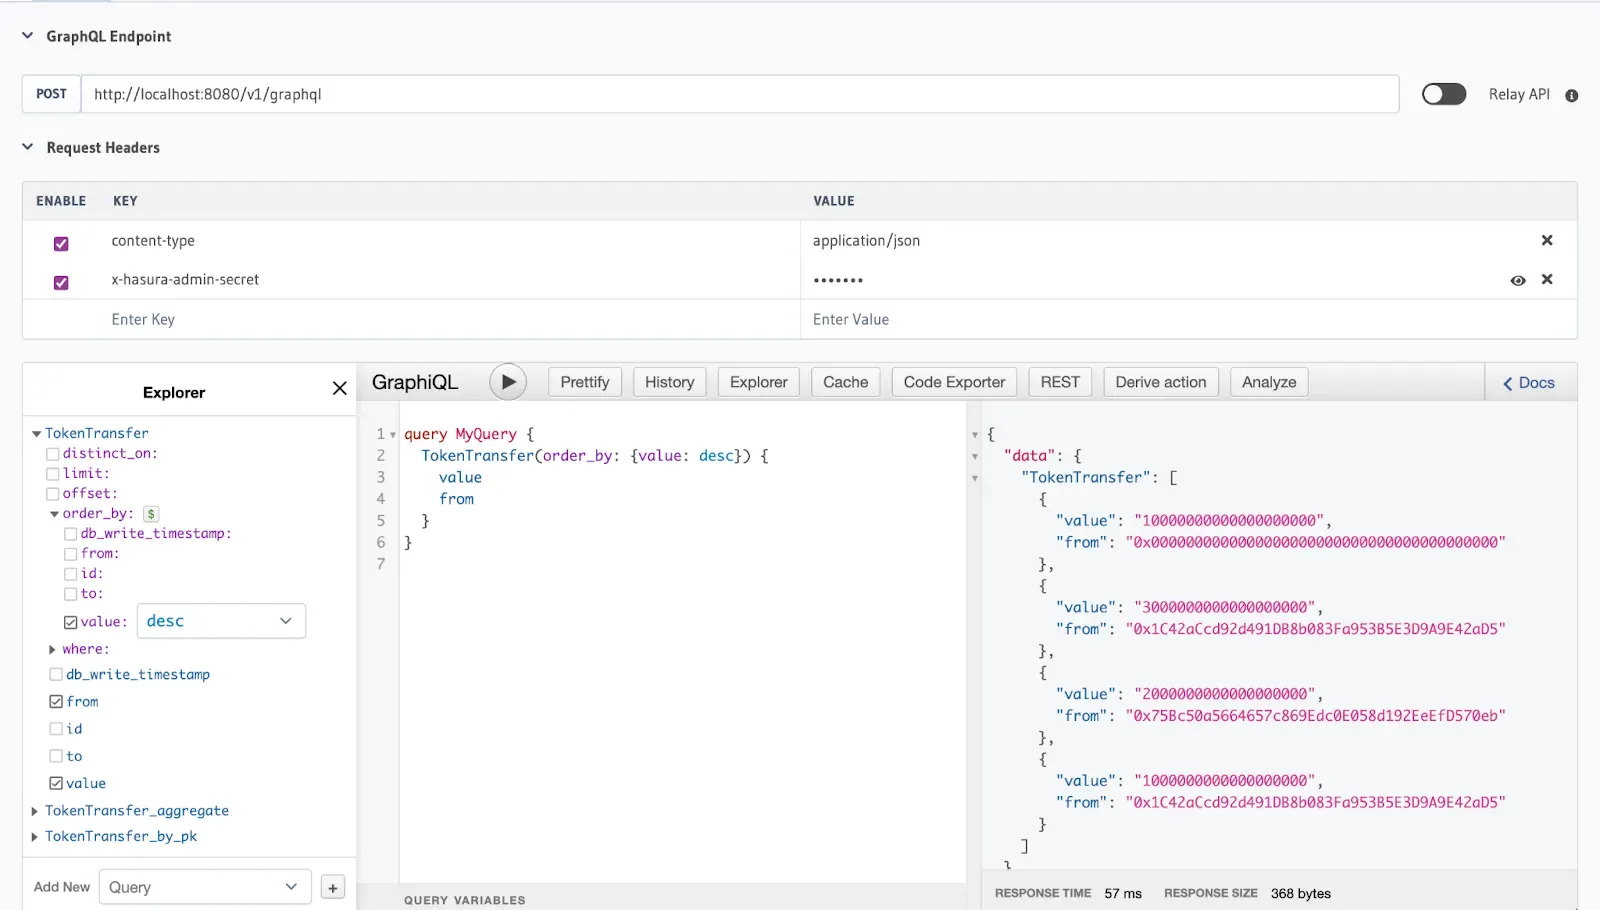
- Head over to Hasura Console served at http://localhost:8080/, type in the admin-secret password (“testing”), and click “API” in the above column to access the GraphQL endpoint to query real-time data.
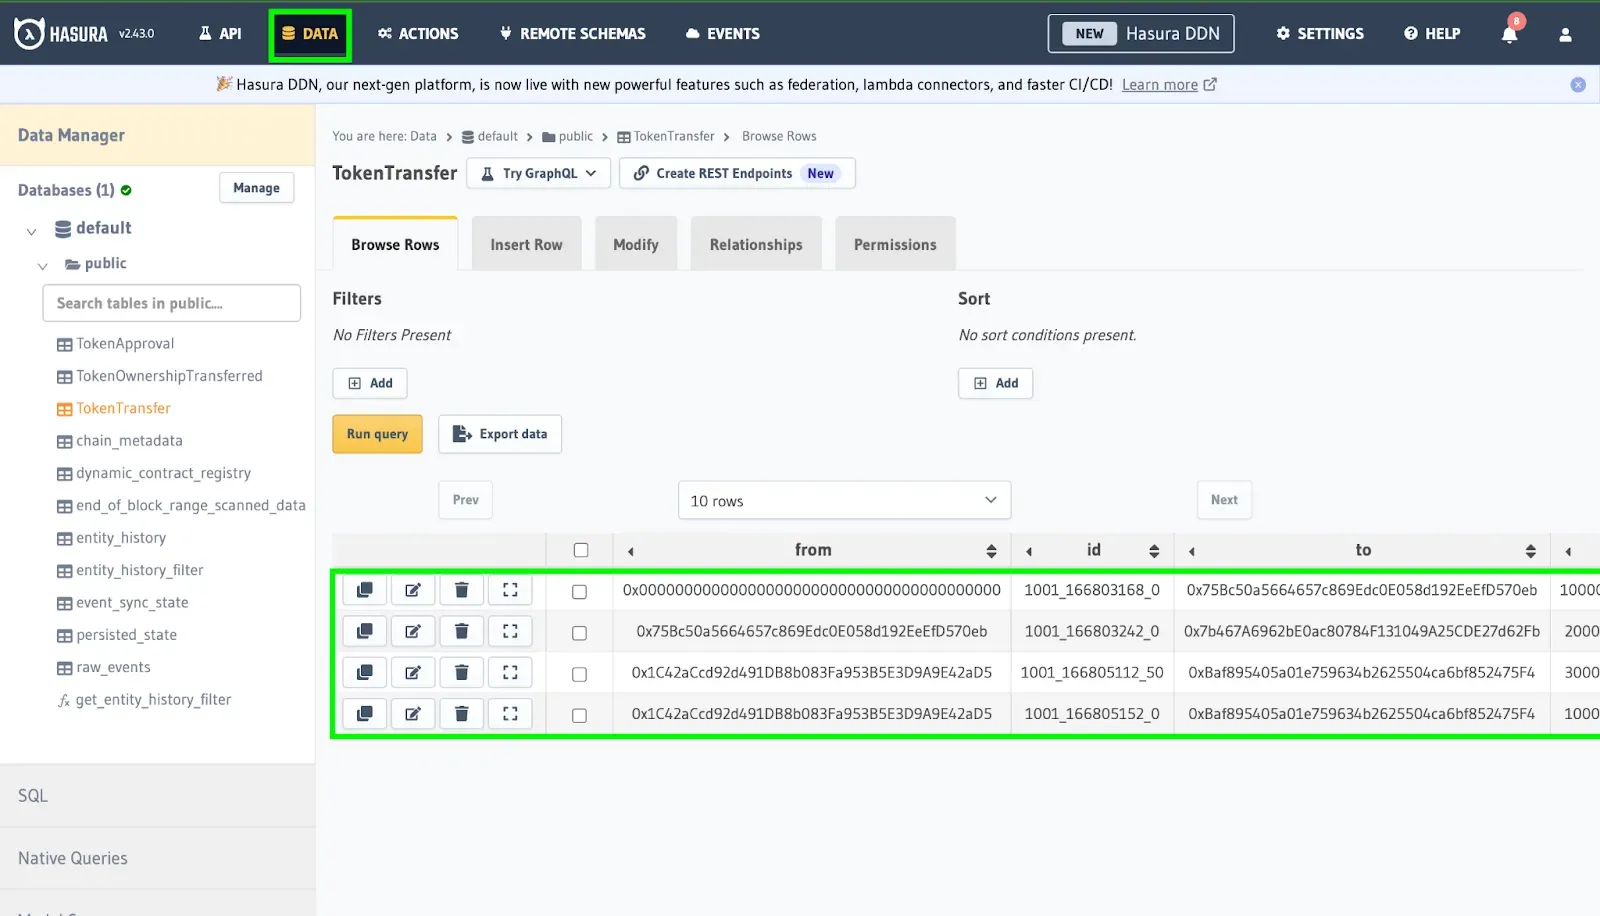
2. Navigate to the “Data” tab in the above column to monitor the indexing progress on Kaia through the events sync state table to see which block number you are on.
Querying in Action
Now let’s query the TokenTransfer events to explore details such as amounts, senders, recipients, and values. For this guide, we would make the query be ordered by the amount we would like to appear first (in this case: desc = largest amount), who it’s from, and the value being transferred.
Once you have selected your desired events, run the query by clicking the play button ( ▶️) to gain access to the real-time indexed data.
Conclusion
Congratulations! You’ve successfully generated an indexer and indexed every token transfer event in the KIP7 Token Contract on Kaia Network. For more information on the Envio Indexing solution, visit Envio Documentation. Also, if you want more information about the Kaia blockchain, visit Kaia Documentation. If you have any questions, visit Kaia Developer Forum.